> ## Documentation Index
> Fetch the complete documentation index at: https://docs.sudocode.ai/llms.txt
> Use this file to discover all available pages before exploring further.
# Dispatching Workflows
> Execute workflows with automated agent coordination from your spec
## What are Workflows?
Workflows in sudocode allow you to execute multiple issues in their dependency order. Just specify a spec, a root issue, or manually select issues to run as a coordinated workflow.
sudocode ensures all dependencies are respected and handles the execution order automatically.
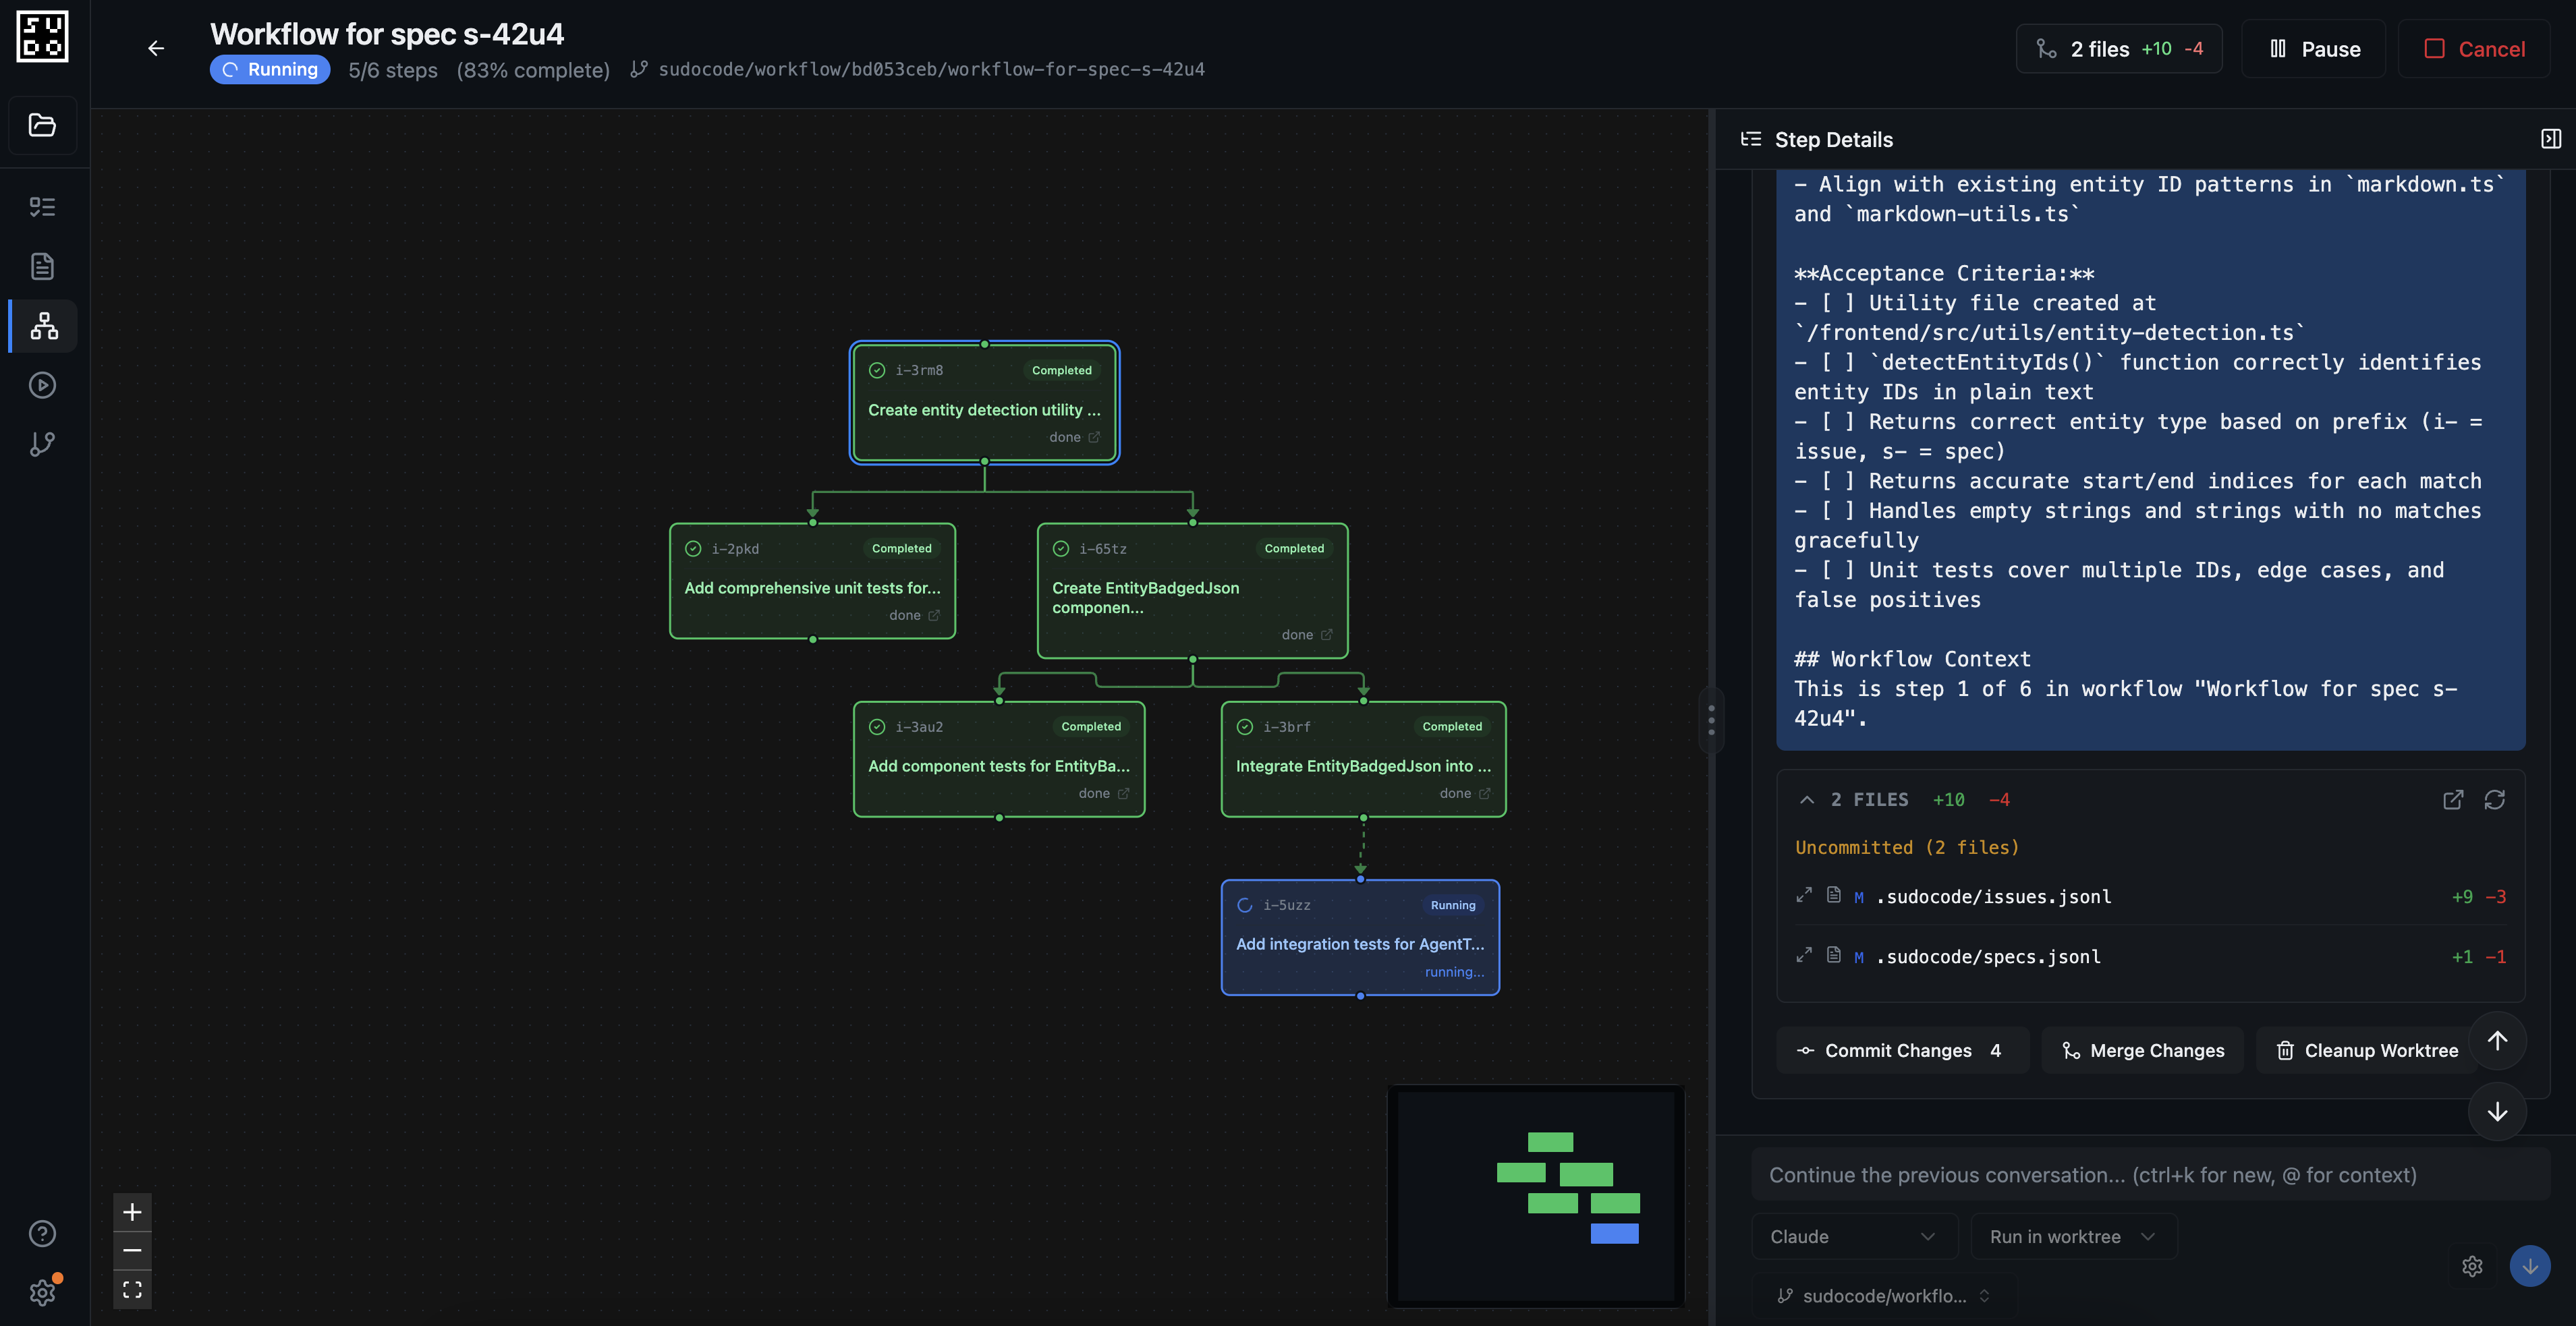 ## Example: Implementing Execution Badges
Let's walk through a complete example of how to combine spec-driven development with workflows to implement a new feature in sudocode.
### The Goal
We want to add badges to sudocode execution chats. When chatting with sudocode during an issue execution, users should see visual badges showing all the specs and issues that have been created or modified throughout the session. This provides better context awareness and helps track what the agent has been working on.
### Phase 1: Create and Refine the Spec
**Step 1: Create a new spec**
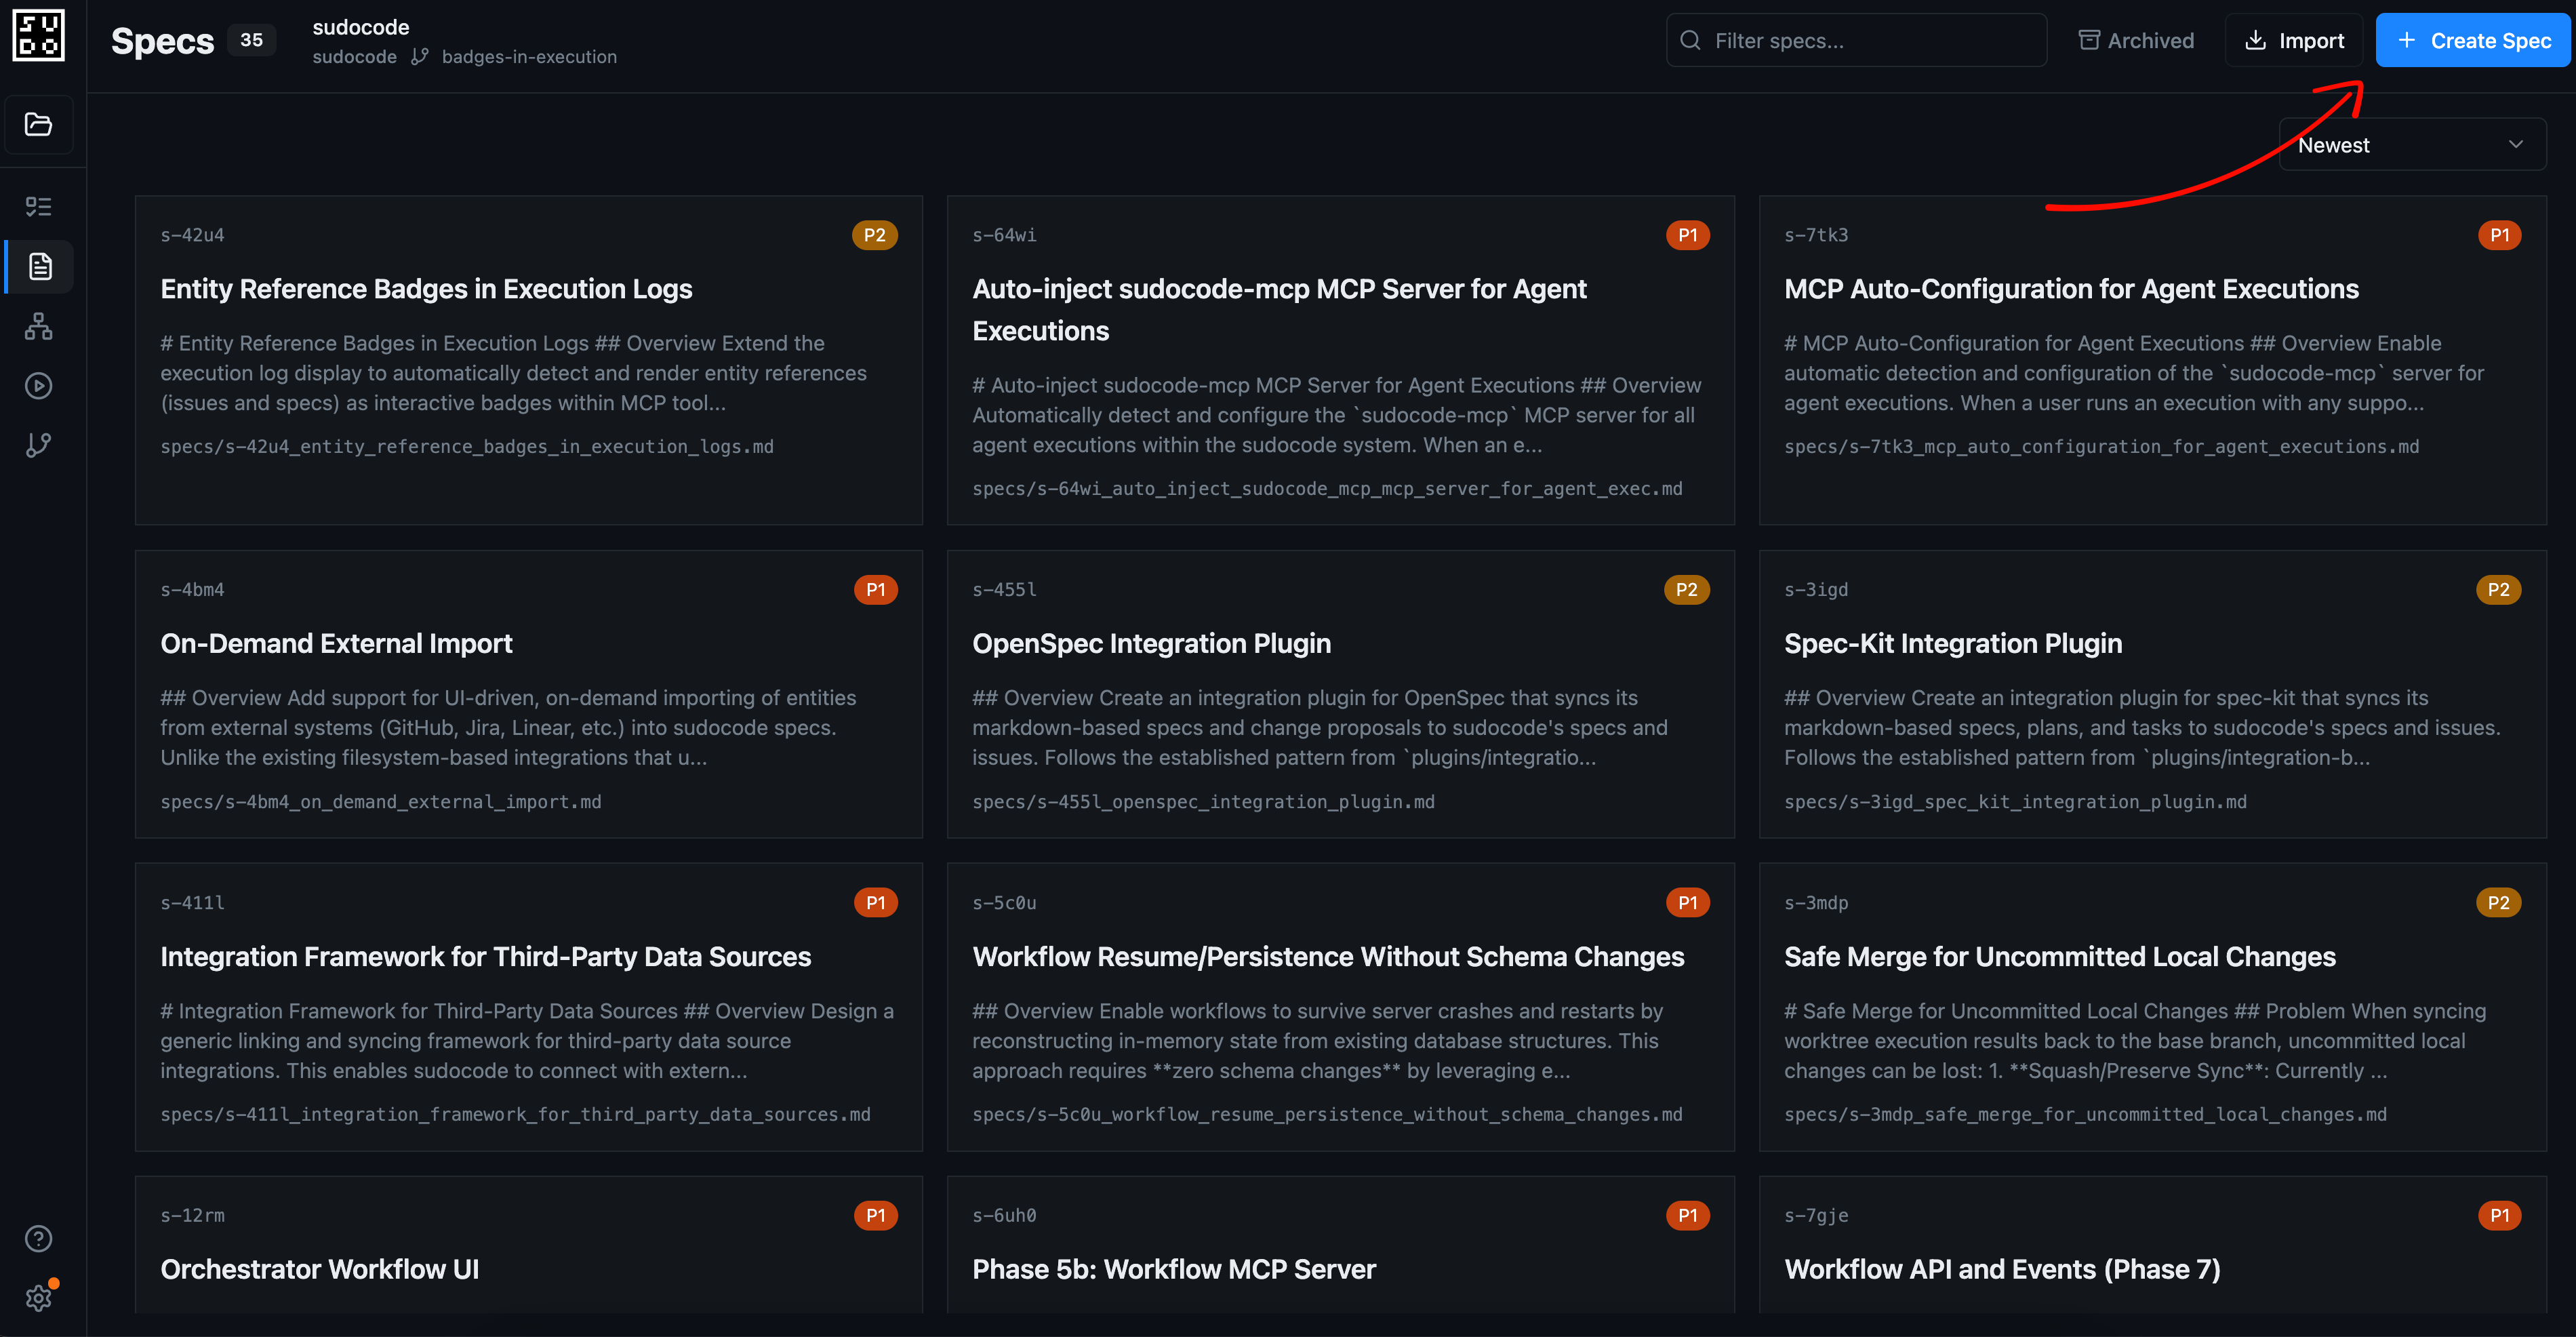
Navigate to `localhost:3000` and click the "Create Spec" button to start defining your feature.
## Example: Implementing Execution Badges
Let's walk through a complete example of how to combine spec-driven development with workflows to implement a new feature in sudocode.
### The Goal
We want to add badges to sudocode execution chats. When chatting with sudocode during an issue execution, users should see visual badges showing all the specs and issues that have been created or modified throughout the session. This provides better context awareness and helps track what the agent has been working on.
### Phase 1: Create and Refine the Spec
**Step 1: Create a new spec**
Navigate to `localhost:3000` and click the "Create Spec" button to start defining your feature.
 **Step 2: Co-write the spec with an agent**
You can work with an agent to draft the specification. The agent helps you think through requirements, edge cases, and implementation details.
**Step 2: Co-write the spec with an agent**
You can work with an agent to draft the specification. The agent helps you think through requirements, edge cases, and implementation details.
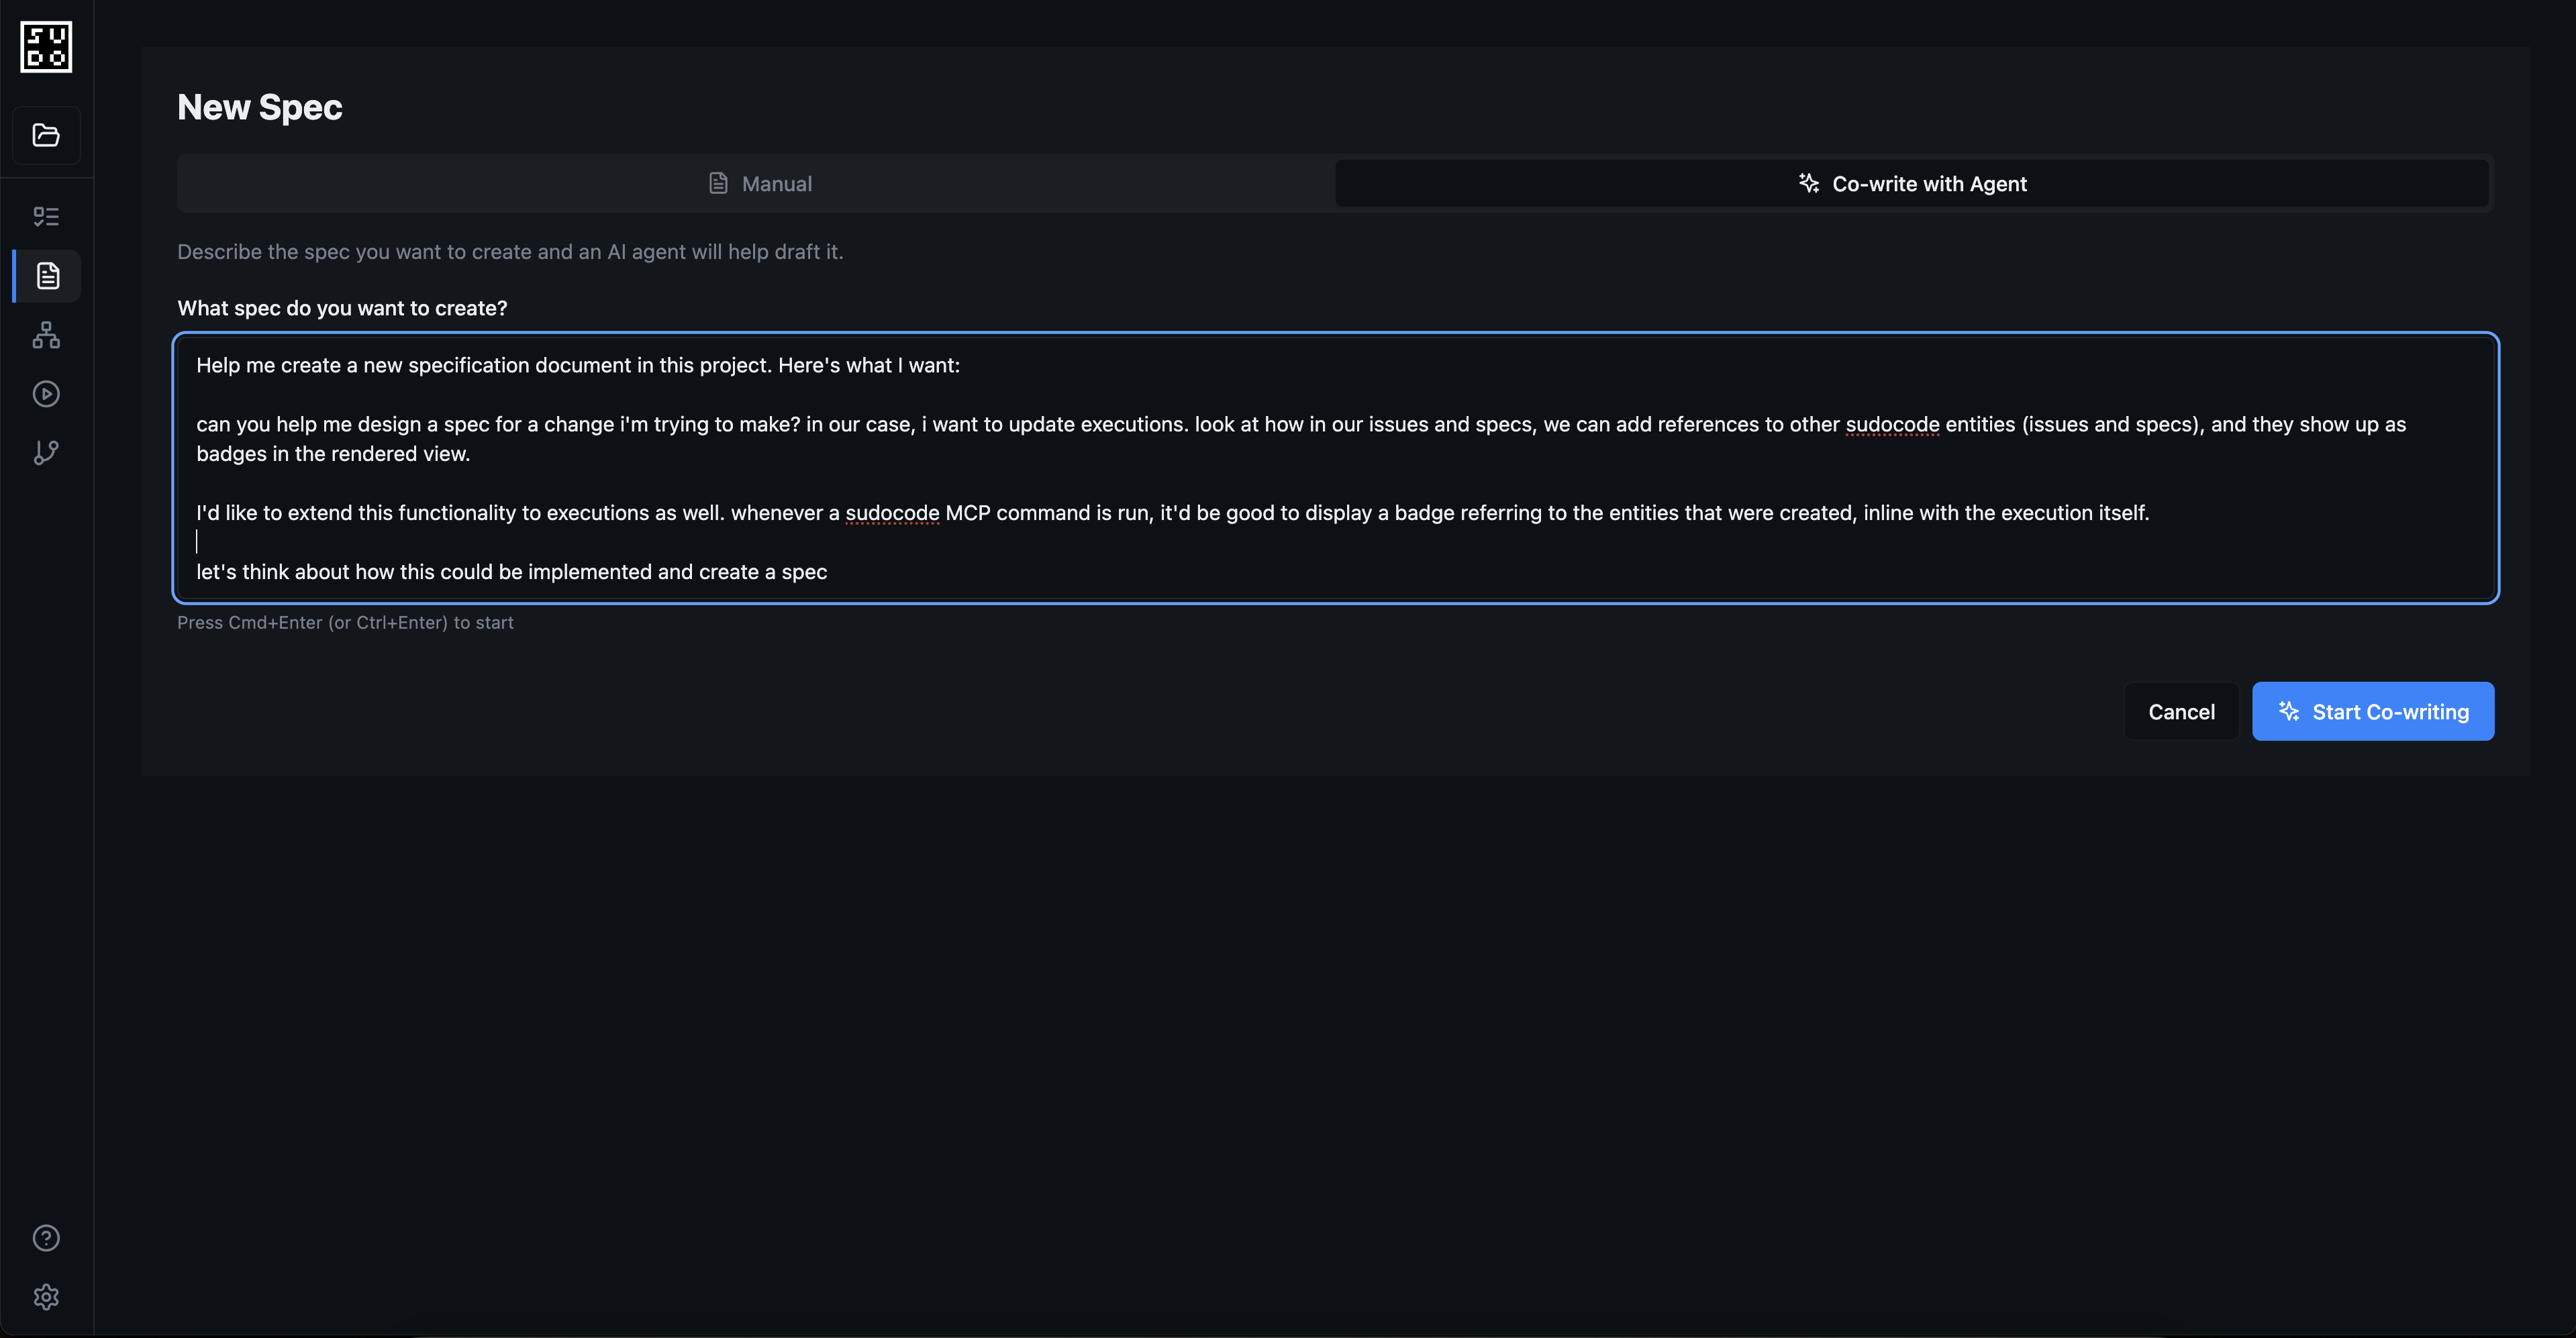 Ask the agent to help define:
* User-facing behavior (what badges should show)
* Technical requirements (which entities to track)
* UI/UX considerations (badge placement, styling)
* Success criteria (how to validate it works)
* Abstractions (what interfaces will be modified as an outcome)
**Step 3: Converse with the agent to refine the spec**
Continue the conversation to add details, clarify requirements, and ensure the spec is comprehensive.
Ask the agent to help define:
* User-facing behavior (what badges should show)
* Technical requirements (which entities to track)
* UI/UX considerations (badge placement, styling)
* Success criteria (how to validate it works)
* Abstractions (what interfaces will be modified as an outcome)
**Step 3: Converse with the agent to refine the spec**
Continue the conversation to add details, clarify requirements, and ensure the spec is comprehensive.
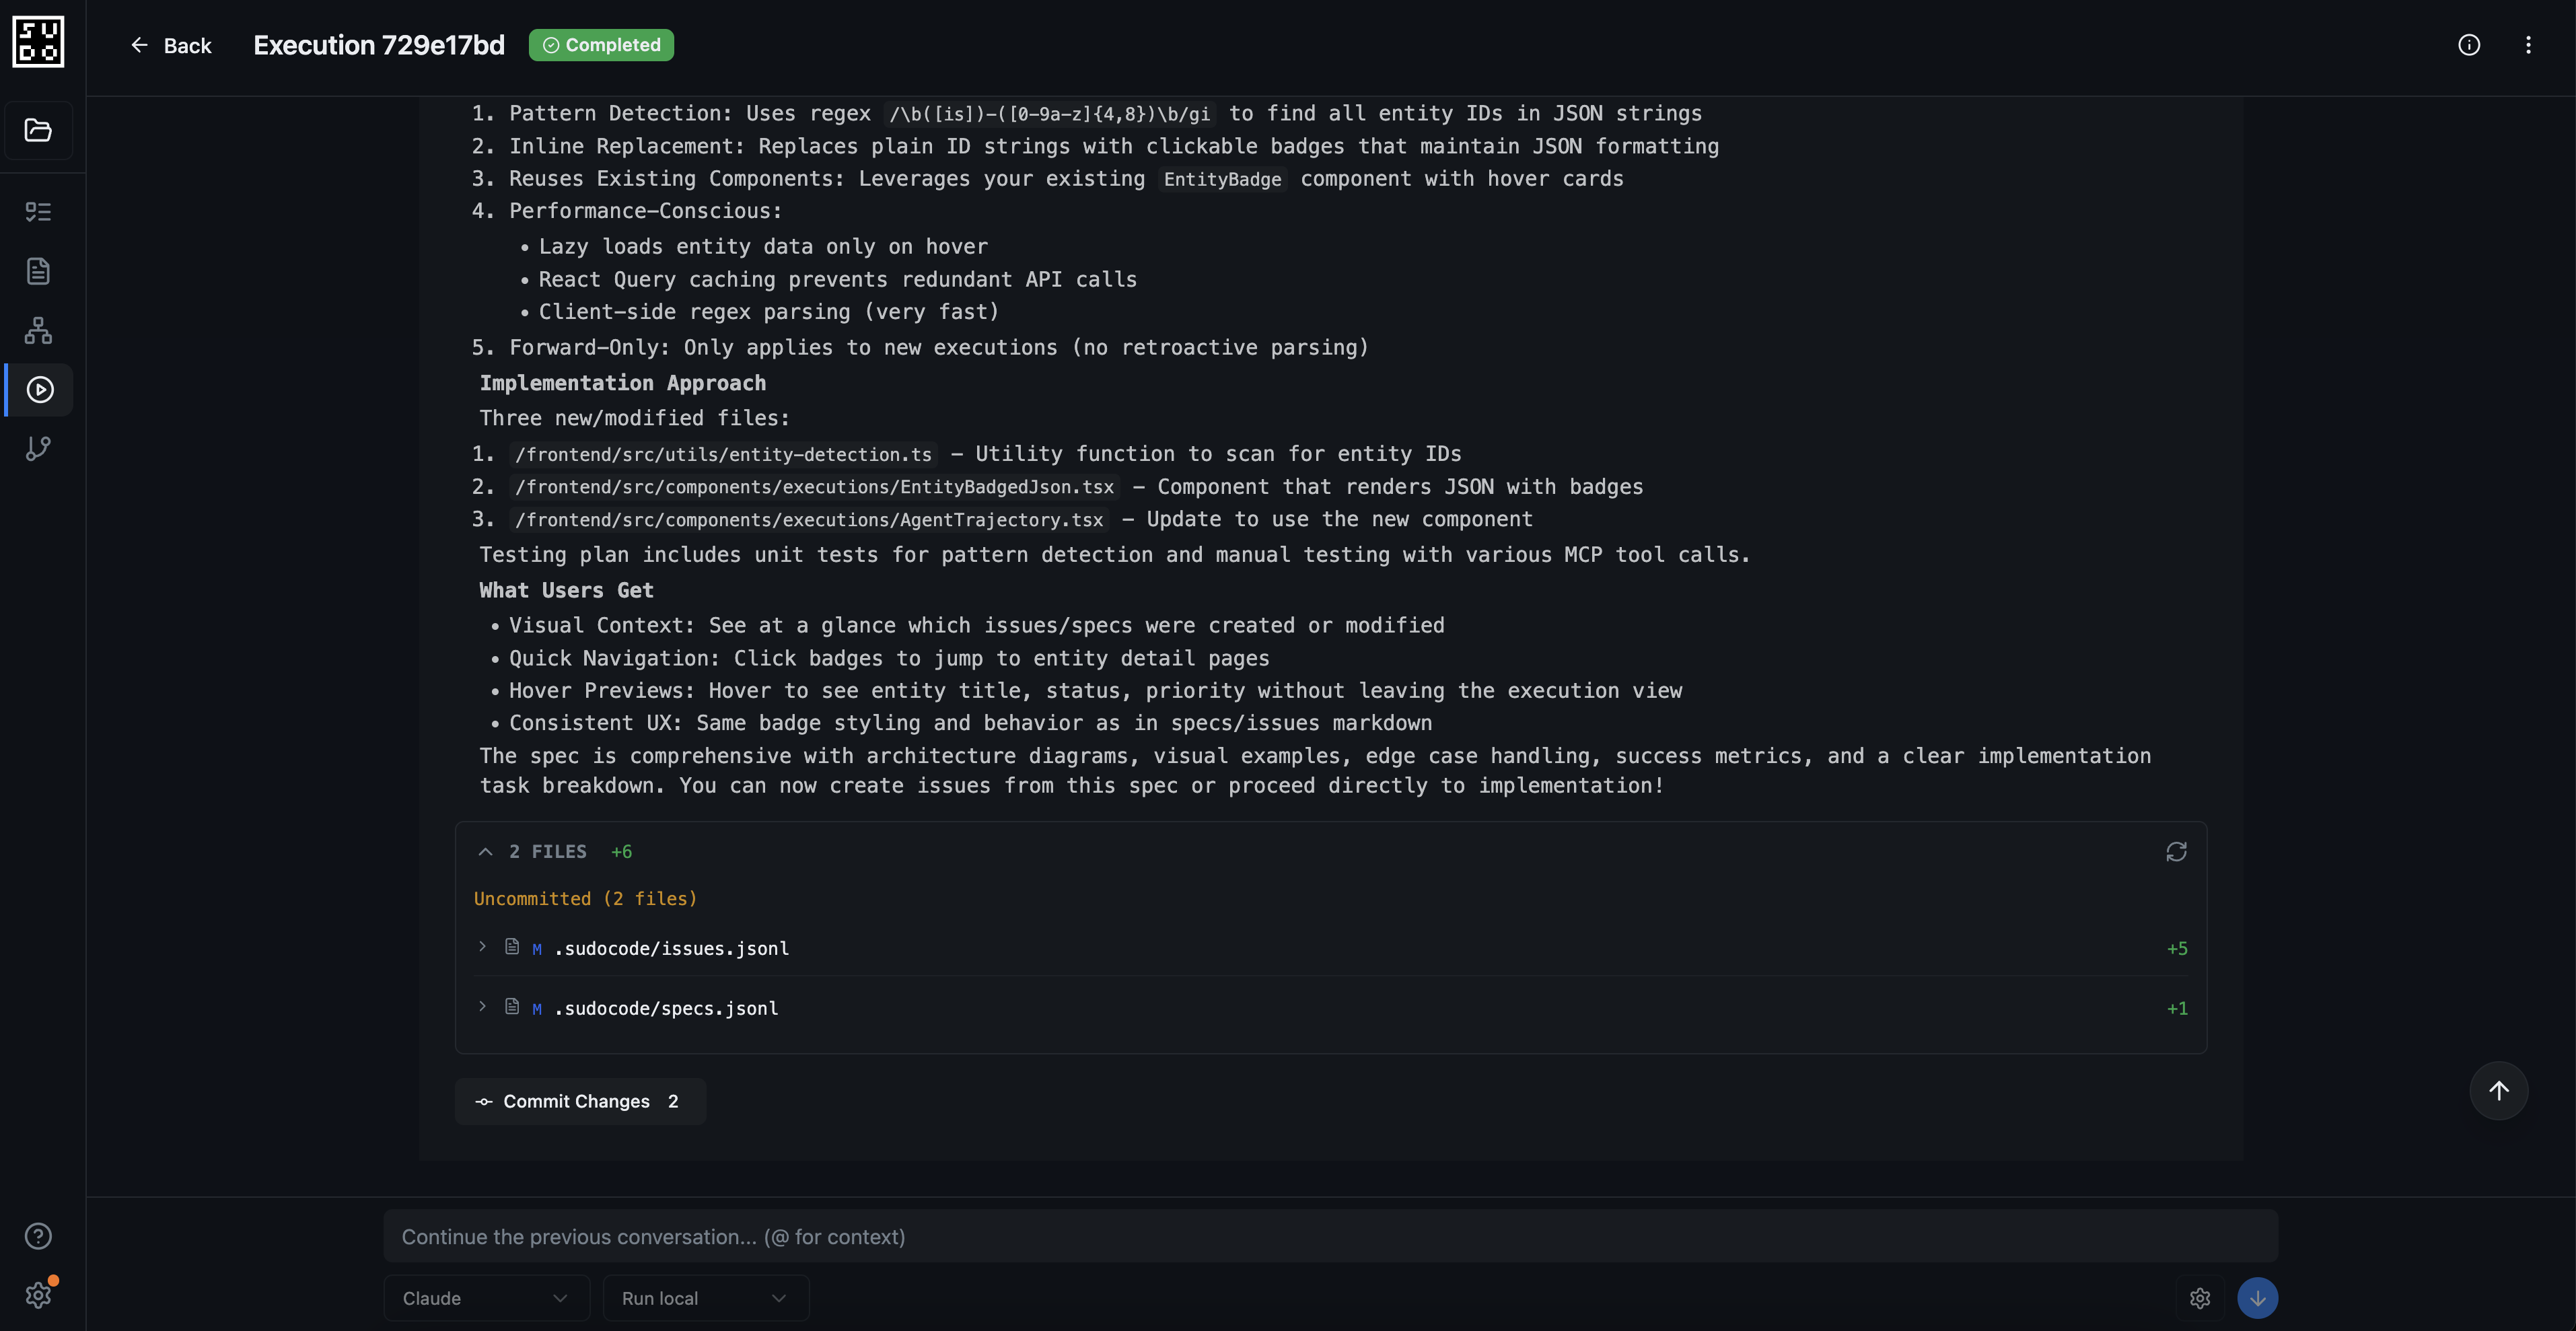 The agent can help you:
* Identify missing requirements
* Suggest implementation approaches
* Consider edge cases
* Define acceptance criteria
**Step 4: Inspect and edit the spec**
You can review and edit the spec directly in the interface or continue collaborating with the agent to refine it.
The agent can help you:
* Identify missing requirements
* Suggest implementation approaches
* Consider edge cases
* Define acceptance criteria
**Step 4: Inspect and edit the spec**
You can review and edit the spec directly in the interface or continue collaborating with the agent to refine it.
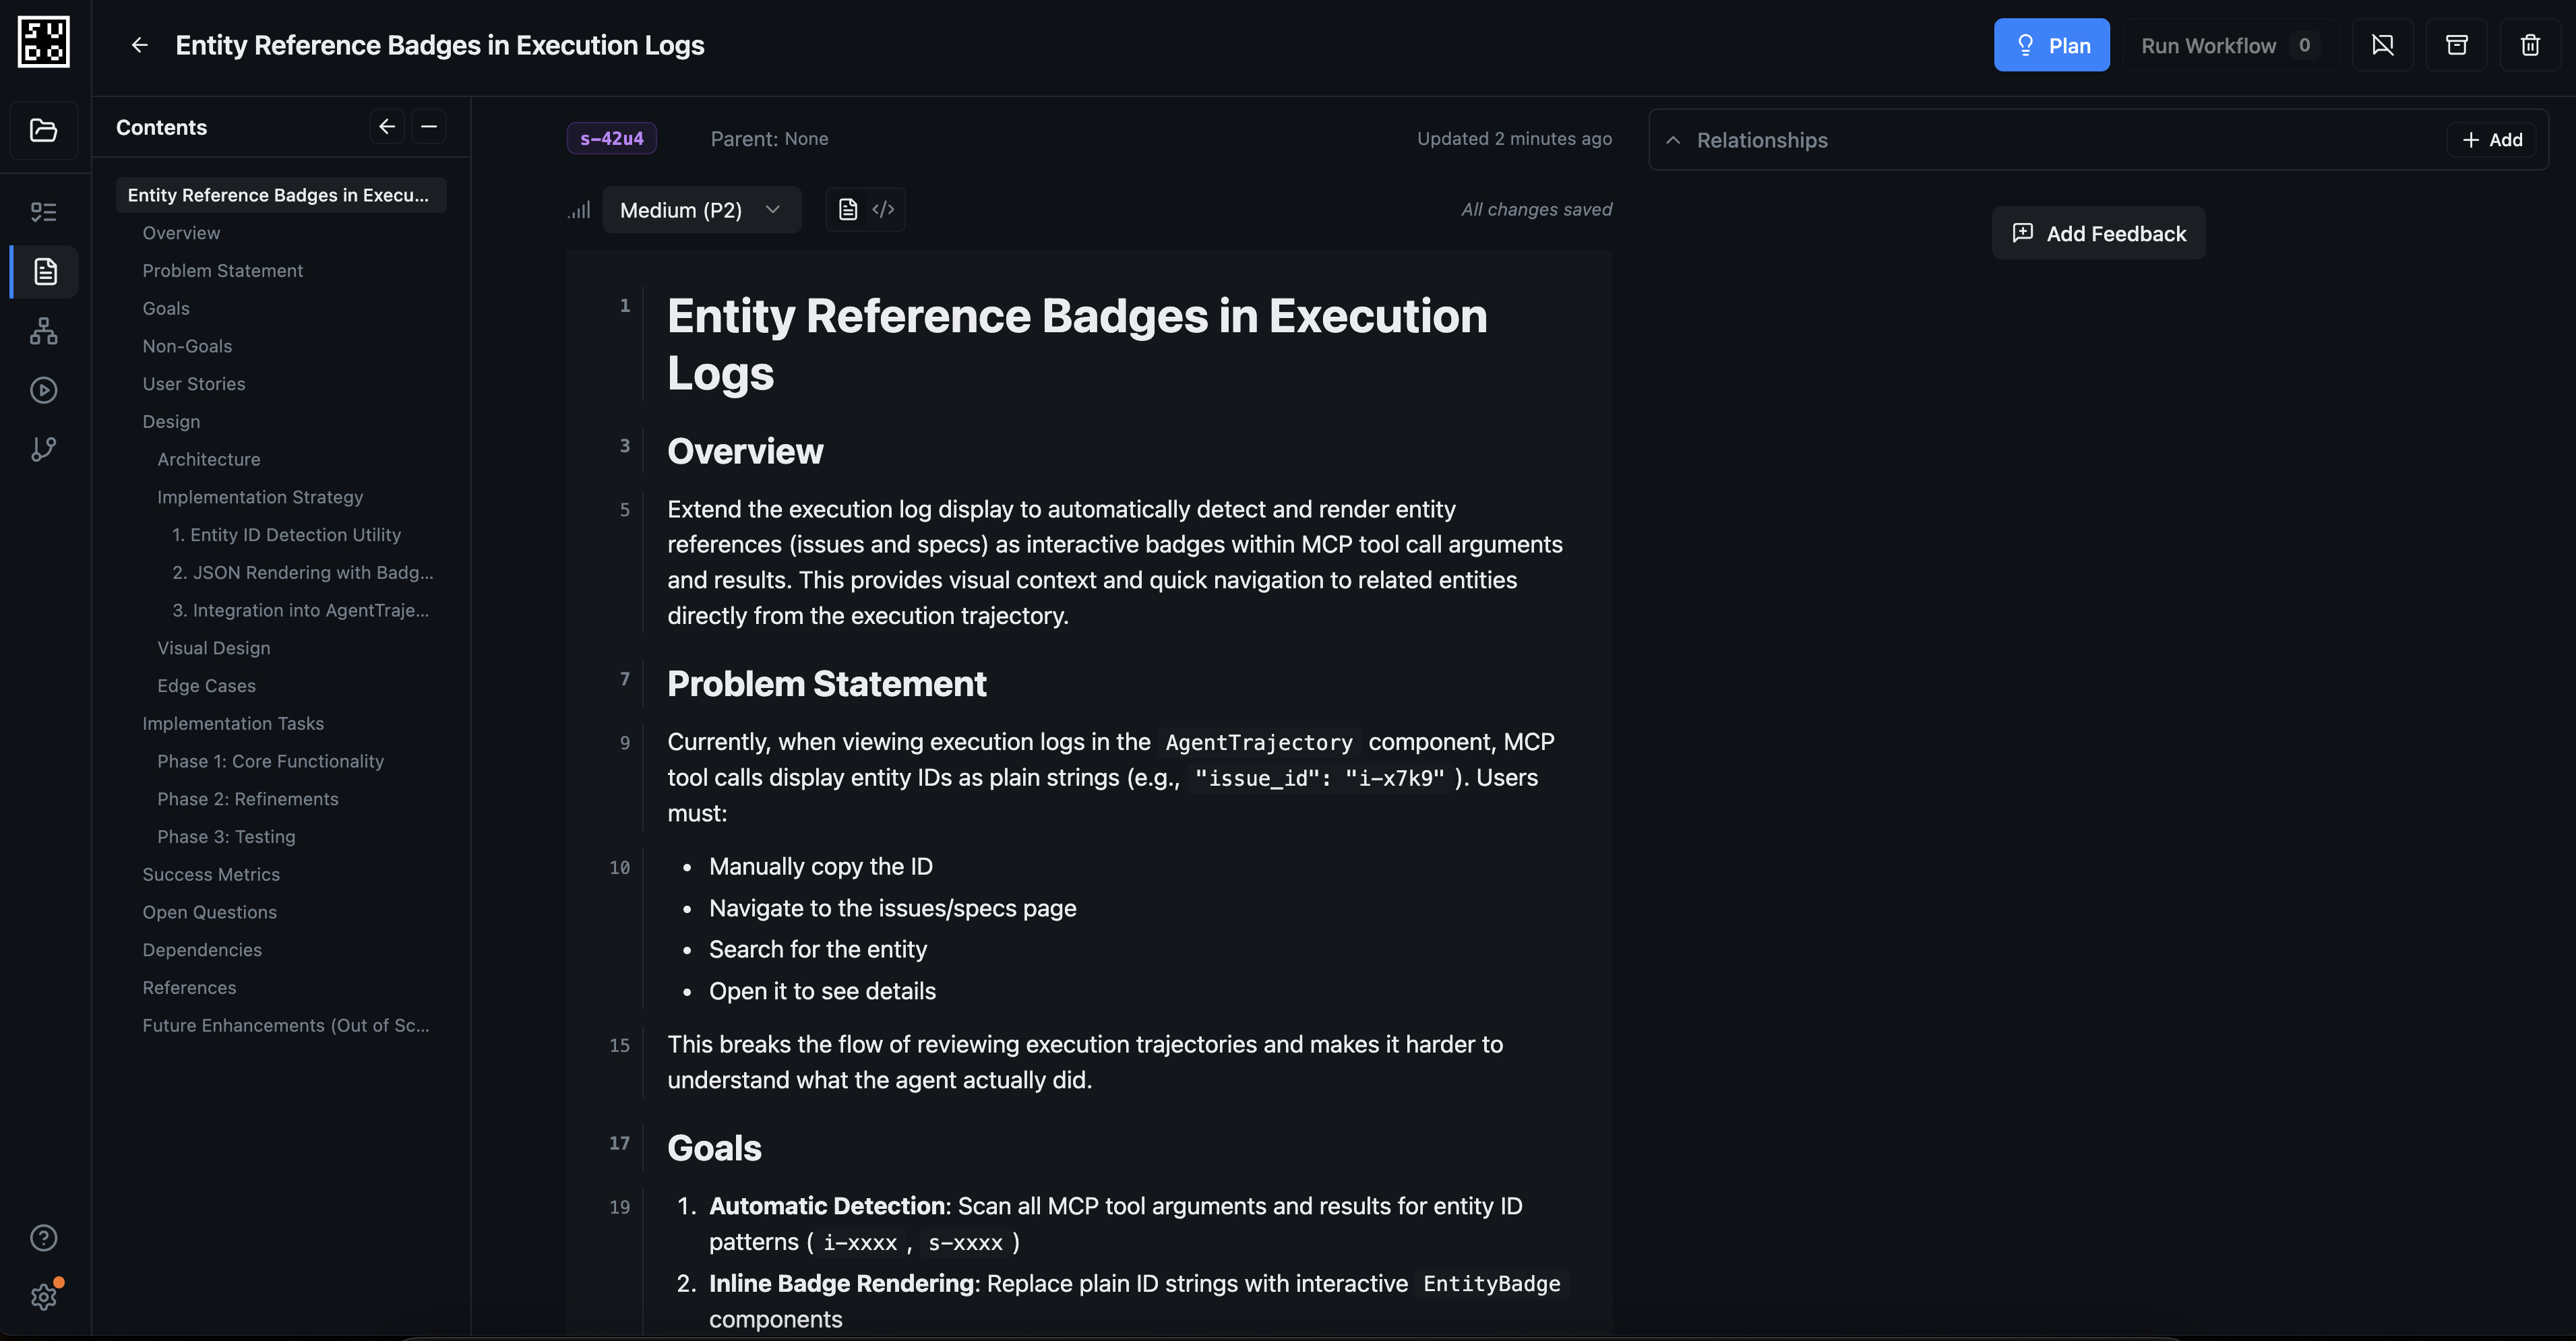 This step ensures your spec is clear, complete, and ready for implementation planning.
### Phase 2: Plan Implementation
**Step 5: Generate implementation plan**
Once your spec is ready, click "Plan Implementation" to have sudocode break down the spec into actionable issues.
This step ensures your spec is clear, complete, and ready for implementation planning.
### Phase 2: Plan Implementation
**Step 5: Generate implementation plan**
Once your spec is ready, click "Plan Implementation" to have sudocode break down the spec into actionable issues.
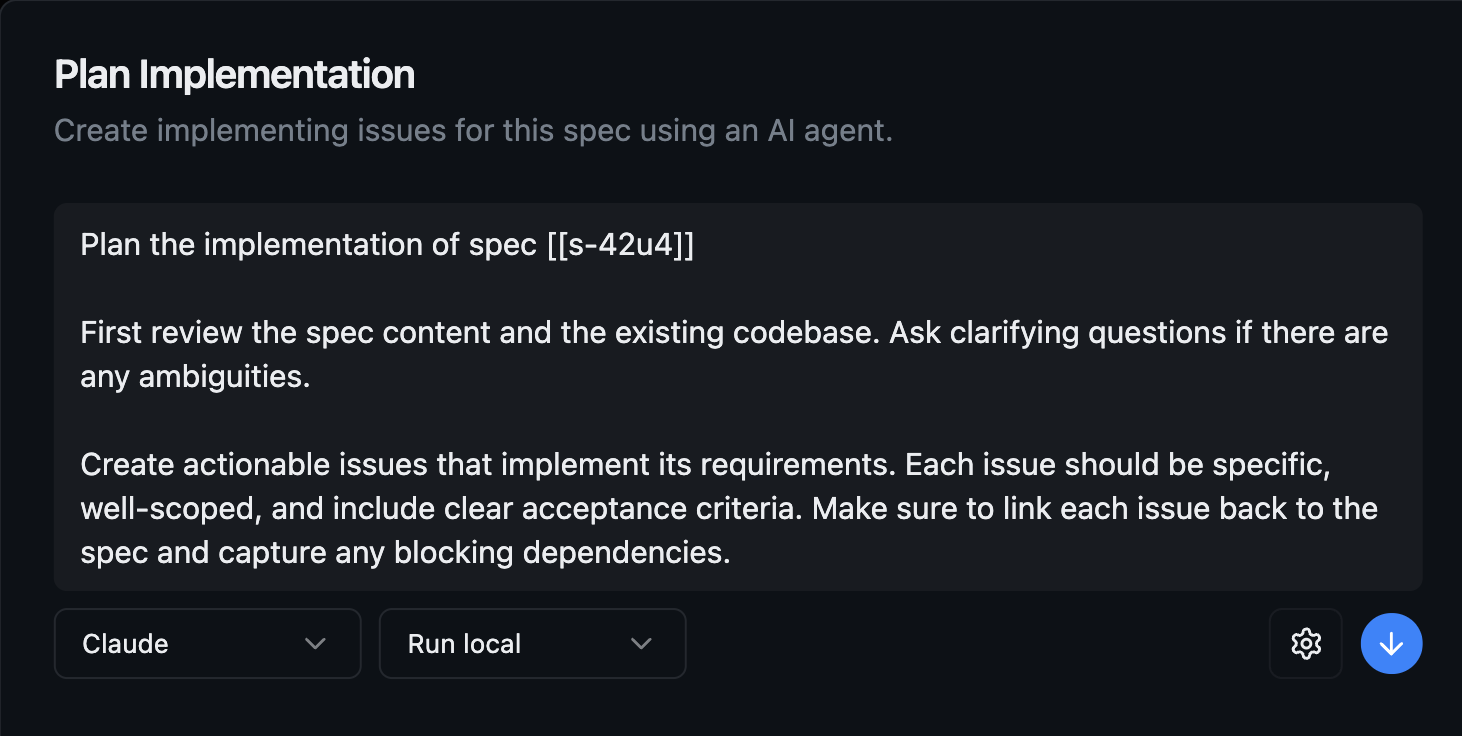 sudocode analyzes your spec and creates:
* Individual issues for each component or step
* Dependency relationships between issues and specifications
**Step 6: Inspect the generated issues**
Review the issues that were created from your spec. You can see modify issues as needed.
sudocode analyzes your spec and creates:
* Individual issues for each component or step
* Dependency relationships between issues and specifications
**Step 6: Inspect the generated issues**
Review the issues that were created from your spec. You can see modify issues as needed.
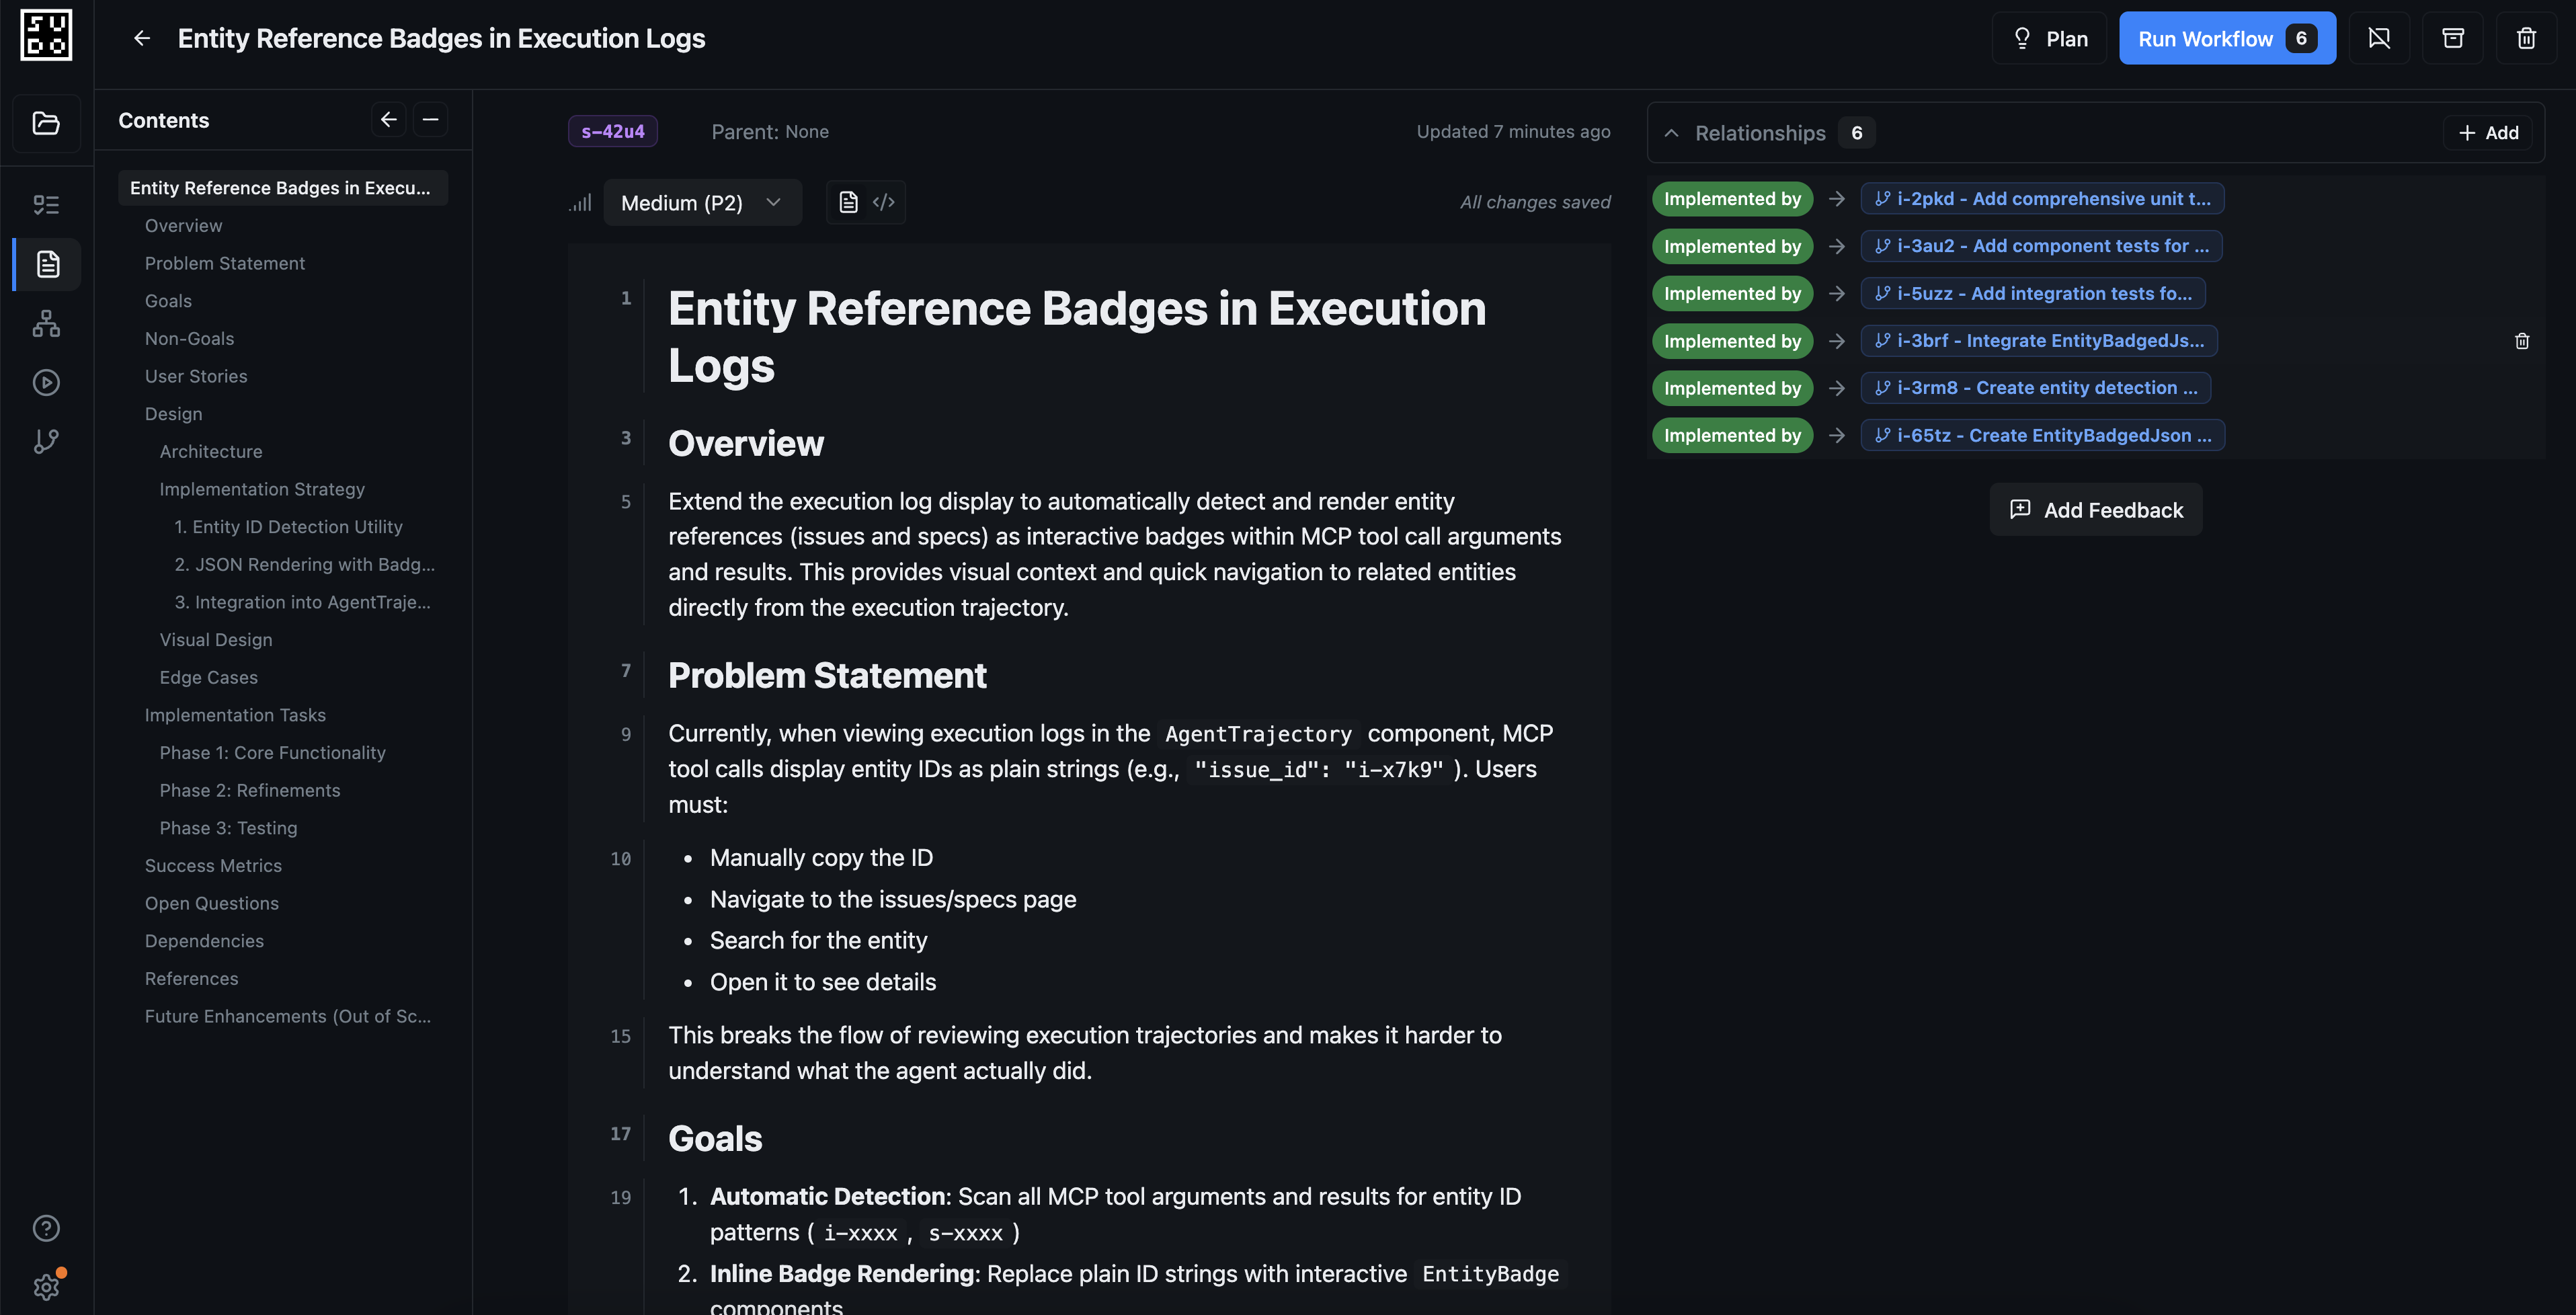 Each issue includes:
* Clear description of what needs to be implemented
* Links to the parent spec
* Dependency relationships with other issues
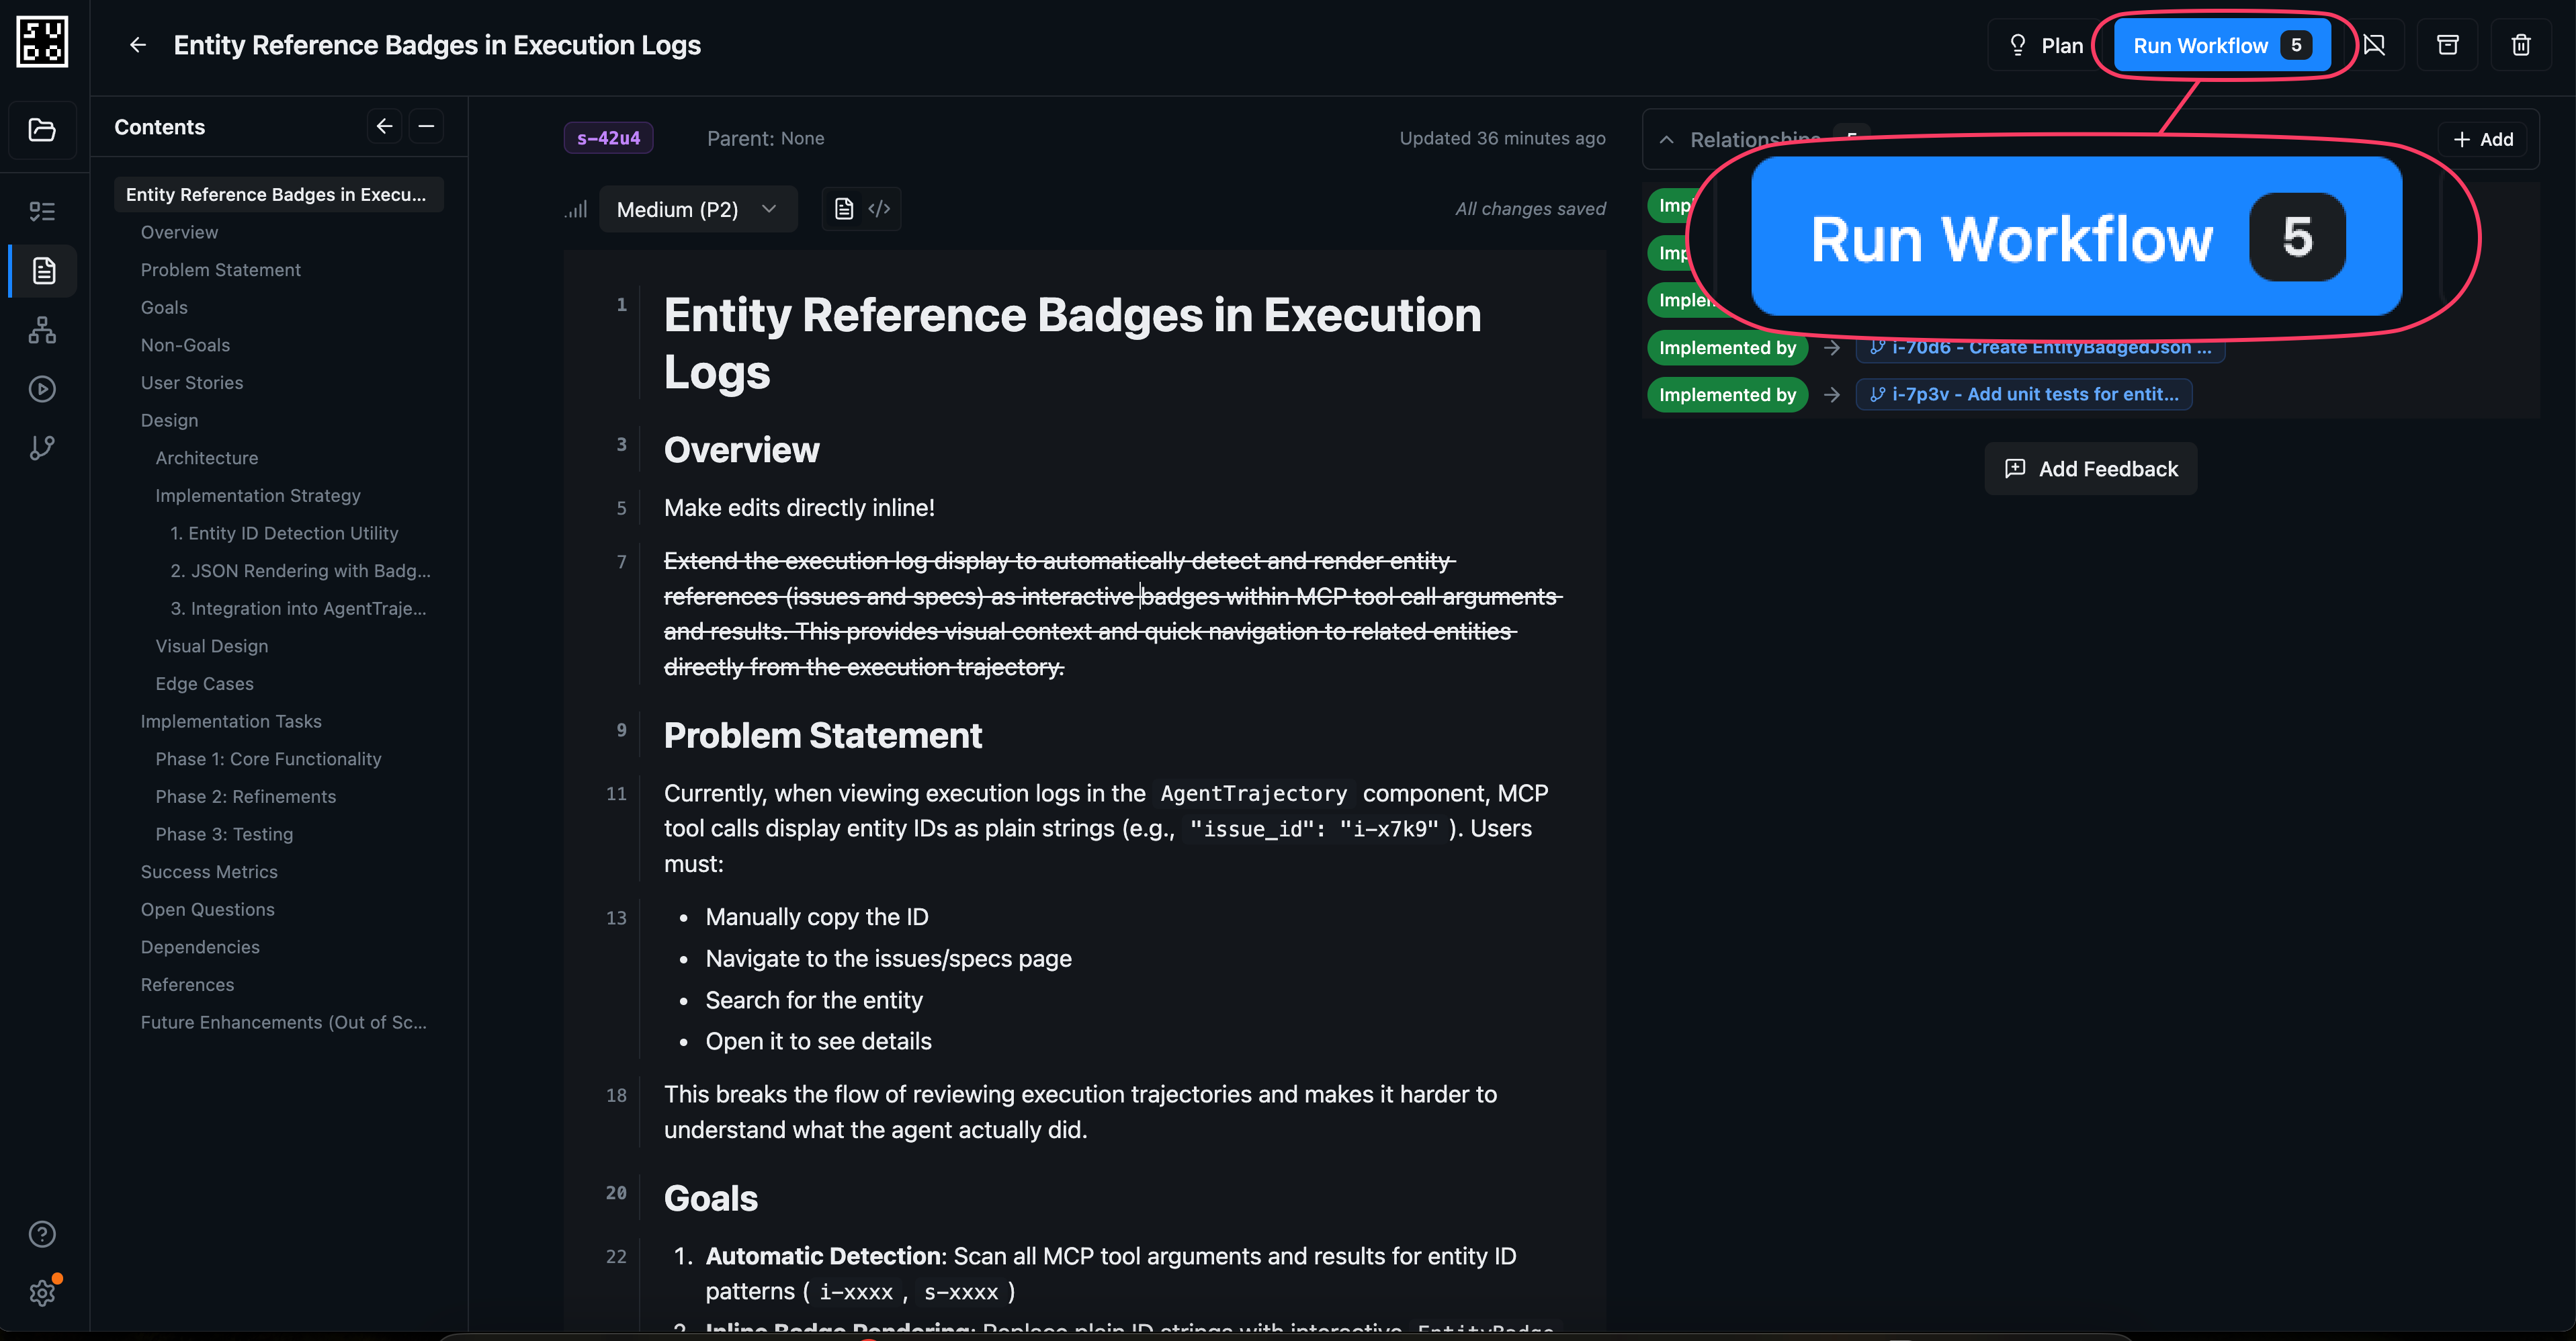
**Step 7: Click Run Workflow**
When you're ready to execute the implementation, click the "Run Workflow" button.
Each issue includes:
* Clear description of what needs to be implemented
* Links to the parent spec
* Dependency relationships with other issues
**Step 7: Click Run Workflow**
When you're ready to execute the implementation, click the "Run Workflow" button.
 ### Phase 3: Execute the Workflow
**Step 8: Configure workflow execution**
The workflow creation screen lets you choose which issues to run and how to execute them.
### Phase 3: Execute the Workflow
**Step 8: Configure workflow execution**
The workflow creation screen lets you choose which issues to run and how to execute them.
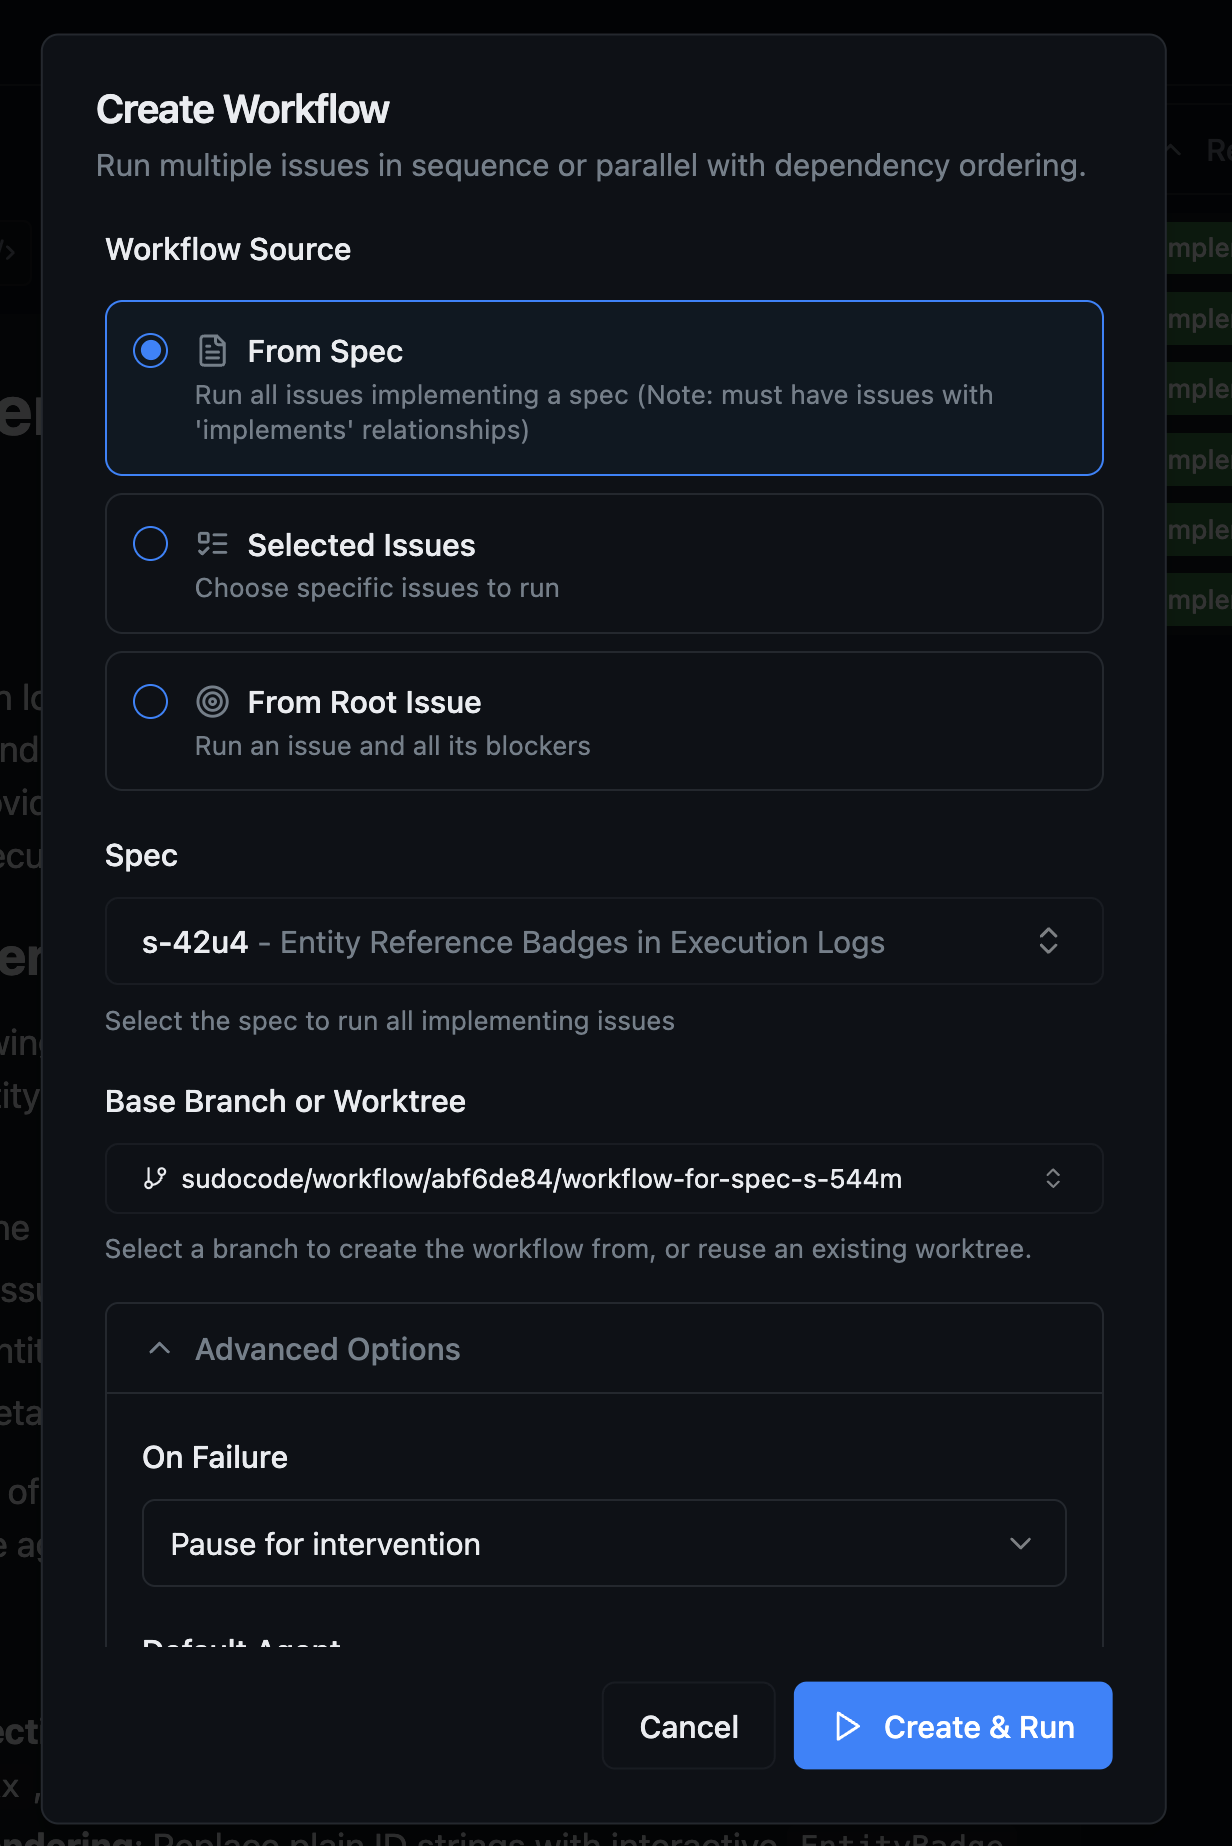 You can:
* Select specific issues to include
* Choose to run from a spec (runs all implementing issues)
* Choose to run from a root issue (runs all blocking dependencies)
* Review the execution order before starting
**Step 9: Monitor workflow progress**
Once started, the workflow executes issues in dependency order. You can monitor progress in real-time.
You can:
* Select specific issues to include
* Choose to run from a spec (runs all implementing issues)
* Choose to run from a root issue (runs all blocking dependencies)
* Review the execution order before starting
**Step 9: Monitor workflow progress**
Once started, the workflow executes issues in dependency order. You can monitor progress in real-time.
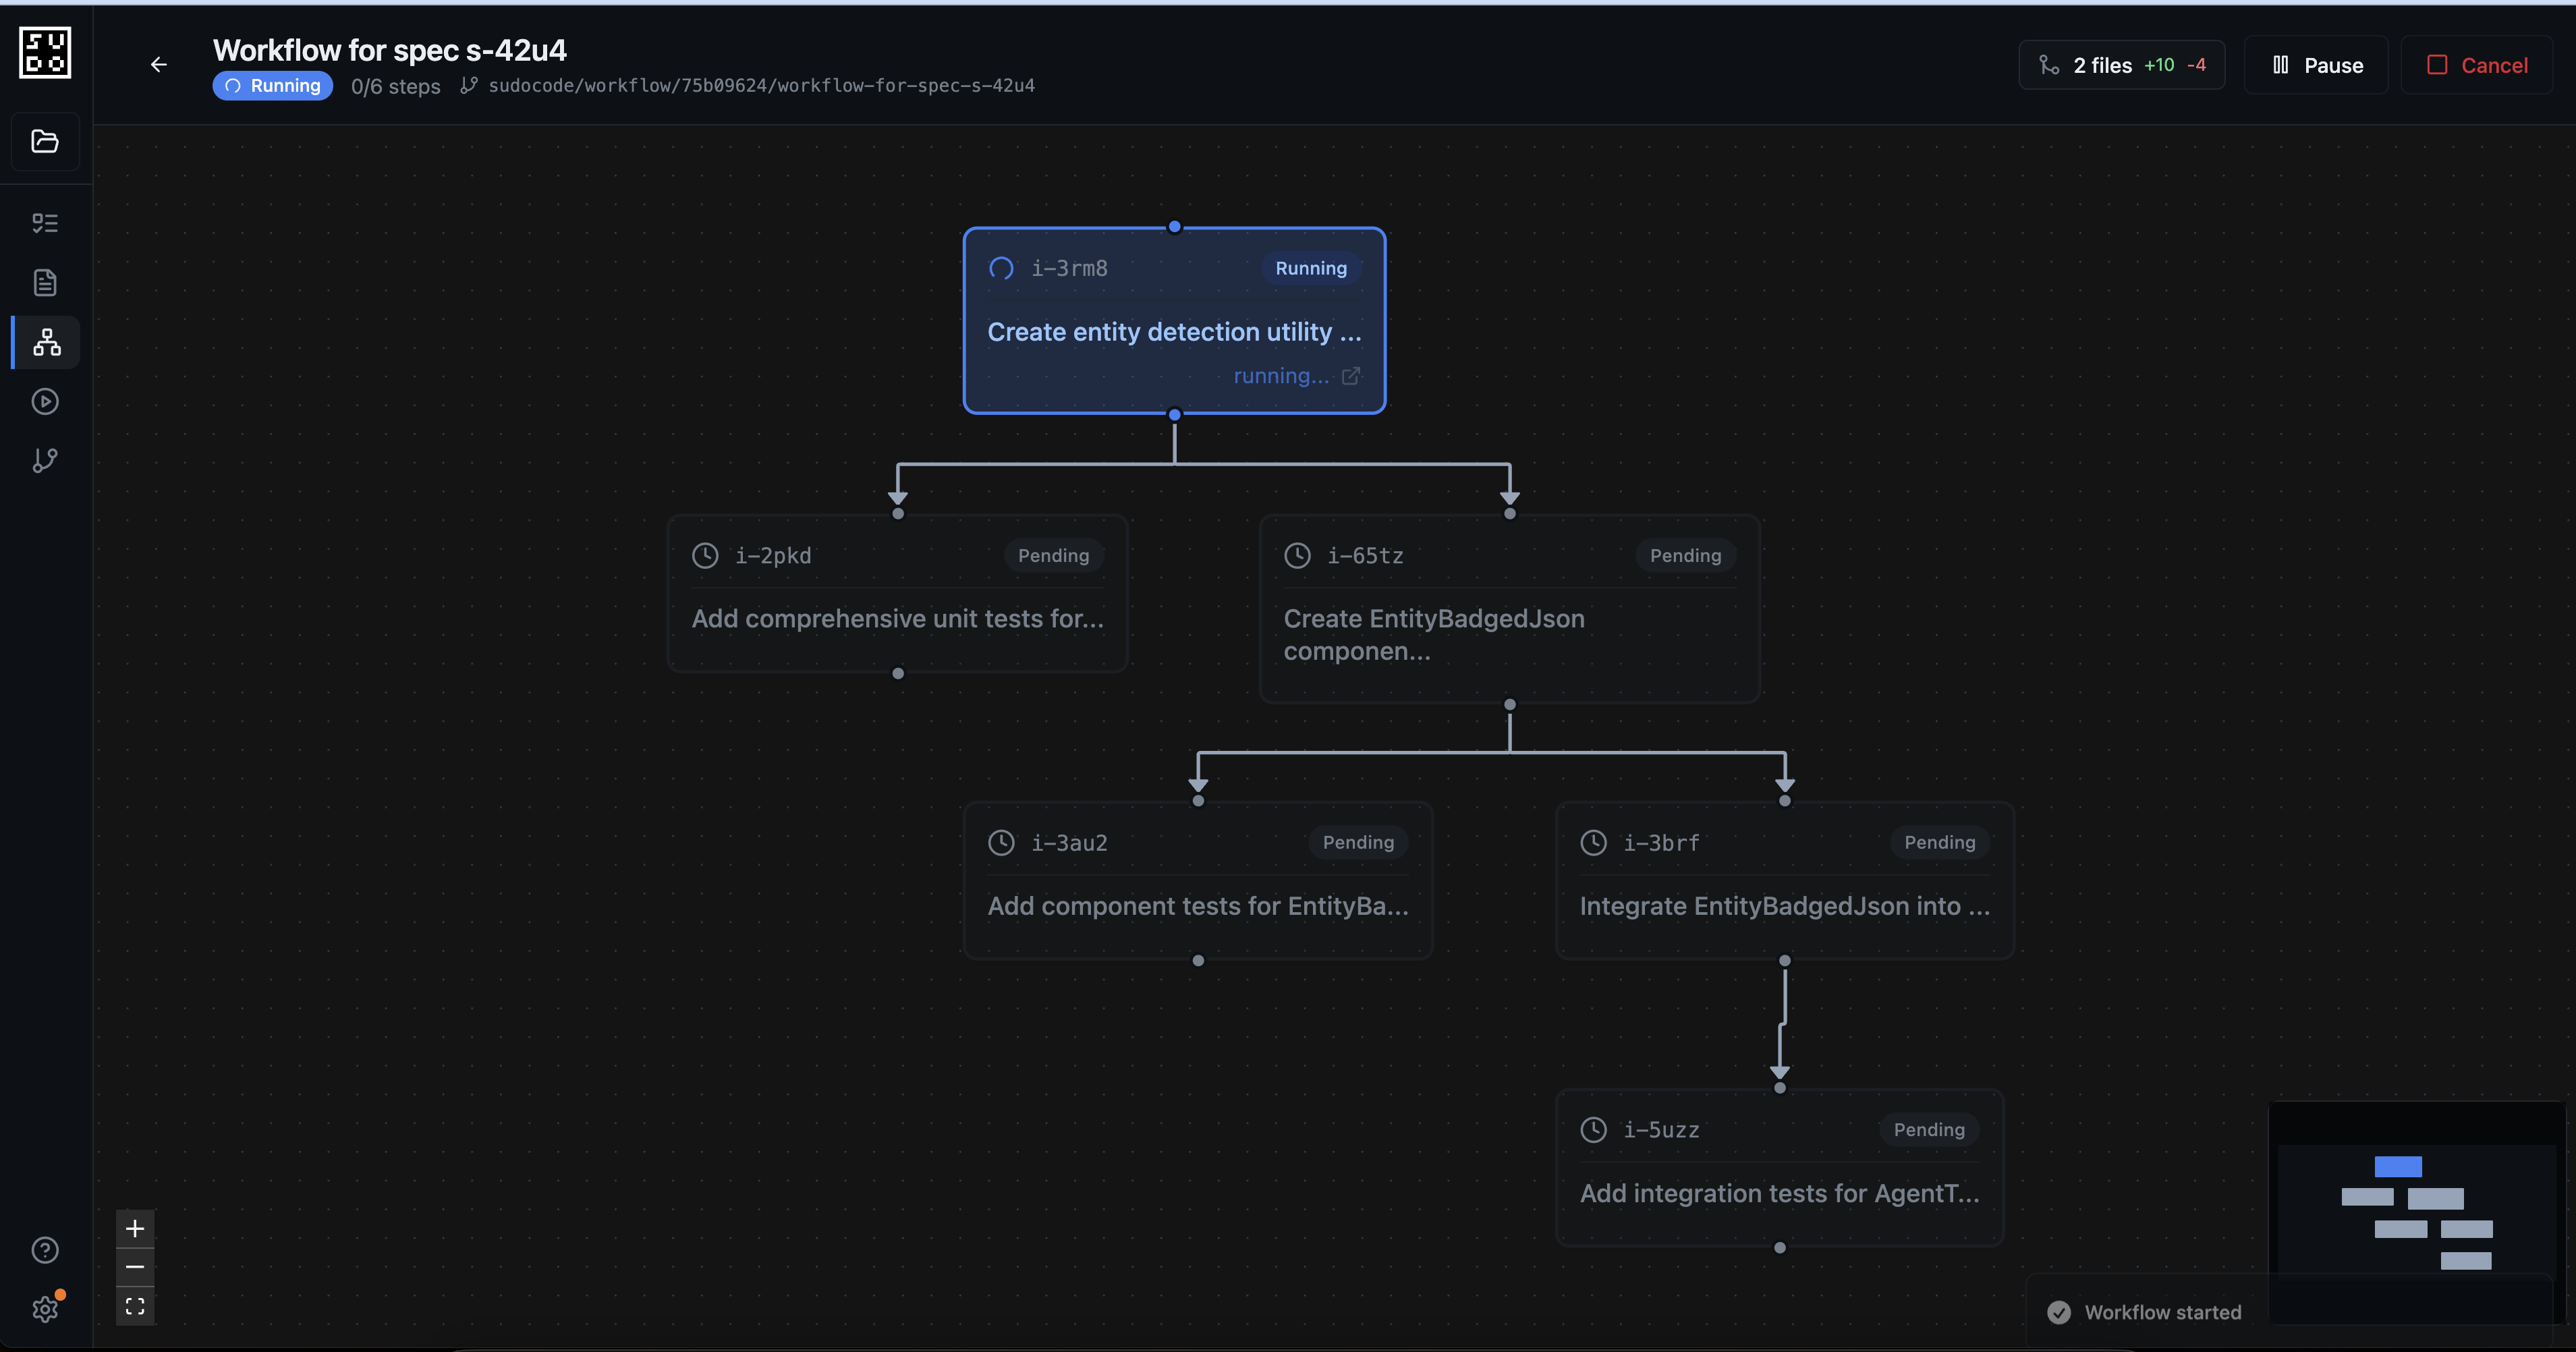 As the workflow executes:
* Issues with no blockers start immediately
* Subsequent issues automatically start when dependencies complete
* Each issue runs in an isolated worktree
* You can click any issue to view its progress and agent conversation
* Real-time status updates show what's being worked on
### Phase 4: Review and Merge Changes
**Step 10: Review workflow changes**
When the workflow completes, you can review all the changes that were made across all issues.
As the workflow executes:
* Issues with no blockers start immediately
* Subsequent issues automatically start when dependencies complete
* Each issue runs in an isolated worktree
* You can click any issue to view its progress and agent conversation
* Real-time status updates show what's being worked on
### Phase 4: Review and Merge Changes
**Step 10: Review workflow changes**
When the workflow completes, you can review all the changes that were made across all issues.
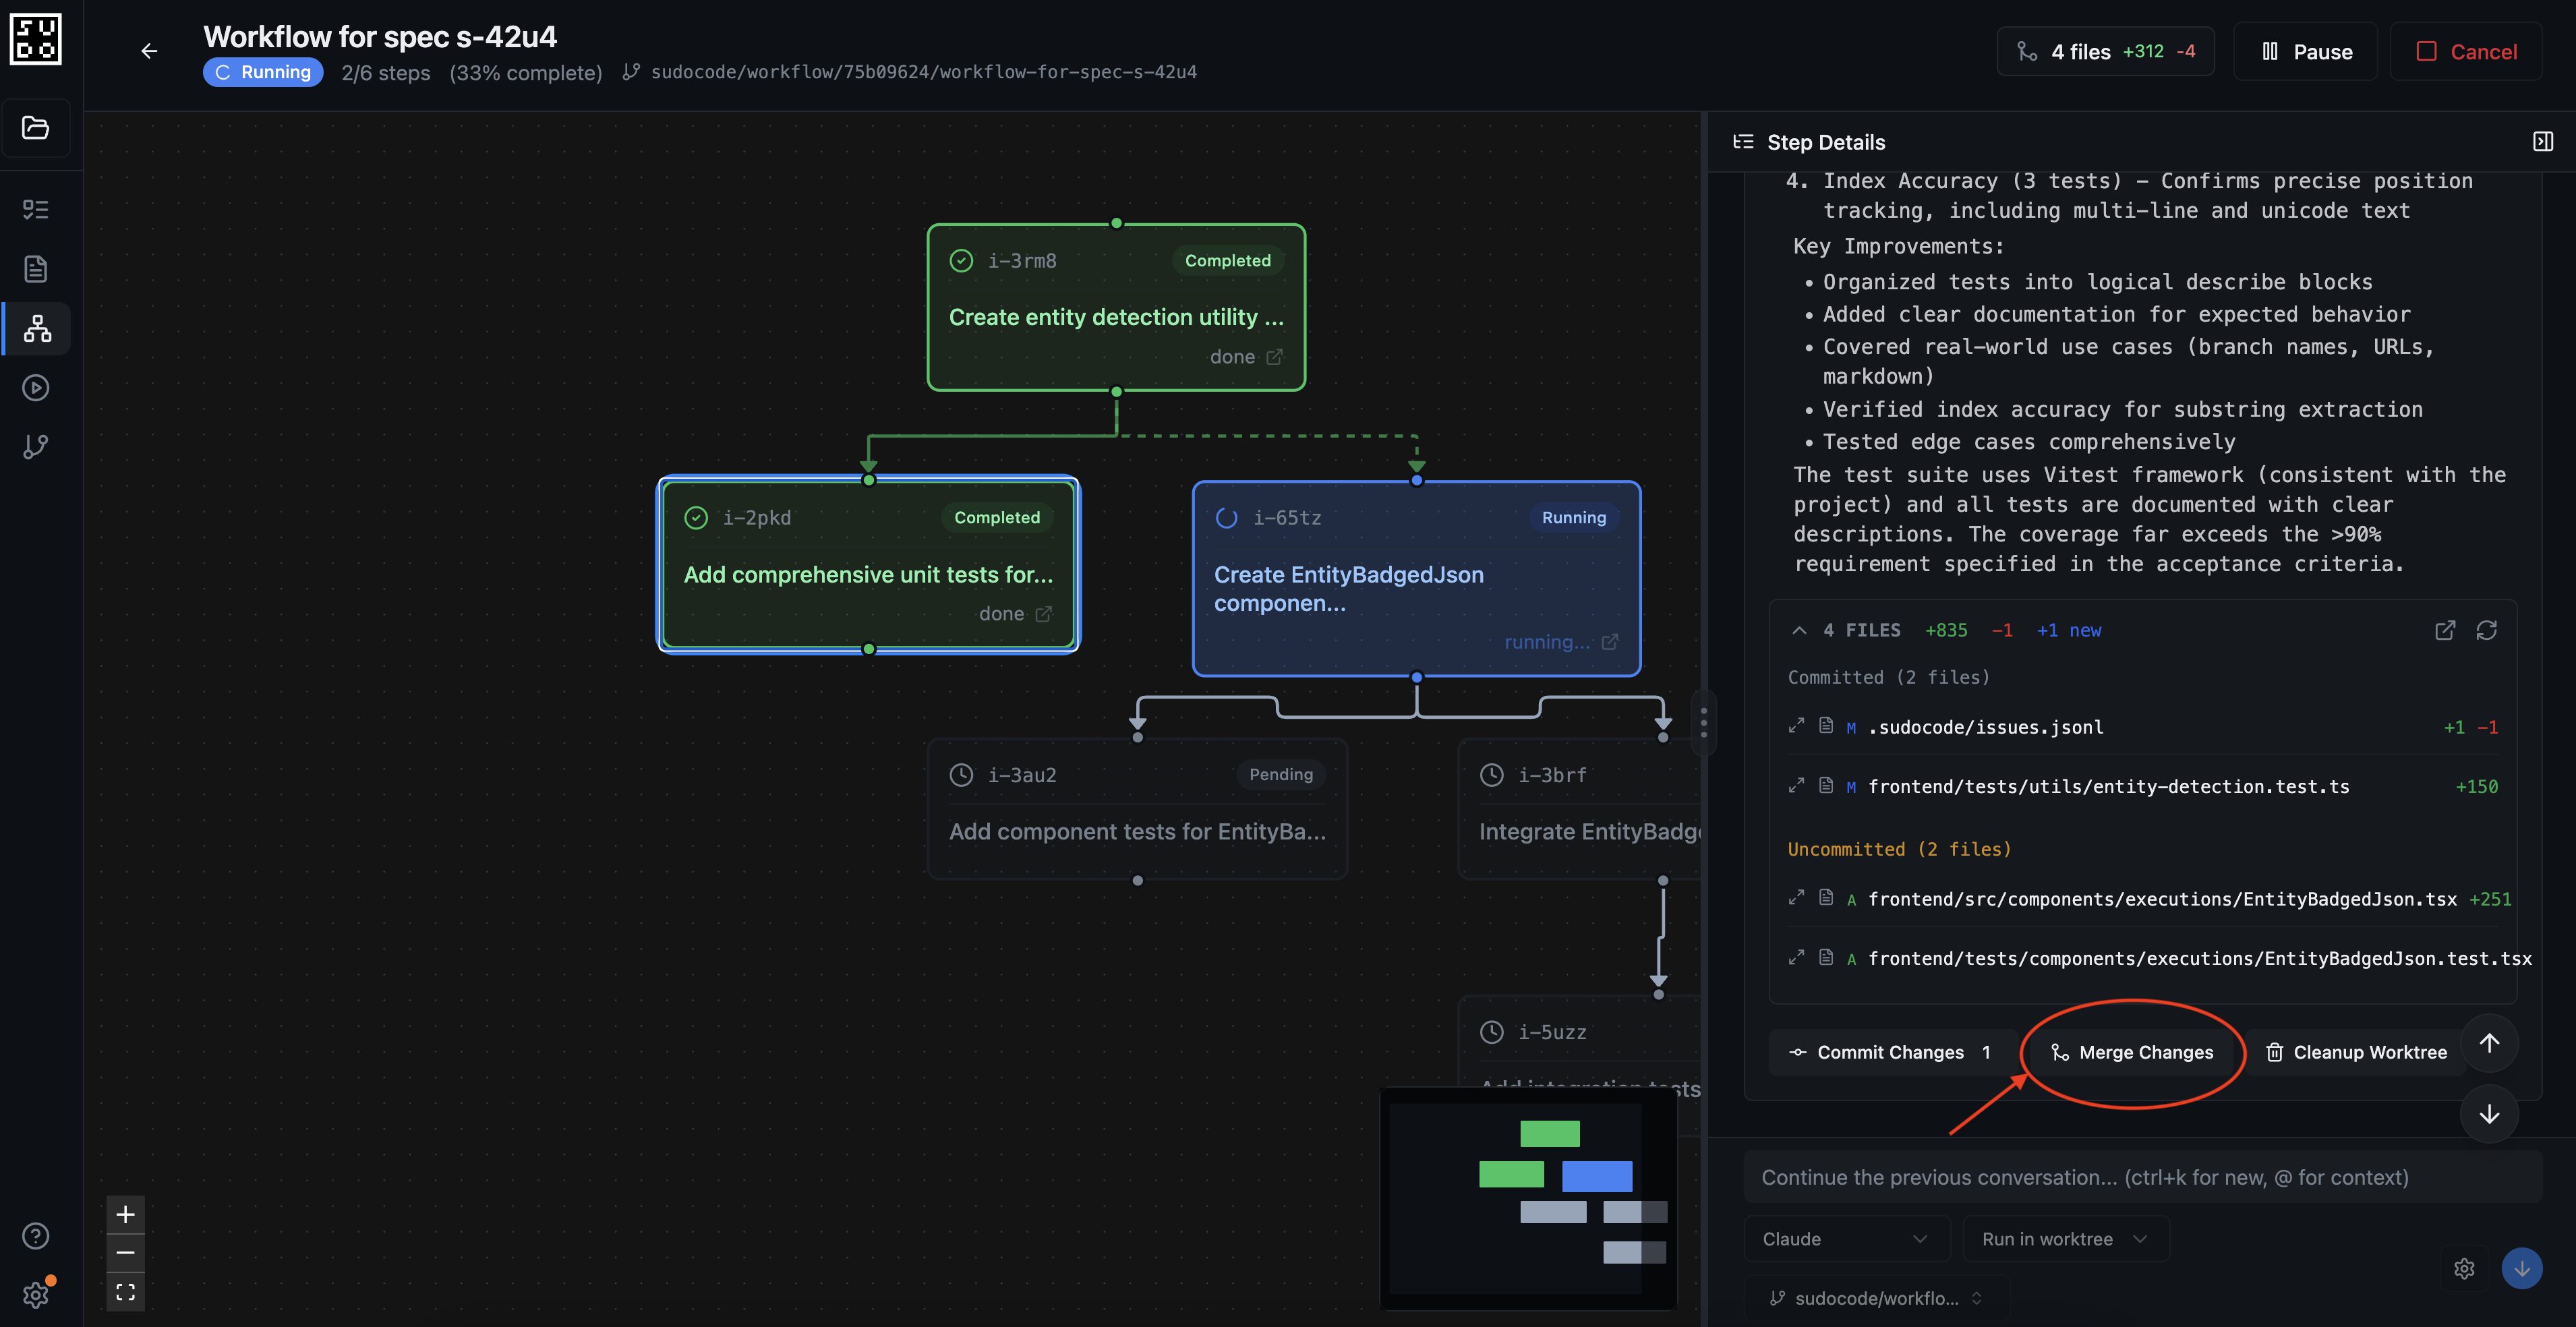 The workflow review shows:
* All completed issues
* Files modified by each issue
* Full diff of changes
* Test results and validation
* Agent decisions and implementation notes
**Step 11: Merge worktree to main branch**
Once you've reviewed the changes and are satisfied with the implementation, click "Merge Worktree" to integrate all changes into your main branch.
The workflow review shows:
* All completed issues
* Files modified by each issue
* Full diff of changes
* Test results and validation
* Agent decisions and implementation notes
**Step 11: Merge worktree to main branch**
Once you've reviewed the changes and are satisfied with the implementation, click "Merge Worktree" to integrate all changes into your main branch.
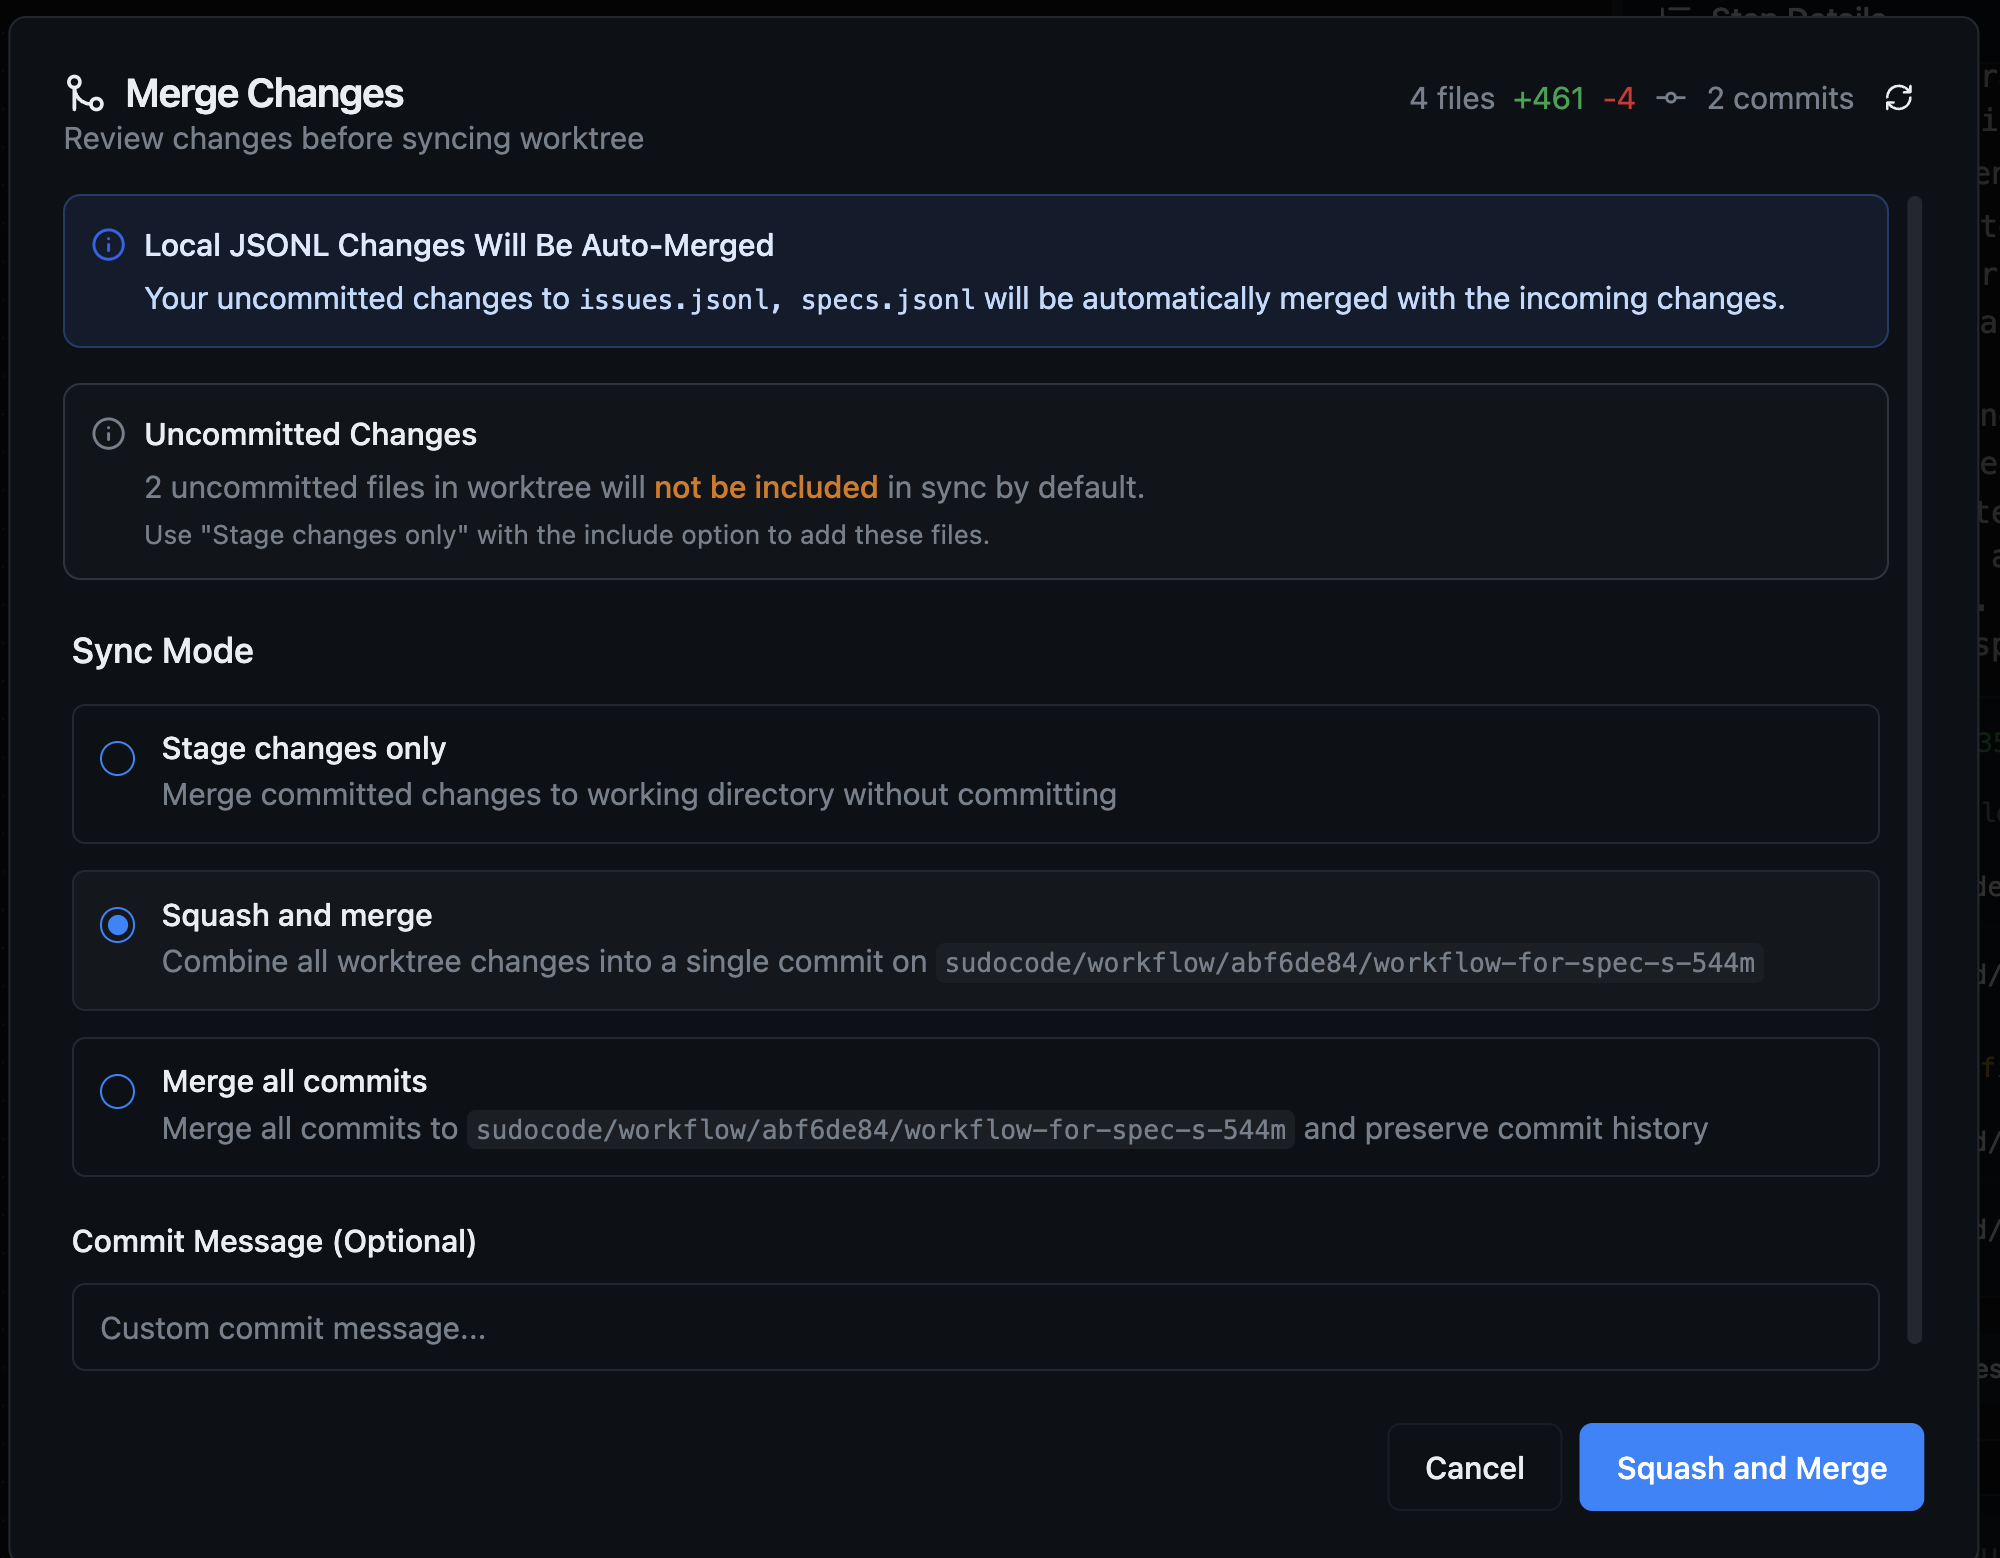 When you merge:
* All commits from the workflow worktree are merged into your main branch
**What just happened?**
You successfully implemented execution badges using a complete spec-driven workflow:
1. Created a spec collaboratively with an agent
2. Refined the requirements through conversation
3. Generated an implementation plan with dependency-ordered issues
4. Executed all issues in an automated workflow
5. Reviewed and merged the complete implementation
## Benefits of Workflows
**No manual orchestration needed**
* sudocode handles execution order
* Parallel work runs concurrently
* Dependencies respected automatically
* Hands-off execution
**Safe, conflict-free processing**
* Each issue in separate worktree
* No interference between agents
* Easy rollback per issue
* Clean merge points
**Track progress in real-time**
* See all issues in workflow
* Monitor agent decisions
* Review files as they're modified
* Understand implementation choices
## When to Use Workflows
Workflows are ideal for:
* **Feature development from specs**: Break down specs into coordinated implementation steps
* **Multi-component features**: UI → logic → API → testing phases that depend on each other
* **Refactoring projects**: Multiple coordinated code changes across related files
* **Multi-step bug fixes**: Test writing, strategy planning, implementation, validation
* **Migration tasks**: Sequential steps with clear dependencies
Workflows are less useful for:
* Single, standalone issues with no dependencies
* Exploratory work without clear structure
* Tasks requiring frequent human decision-making between steps
## Best Practices
Begin your workflow by creating a detailed spec collaboratively with an agent. A good spec should include:
**Essential elements:**
* Clear user-facing behavior description
* Technical requirements and constraints
* UI/UX considerations
* Success criteria and acceptance tests
* Edge cases and error handling
**Why this matters:**
* Agents can generate better implementation plans from detailed specs
* Issues created from specs have clearer scope and dependencies
* You catch requirement gaps before implementation starts
* The spec serves as documentation for the feature
You can always refine the spec through conversation before planning implementation.
Use the "Plan Implementation" feature to automatically break down specs into issues rather than creating issues manually.
**Benefits:**
* Automatically generates dependency relationships
* Creates focused, single-responsibility issues
* Ensures nothing from the spec is missed
* Saves time compared to manual planning
You can always review and modify the generated issues before running the workflow.
When starting a workflow, select "From Spec" to run all implementing issues in dependency order.
**Why this works:**
* The workflow engine automatically identifies all issues that implement the spec
* Dependencies are traced and respected
* You get a complete implementation without manual coordination
* All work is tracked back to the original spec
Alternatively, you can select "From Root Issue" to run from a specific issue and its dependencies.
Always review worktree changes before merging into your main branch.
**What to check:**
* Implementation matches spec requirements
* All issues completed successfully
* Tests are passing
* No unintended side effects
* Code quality meets standards
* Agent decisions make sense
You can inspect individual issues and files during workflow execution to catch problems early.
## Troubleshooting
**Cause:** Multiple worktrees modified the same issues or specs
**Solution:**
```bash theme={null}
# Run the sudocode conflict resolver
sudocode resolve-conflicts
# This intelligently merges changes from both versions
# Then commit the resolved files
git add .sudocode/
git commit -m "Resolve sudocode conflicts from workflow"
```
The `resolve-conflicts` command automatically handles concurrent modifications to sudocode metadata files.
**Cause:** Agent encountered an error or needs human input
**Solution:**
1. Click on the stuck issue to view details
2. Review the agent conversation to identify the blocker
3. If the agent needs clarification, provide it in the issue chat
4. If the agent errored, you can restart the issue or manually fix and continue
Workflows pause when an issue can't make progress, allowing you to intervene.
**Cause:** Need to stop execution due to errors or changed requirements
**Solution:**
Simply press Cancel and start a new workflow! You can remove your existing workflow and worktree as needed.
Cancelled workflows don't affect your main branch since work is isolated in worktrees.
## Related Documentation
Complete tutorial on spec-driven workflows
Complete web interface guide
How specs, issues, and dependencies connect
When you merge:
* All commits from the workflow worktree are merged into your main branch
**What just happened?**
You successfully implemented execution badges using a complete spec-driven workflow:
1. Created a spec collaboratively with an agent
2. Refined the requirements through conversation
3. Generated an implementation plan with dependency-ordered issues
4. Executed all issues in an automated workflow
5. Reviewed and merged the complete implementation
## Benefits of Workflows
**No manual orchestration needed**
* sudocode handles execution order
* Parallel work runs concurrently
* Dependencies respected automatically
* Hands-off execution
**Safe, conflict-free processing**
* Each issue in separate worktree
* No interference between agents
* Easy rollback per issue
* Clean merge points
**Track progress in real-time**
* See all issues in workflow
* Monitor agent decisions
* Review files as they're modified
* Understand implementation choices
## When to Use Workflows
Workflows are ideal for:
* **Feature development from specs**: Break down specs into coordinated implementation steps
* **Multi-component features**: UI → logic → API → testing phases that depend on each other
* **Refactoring projects**: Multiple coordinated code changes across related files
* **Multi-step bug fixes**: Test writing, strategy planning, implementation, validation
* **Migration tasks**: Sequential steps with clear dependencies
Workflows are less useful for:
* Single, standalone issues with no dependencies
* Exploratory work without clear structure
* Tasks requiring frequent human decision-making between steps
## Best Practices
Begin your workflow by creating a detailed spec collaboratively with an agent. A good spec should include:
**Essential elements:**
* Clear user-facing behavior description
* Technical requirements and constraints
* UI/UX considerations
* Success criteria and acceptance tests
* Edge cases and error handling
**Why this matters:**
* Agents can generate better implementation plans from detailed specs
* Issues created from specs have clearer scope and dependencies
* You catch requirement gaps before implementation starts
* The spec serves as documentation for the feature
You can always refine the spec through conversation before planning implementation.
Use the "Plan Implementation" feature to automatically break down specs into issues rather than creating issues manually.
**Benefits:**
* Automatically generates dependency relationships
* Creates focused, single-responsibility issues
* Ensures nothing from the spec is missed
* Saves time compared to manual planning
You can always review and modify the generated issues before running the workflow.
When starting a workflow, select "From Spec" to run all implementing issues in dependency order.
**Why this works:**
* The workflow engine automatically identifies all issues that implement the spec
* Dependencies are traced and respected
* You get a complete implementation without manual coordination
* All work is tracked back to the original spec
Alternatively, you can select "From Root Issue" to run from a specific issue and its dependencies.
Always review worktree changes before merging into your main branch.
**What to check:**
* Implementation matches spec requirements
* All issues completed successfully
* Tests are passing
* No unintended side effects
* Code quality meets standards
* Agent decisions make sense
You can inspect individual issues and files during workflow execution to catch problems early.
## Troubleshooting
**Cause:** Multiple worktrees modified the same issues or specs
**Solution:**
```bash theme={null}
# Run the sudocode conflict resolver
sudocode resolve-conflicts
# This intelligently merges changes from both versions
# Then commit the resolved files
git add .sudocode/
git commit -m "Resolve sudocode conflicts from workflow"
```
The `resolve-conflicts` command automatically handles concurrent modifications to sudocode metadata files.
**Cause:** Agent encountered an error or needs human input
**Solution:**
1. Click on the stuck issue to view details
2. Review the agent conversation to identify the blocker
3. If the agent needs clarification, provide it in the issue chat
4. If the agent errored, you can restart the issue or manually fix and continue
Workflows pause when an issue can't make progress, allowing you to intervene.
**Cause:** Need to stop execution due to errors or changed requirements
**Solution:**
Simply press Cancel and start a new workflow! You can remove your existing workflow and worktree as needed.
Cancelled workflows don't affect your main branch since work is isolated in worktrees.
## Related Documentation
Complete tutorial on spec-driven workflows
Complete web interface guide
How specs, issues, and dependencies connect