> ## Documentation Index
> Fetch the complete documentation index at: https://docs.sudocode.ai/llms.txt
> Use this file to discover all available pages before exploring further.
# Issue Management
> Manage and coordinate issues through the sudocode web interface
## Overview
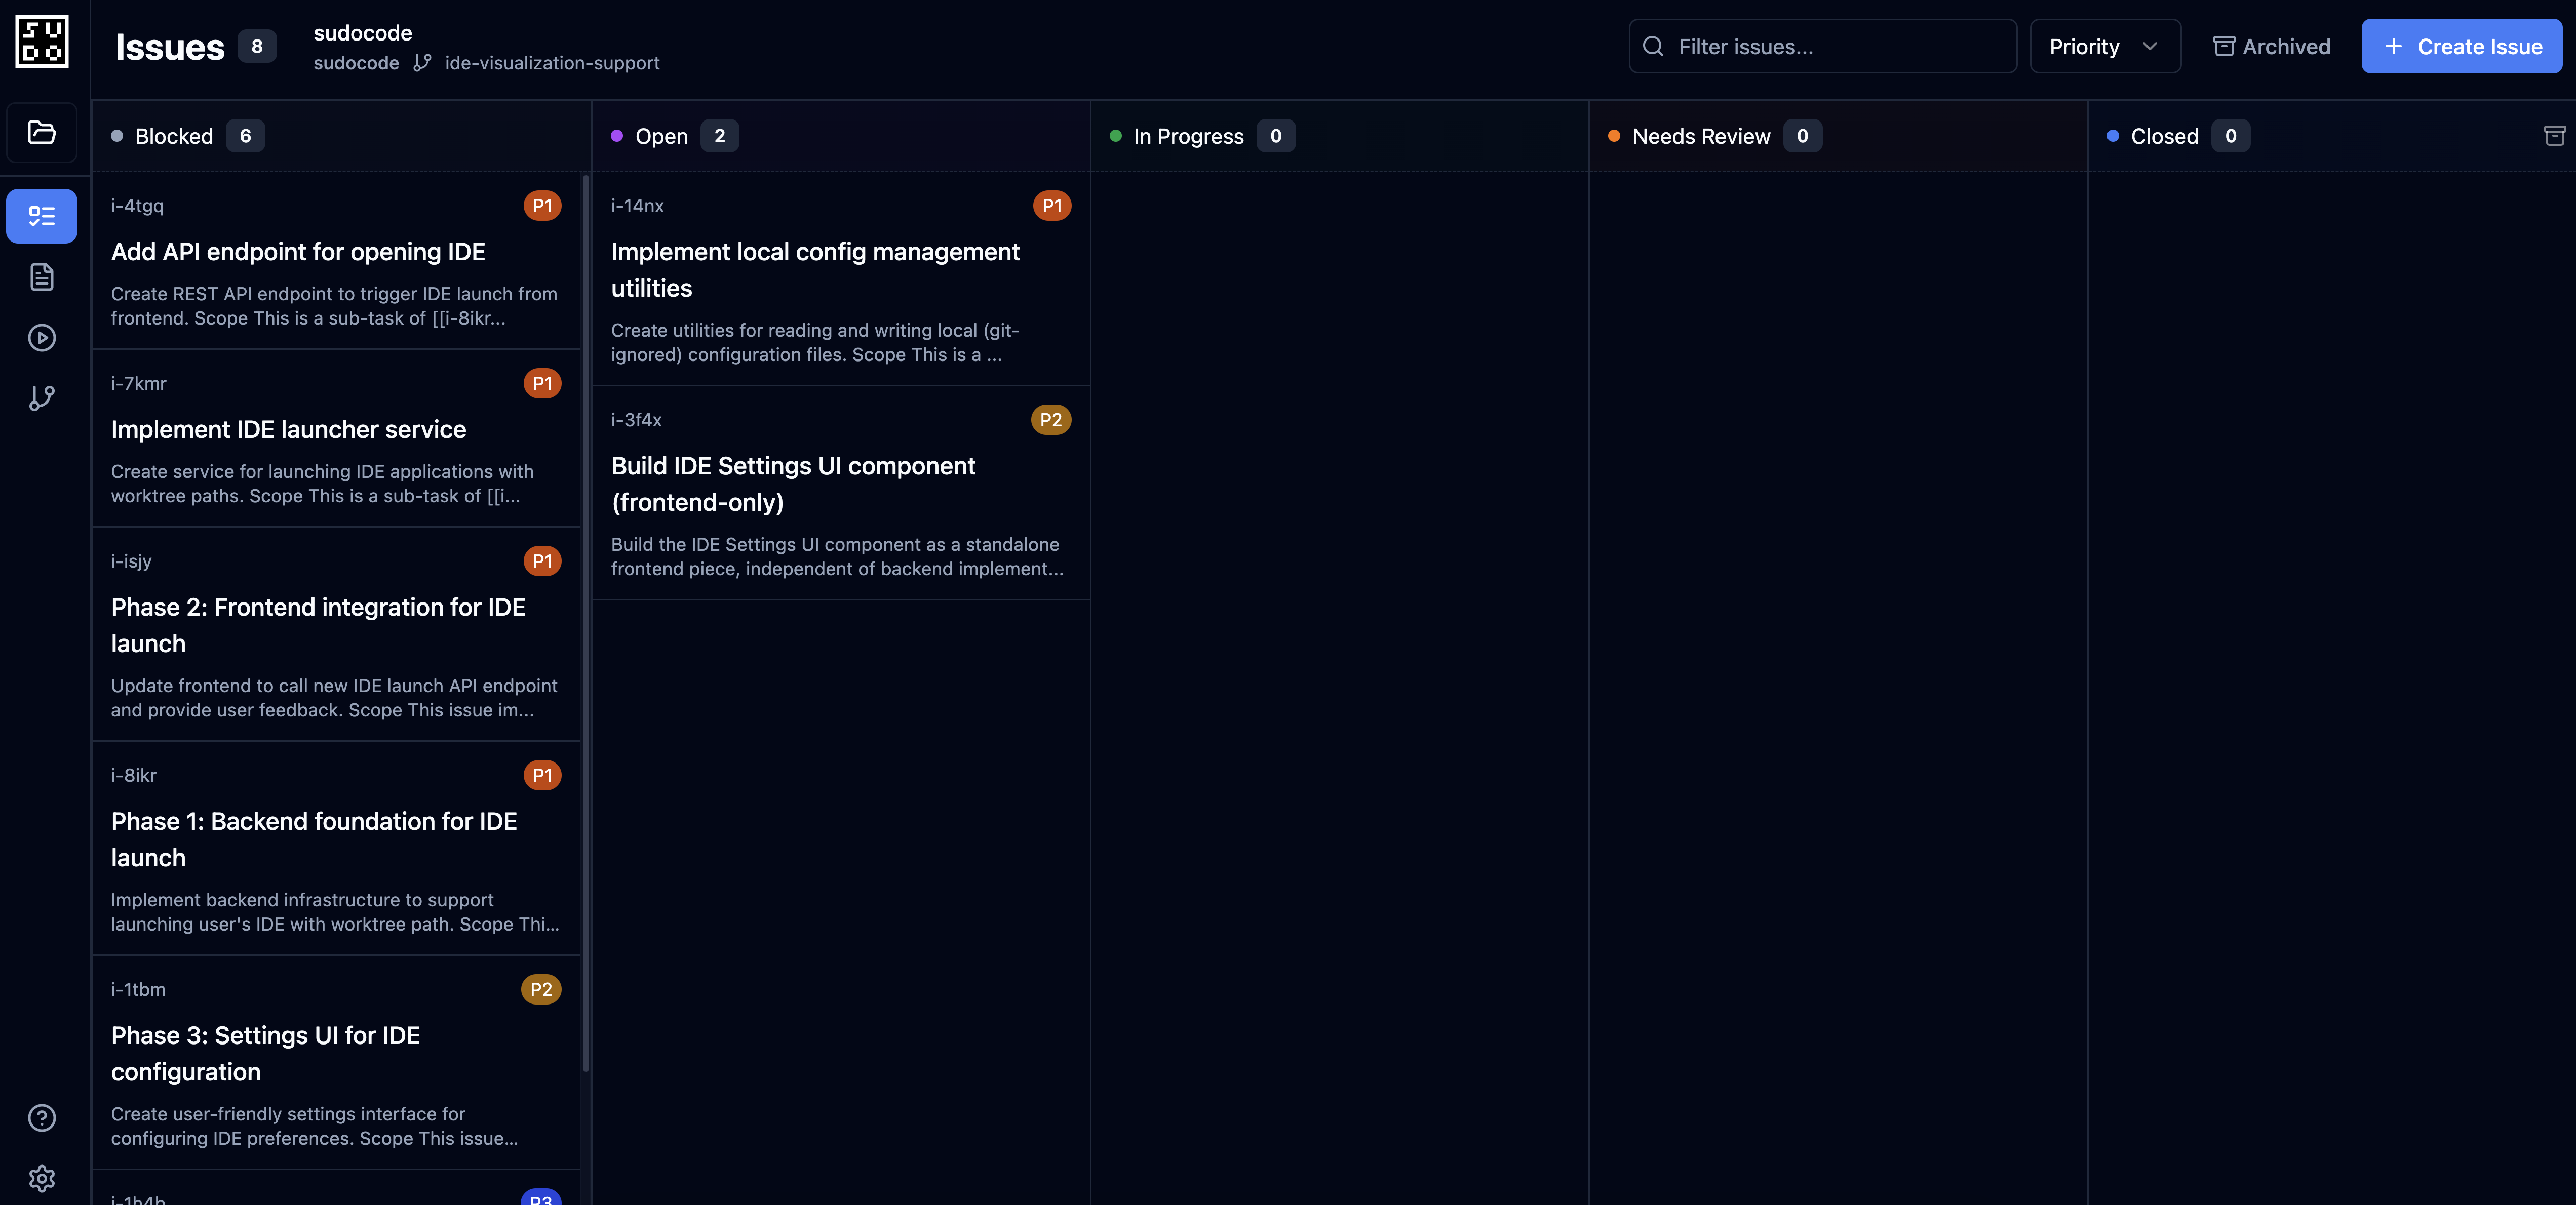
The sudocode web server provides a visual Kanban-style interface for managing issues. Unlike spec creation (which currently lives in the MCP server), issue management is fully supported in the web interface.
 ## Issue Board
The issue board shows all your issues organized by status:
* **Open** - Ready to work on (no blockers)
* **In Progress** - Currently being worked on
* **Blocked** - Waiting on dependencies
* **Closed** - Completed
### Drag and Drop
Simply drag issues between columns to update their status:
```
Open → In Progress (Start working)
In Progress → Closed (Complete work)
In Progress → Blocked (Hit a blocker)
Blocked → Open (Blocker resolved)
```
The web server automatically syncs these changes to the underlying `.sudocode/issues/` files.
## Filtering and Search
Use the filter controls to focus on specific work:
* **Priority**: Filter by priority level (0-4)
* **Tags**: Show only issues with specific tags
* **Search**: Search issue titles and descriptions
* **Assignee**: Filter by who's working on what
## Issue Creation
The current recommended way to create issues is through AI agents using the MCP server:
Learn how agents create and manage issues
The MCP server provides tools for:
* Creating new issues with `upsert_issue`
* Setting priority, status, tags, and descriptions
* Linking issues to specs they implement
* Creating parent-child issue relationships
**Web-based issue creation is in development.** For now, use the MCP server or CLI for creating issues, and the web interface for managing and dispatching them.
## Issue Linking
Connecting issues to specs and other issues is done through the MCP server:
Learn how to link issues using the MCP server
The MCP server's `link` tool creates relationships between entities:
**Common relationship types:**
* `implements` - Issue implements a spec or another issue
* `blocks` - Issue must complete before another can start
* `depends-on` - Issue depends on another completing first
* `related` - General relationship between entities
**Example:**
```
link(from_id="i-abc123", to_id="s-xyz789", type="implements")
```
This creates the dependency graph that determines which issues are ready to work on.
**Web-based issue linking is in development.** For now, use the MCP server or CLI for linking issues, and the web interface for managing and dispatching them.
## Dispatching Issues to Agents
Dispatch agents directly through the web-server, with the click of a button.
## Issue Board
The issue board shows all your issues organized by status:
* **Open** - Ready to work on (no blockers)
* **In Progress** - Currently being worked on
* **Blocked** - Waiting on dependencies
* **Closed** - Completed
### Drag and Drop
Simply drag issues between columns to update their status:
```
Open → In Progress (Start working)
In Progress → Closed (Complete work)
In Progress → Blocked (Hit a blocker)
Blocked → Open (Blocker resolved)
```
The web server automatically syncs these changes to the underlying `.sudocode/issues/` files.
## Filtering and Search
Use the filter controls to focus on specific work:
* **Priority**: Filter by priority level (0-4)
* **Tags**: Show only issues with specific tags
* **Search**: Search issue titles and descriptions
* **Assignee**: Filter by who's working on what
## Issue Creation
The current recommended way to create issues is through AI agents using the MCP server:
Learn how agents create and manage issues
The MCP server provides tools for:
* Creating new issues with `upsert_issue`
* Setting priority, status, tags, and descriptions
* Linking issues to specs they implement
* Creating parent-child issue relationships
**Web-based issue creation is in development.** For now, use the MCP server or CLI for creating issues, and the web interface for managing and dispatching them.
## Issue Linking
Connecting issues to specs and other issues is done through the MCP server:
Learn how to link issues using the MCP server
The MCP server's `link` tool creates relationships between entities:
**Common relationship types:**
* `implements` - Issue implements a spec or another issue
* `blocks` - Issue must complete before another can start
* `depends-on` - Issue depends on another completing first
* `related` - General relationship between entities
**Example:**
```
link(from_id="i-abc123", to_id="s-xyz789", type="implements")
```
This creates the dependency graph that determines which issues are ready to work on.
**Web-based issue linking is in development.** For now, use the MCP server or CLI for linking issues, and the web interface for managing and dispatching them.
## Dispatching Issues to Agents
Dispatch agents directly through the web-server, with the click of a button.
 ### How It Works
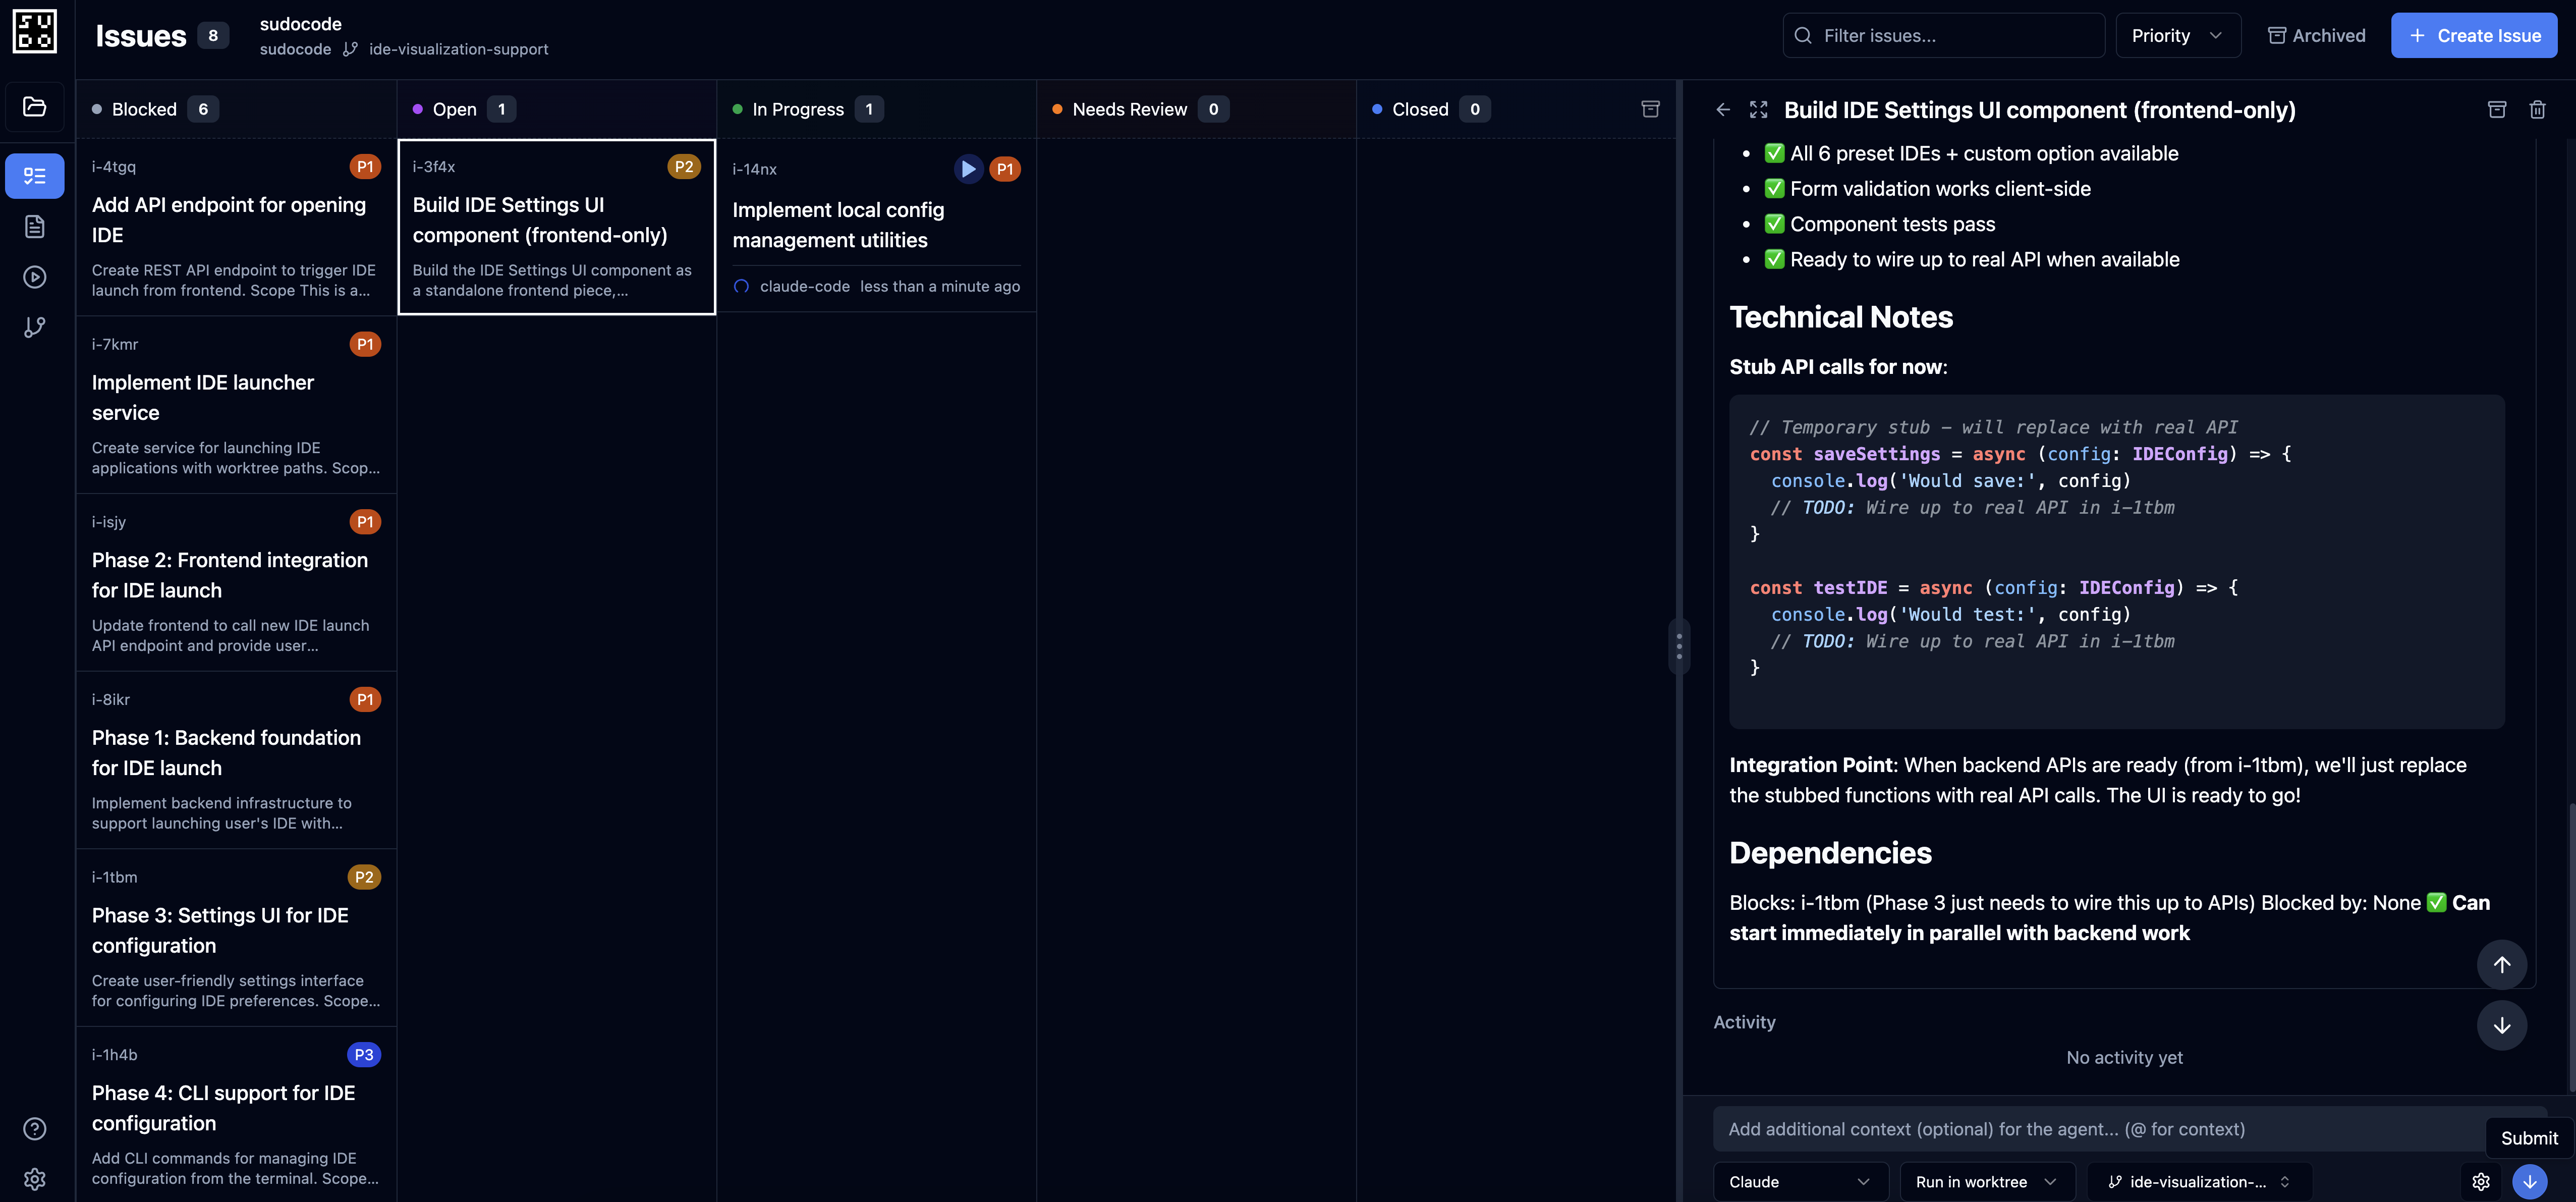
The dispatch workflow is simple and visual:
1. **Click an Issue**: Select any issue from the Kanban board to view its details in the right panel
2. **Configure Agent**: Choose your agent (Claude, custom agent, etc.) from the dropdown
3. **Configure Branch**: Have the agent run from a worktree (default) or from your local project directory.
4. **Add Context** (Optional): Provide additional instructions or context for the agent
5. **Press Enter or Click Start**: Launch the agent - it starts working immediately in the specified environment.
### Running Multiple Issues Simultaneously
The real power comes from parallel execution:
Click an issue and hit "Run in worktree" - the agent starts working
Immediately select another ready issue (no blockers)
Click Run again - a second agent starts in parallel
Watch the "Activity" section on each issue to see real-time progress across all running agents
**Key benefits:**
* Each agent can work in its own isolated worktree (no conflicts)
* Run as many agents as you want in parallel
* Web server coordinates and monitors all agents
* Real-time updates show progress across all work
* Agents automatically provide feedback when complete
### Agent Worktrees
When you click "Run in worktree", the web server:
1. Creates an isolated git worktree for the agent
2. Launches the agent with MCP access to the sudocode database
3. Provides the issue context and any additional instructions
4. Monitors the agent's progress in real-time
5. Collects feedback when the agent completes
This isolation means multiple agents can work on different issues simultaneously without interfering with each other or your main branch.
## Issue Details
Click any issue to see full details:
* **Description**: Full markdown content
* **Implements**: Which spec(s) and issue(s) this issue implements
* **Blocked By**: Dependencies that must complete first
* **Blocks**: Issues waiting on this one
* **Feedback**: Agent feedback from implementation
* **Related**: Connected issues and specs
## Best Practices
Issues can implement specs. Use the `implements` relationship to connect them.
```markdown theme={null}
[[s-abc123]]{implements}
```
Use `blocks` and `depends-on` relationships to establish work order. This helps the `ready` command show only unblocked work. Use the MCP server to manage these links.
Each issue should be a single, completable unit of work. Break large features into multiple issues.
When agents complete issues, they provide feedback on the spec. Review this to improve future specs.
## Workflow Example
Here's a typical workflow using the web interface:
Open the web interface and see all ready (unblocked) issues
Choose an issue to work on based on priority and dependencies
Click the Run button and configure which agent should work on it
Watch real-time updates as the agent works
When complete, review the agent's implementation and feedback
Either merge the issue results or continue the conversation with the agent to guide it further
## Real-Time Sync
The web server provides real-time updates via WebSockets:
* See changes as agents work
* File watcher detects external edits (CLI, direct file edits)
* Automatic sync across all connected browser clients
* No manual refresh needed
## Next Steps
Learn how agents create issues
Manage and review agent feedback
Use the command-line interface
Understand issue fundamentals
### How It Works
The dispatch workflow is simple and visual:
1. **Click an Issue**: Select any issue from the Kanban board to view its details in the right panel
2. **Configure Agent**: Choose your agent (Claude, custom agent, etc.) from the dropdown
3. **Configure Branch**: Have the agent run from a worktree (default) or from your local project directory.
4. **Add Context** (Optional): Provide additional instructions or context for the agent
5. **Press Enter or Click Start**: Launch the agent - it starts working immediately in the specified environment.
### Running Multiple Issues Simultaneously
The real power comes from parallel execution:
Click an issue and hit "Run in worktree" - the agent starts working
Immediately select another ready issue (no blockers)
Click Run again - a second agent starts in parallel
Watch the "Activity" section on each issue to see real-time progress across all running agents
**Key benefits:**
* Each agent can work in its own isolated worktree (no conflicts)
* Run as many agents as you want in parallel
* Web server coordinates and monitors all agents
* Real-time updates show progress across all work
* Agents automatically provide feedback when complete
### Agent Worktrees
When you click "Run in worktree", the web server:
1. Creates an isolated git worktree for the agent
2. Launches the agent with MCP access to the sudocode database
3. Provides the issue context and any additional instructions
4. Monitors the agent's progress in real-time
5. Collects feedback when the agent completes
This isolation means multiple agents can work on different issues simultaneously without interfering with each other or your main branch.
## Issue Details
Click any issue to see full details:
* **Description**: Full markdown content
* **Implements**: Which spec(s) and issue(s) this issue implements
* **Blocked By**: Dependencies that must complete first
* **Blocks**: Issues waiting on this one
* **Feedback**: Agent feedback from implementation
* **Related**: Connected issues and specs
## Best Practices
Issues can implement specs. Use the `implements` relationship to connect them.
```markdown theme={null}
[[s-abc123]]{implements}
```
Use `blocks` and `depends-on` relationships to establish work order. This helps the `ready` command show only unblocked work. Use the MCP server to manage these links.
Each issue should be a single, completable unit of work. Break large features into multiple issues.
When agents complete issues, they provide feedback on the spec. Review this to improve future specs.
## Workflow Example
Here's a typical workflow using the web interface:
Open the web interface and see all ready (unblocked) issues
Choose an issue to work on based on priority and dependencies
Click the Run button and configure which agent should work on it
Watch real-time updates as the agent works
When complete, review the agent's implementation and feedback
Either merge the issue results or continue the conversation with the agent to guide it further
## Real-Time Sync
The web server provides real-time updates via WebSockets:
* See changes as agents work
* File watcher detects external edits (CLI, direct file edits)
* Automatic sync across all connected browser clients
* No manual refresh needed
## Next Steps
Learn how agents create issues
Manage and review agent feedback
Use the command-line interface
Understand issue fundamentals