Step 1: Install sudocode
Step 2: Initialize project
Step 3: Start the web server
http://localhost:3000. Keep this terminal running.
Step 4: Set up your agent (Optional)
Open a new terminal and set up the sudocode MCP integration with your AI agent.This step is optional for all agents except for Cursor CLI.If you want to interact with sudocode directly in your own CLI agent, follow these instructions to do so.
Claude
Claude
Version requirement: Make sure you’re running Claude Code version 2.0.35 or higher.Check your version:If your version is lower than 2.0.35, update Claude Code:
1
Add sudocode plugin from marketplace and install
Expected output
Expected output
2
Verify installation
Start Claude Code and test the integration:Then ask Claude:If you see Claude using tools like
plugin:sudocode:sudocode - upsert_issue, the setup is working!Claude Code is now configured with sudocode! The plugin automatically handles MCP server configuration and working directory detection.
Codex
Codex
1
Add MCP Server
Add the sudocode MCP server to Codex:
2
Verify Setup
Test that sudocode is working:If the setup is working, you’ll see Codex use the sudocode MCP tools to create the issue:
Expected output
Expected output
Codex is now configured with sudocode!
Cursor CLI (Required)
Cursor CLI (Required)
Cursor CLI uses an MCP configuration file in the
.cursor directory of your project root.1
Create .cursor directory
In your project root directory, create a
.cursor directory if it doesn’t exist:2
Create or edit .cursor/mcp.json
Open or create
.cursor/mcp.json and add the following configuration:If you already have other MCP servers configured, just add the
"sudocode-mcp" entry inside the existing "mcpServers" object.3
Enable the MCP Server (IDE Only)
Note, this step is only relevant if you want to communicate with sudocode inside of the cursor IDE, in addition to the CLI.After creating the configuration, enable the MCP server in Cursor:Option A: Click Enable (when prompted)When Cursor detects the new MCP configuration, an Enable button will appear on the left side. Click it to activate the sudocode MCP server.

- Go to Cursor > Settings > Cursor Settings
- Enable the MCP server
Restart may be required to see the MCP Server under the list of tools! Once you enable the MCP server, it will be active immediately.
4
Verify Setup
CLI Flow
CLI Flow
Test that sudocode is working via the Cursor CLI:If the setup is working, you’ll see Cursor use the sudocode MCP tools:
Expected output
Expected output
IDE Flow
IDE Flow
If you want to use sudocode within the Cursor IDE (not just the CLI), you can test it by asking Cursor to create an issue:If the setup is working, you’ll see Cursor use the sudocode MCP tools: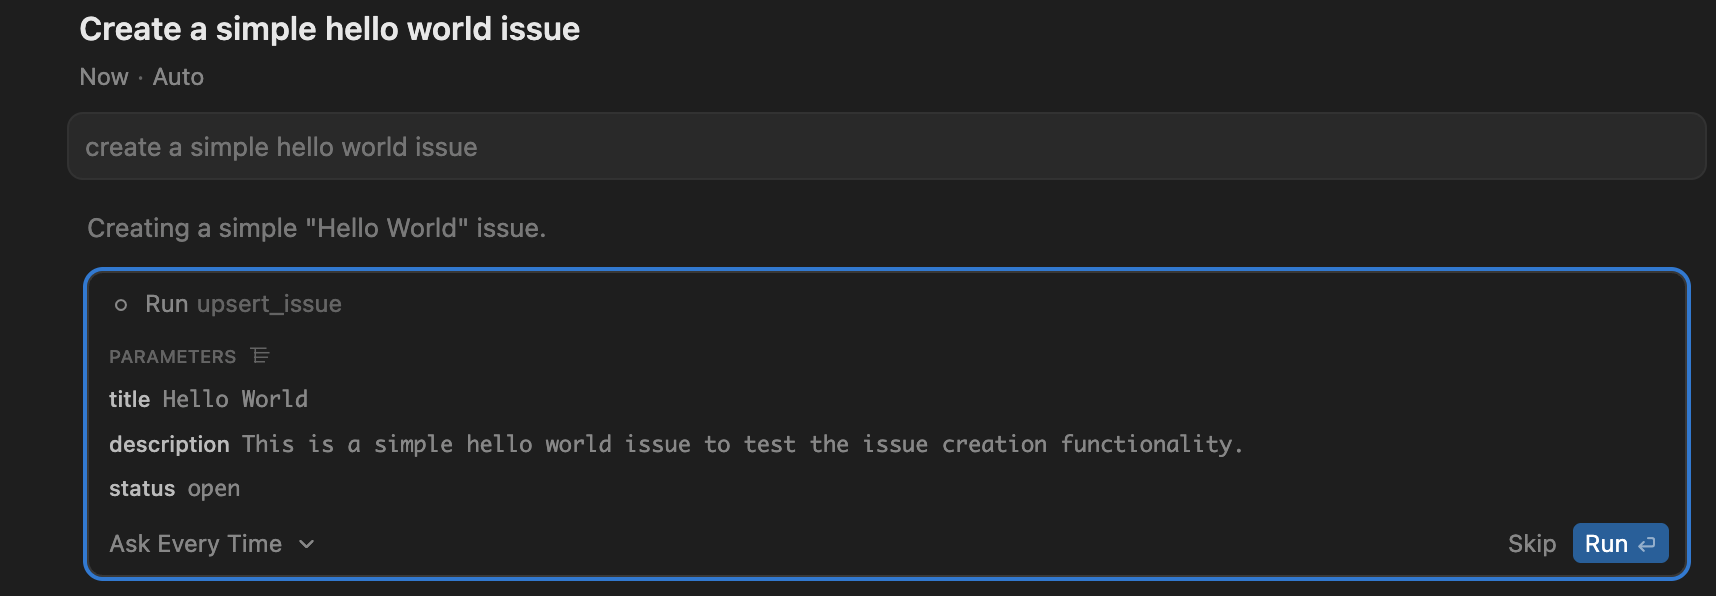
Cursor is now configured with sudocode! The MCP server will automatically run when you use sudocode tools in Cursor.
GitHub Copilot CLI
GitHub Copilot CLI
1
Start GitHub Copilot CLI
Start the Copilot CLI:
2
Configure MCP Server
In the Copilot CLI, run:This will open the MCP server configuration screen:Fill in the following:
- Server Name:
sudocode-mcp - Server Type: Select
[1] Local(default) - Command:
sudocode-mcp - Tools:
*(default, for all tools)
Ctrl+S to save the server configuration.3
Verify Setup
Test that sudocode is working:If the setup is working, you’ll see a prompt asking to approve the tool call:
Expected output
Expected output
GitHub Copilot CLI is now configured with sudocode!
Optional IDE Support
Optional IDE Support
If you want to use sudocode within VS Code (not just the CLI), you can set it up using the Command Palette or by creating a configuration file:Method 1: Command Palette (Recommended)Method 2: Manual ConfigurationAlternatively, create Then reload VS Code to apply the configuration.Verify SetupTest that MCP tools are available in VS Code by opening GitHub Copilot and asking:
1
Open Command Palette
Press 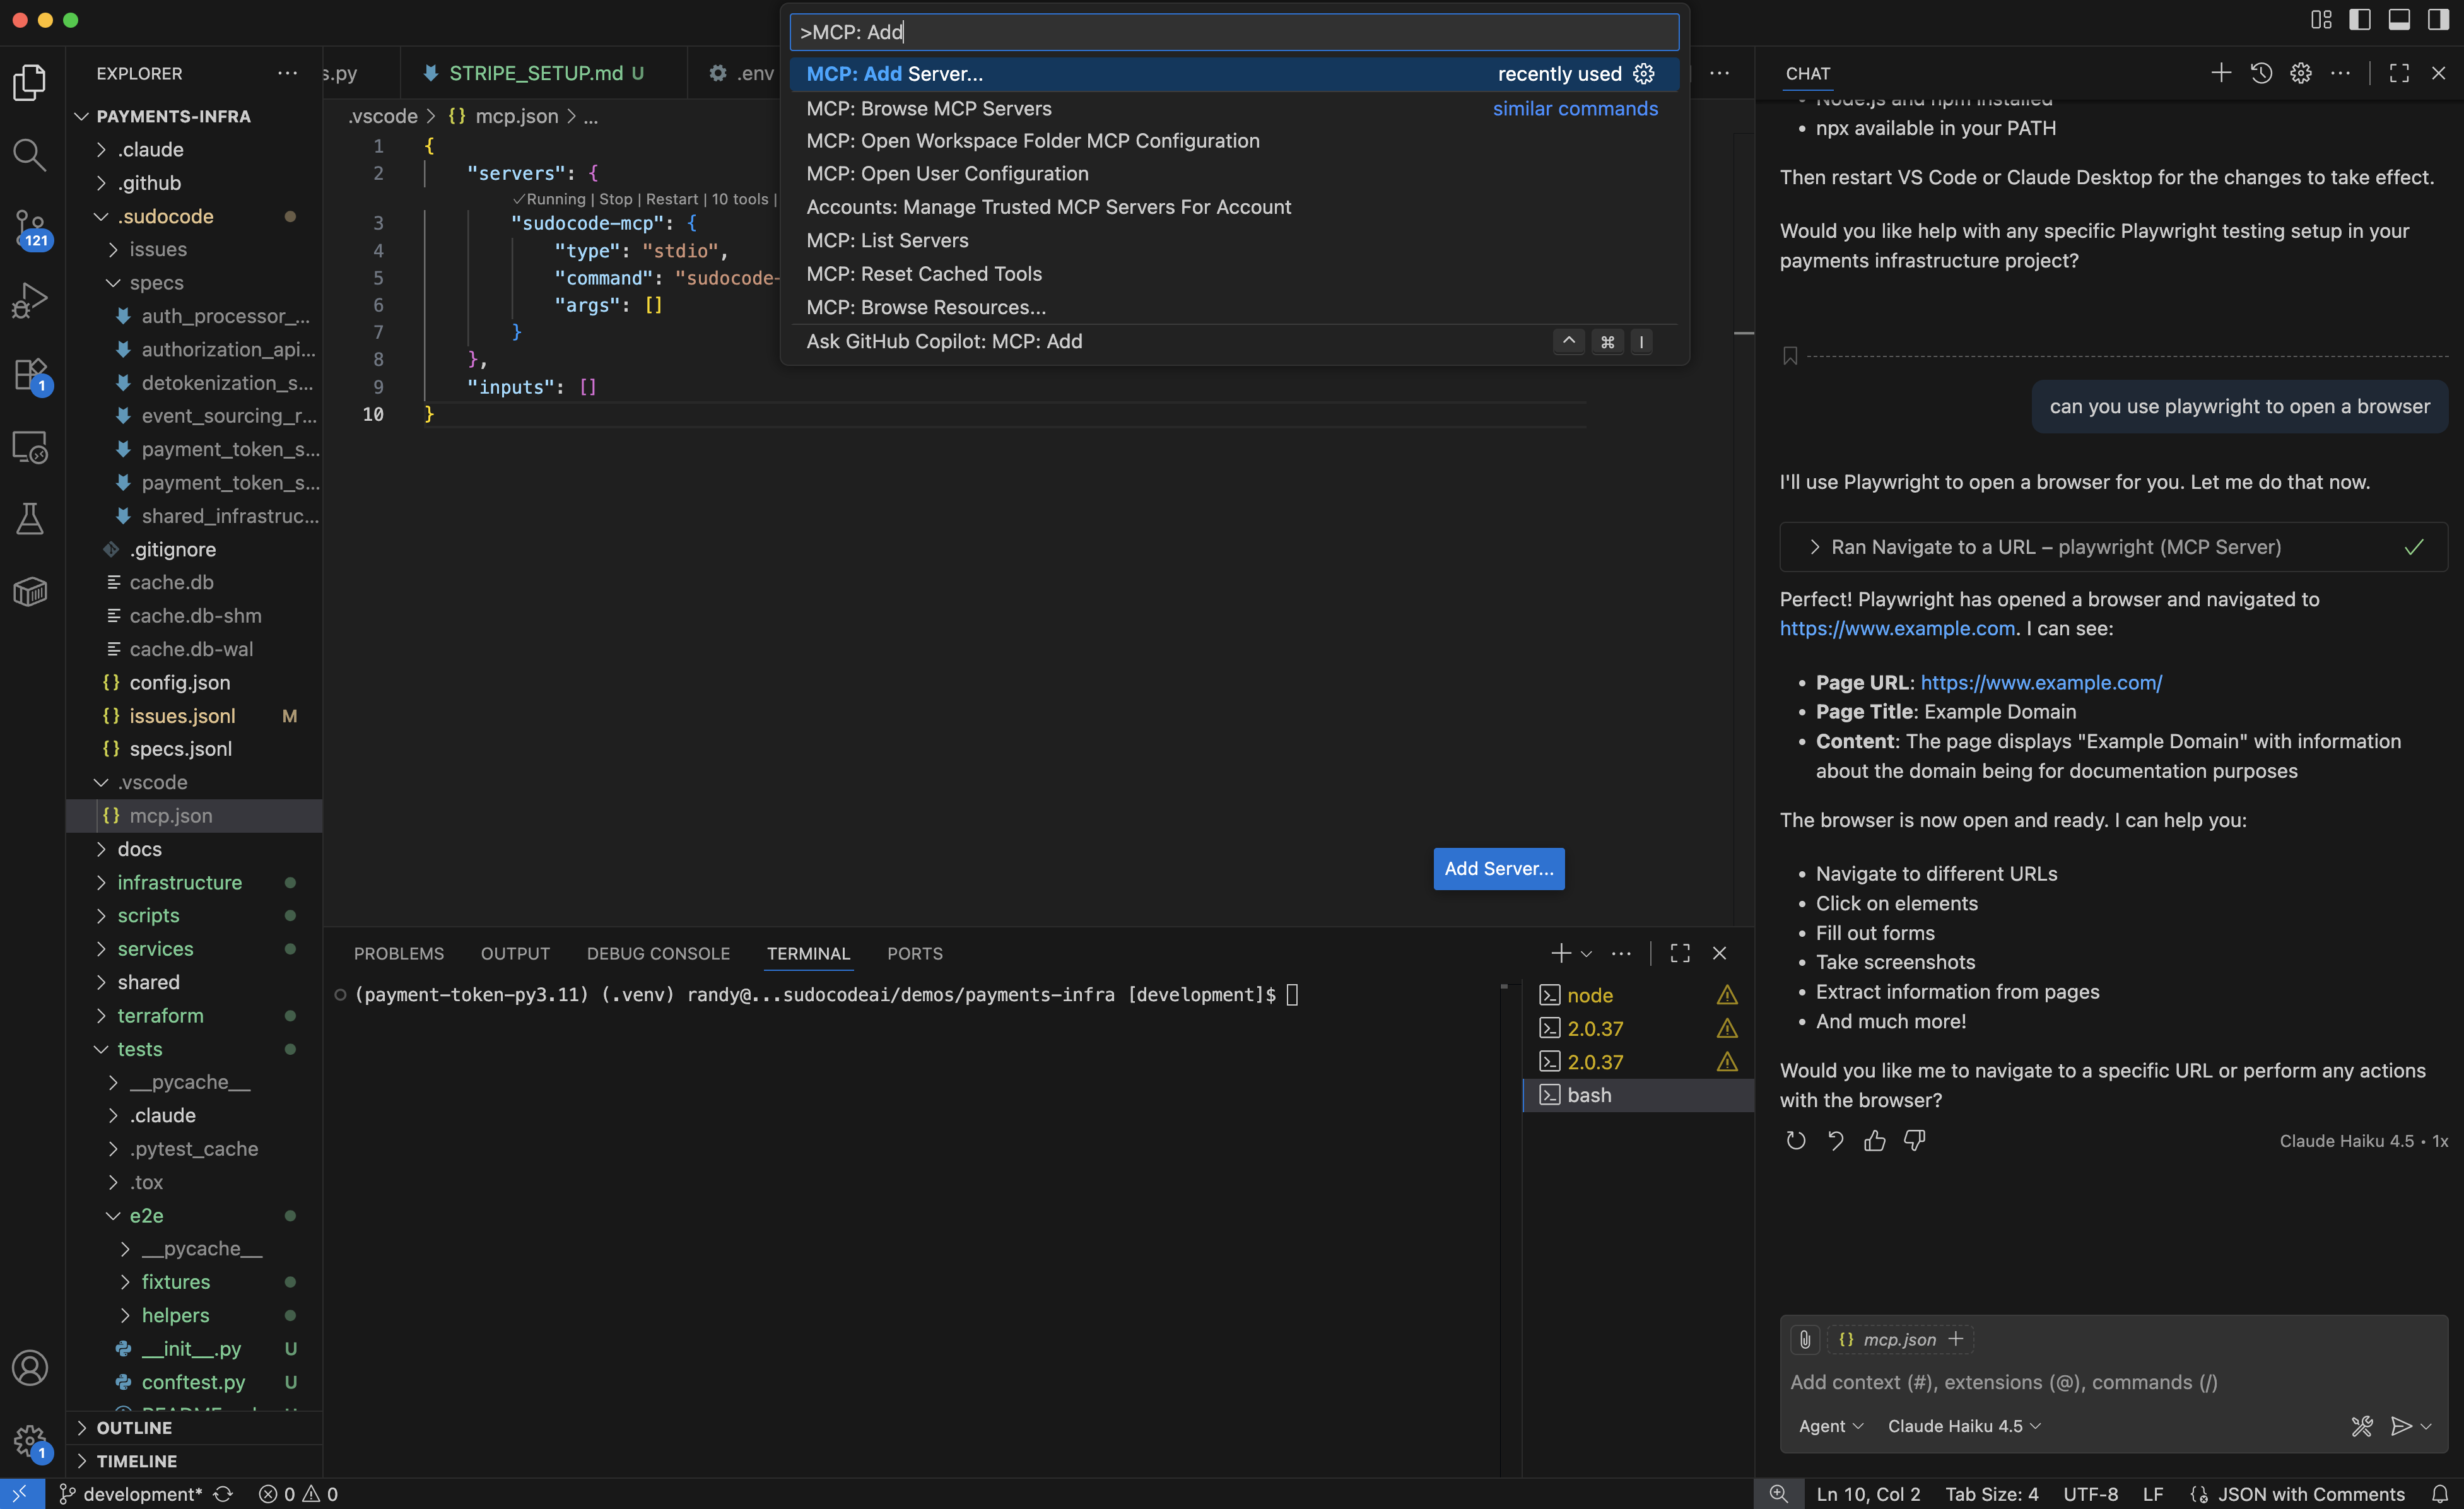
Cmd+Shift+P (macOS) or Ctrl+Shift+P (Windows/Linux) to open the Command Palette.Type and select:2
Select Command (stdio)
When prompted for the server type, select Command (stdio).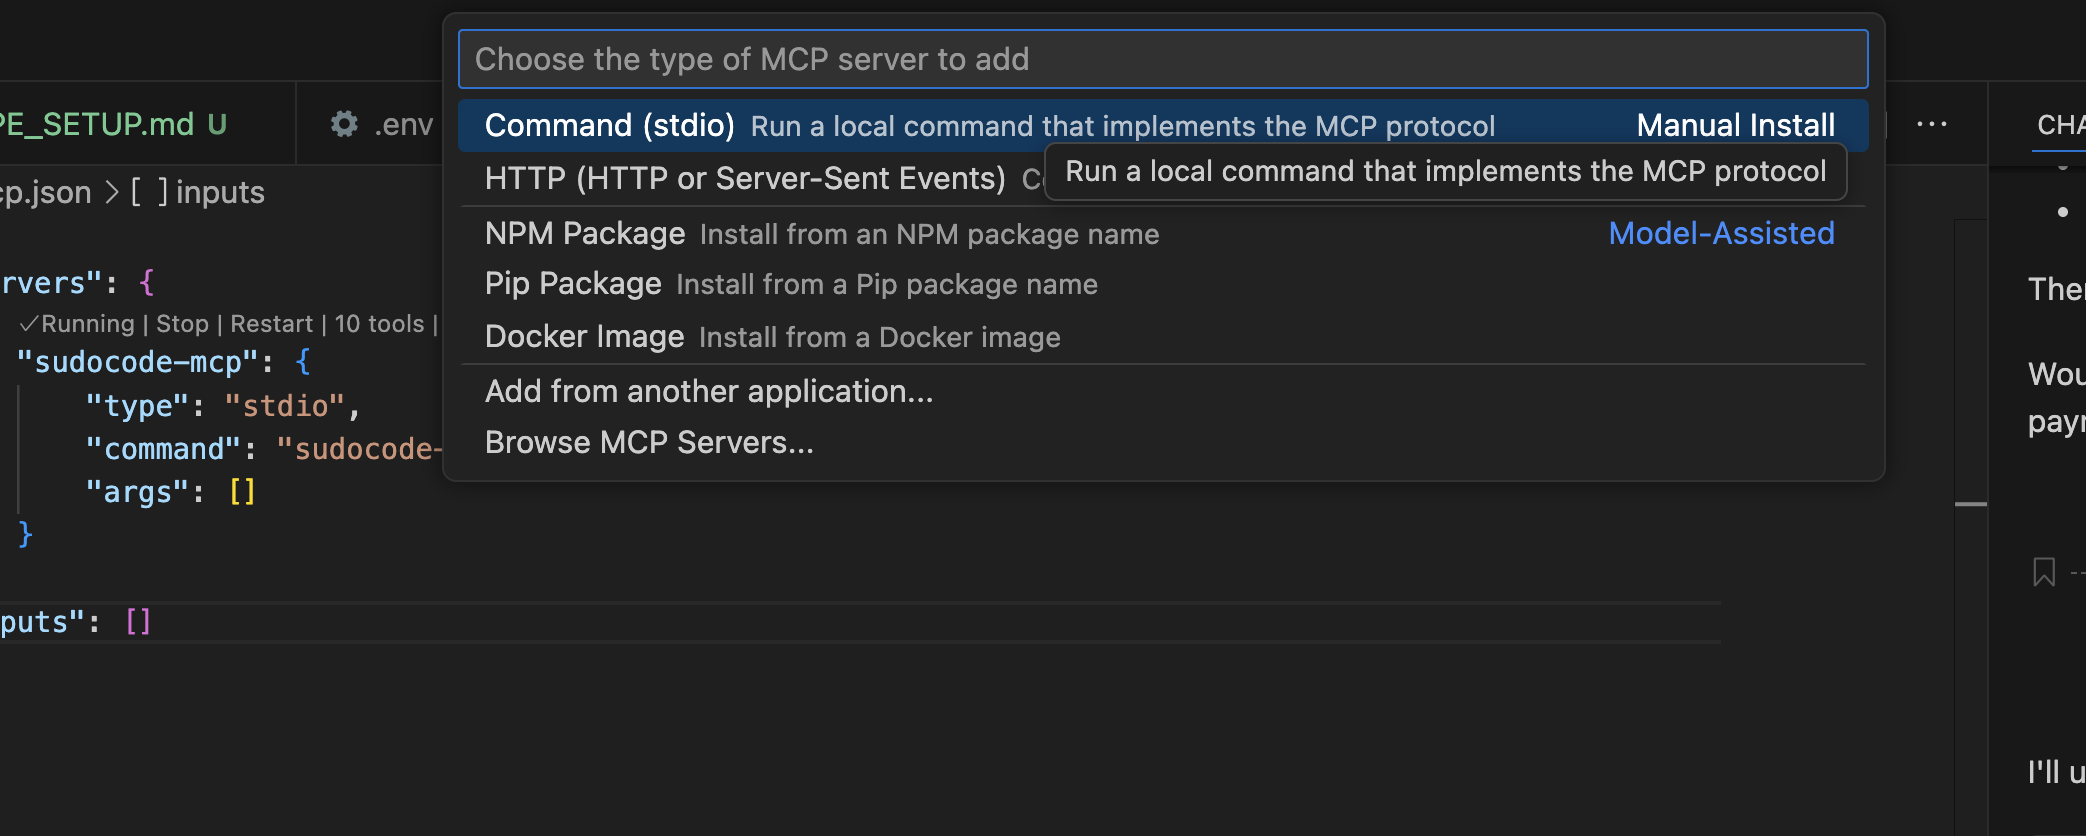
3
Enter command
Type the command: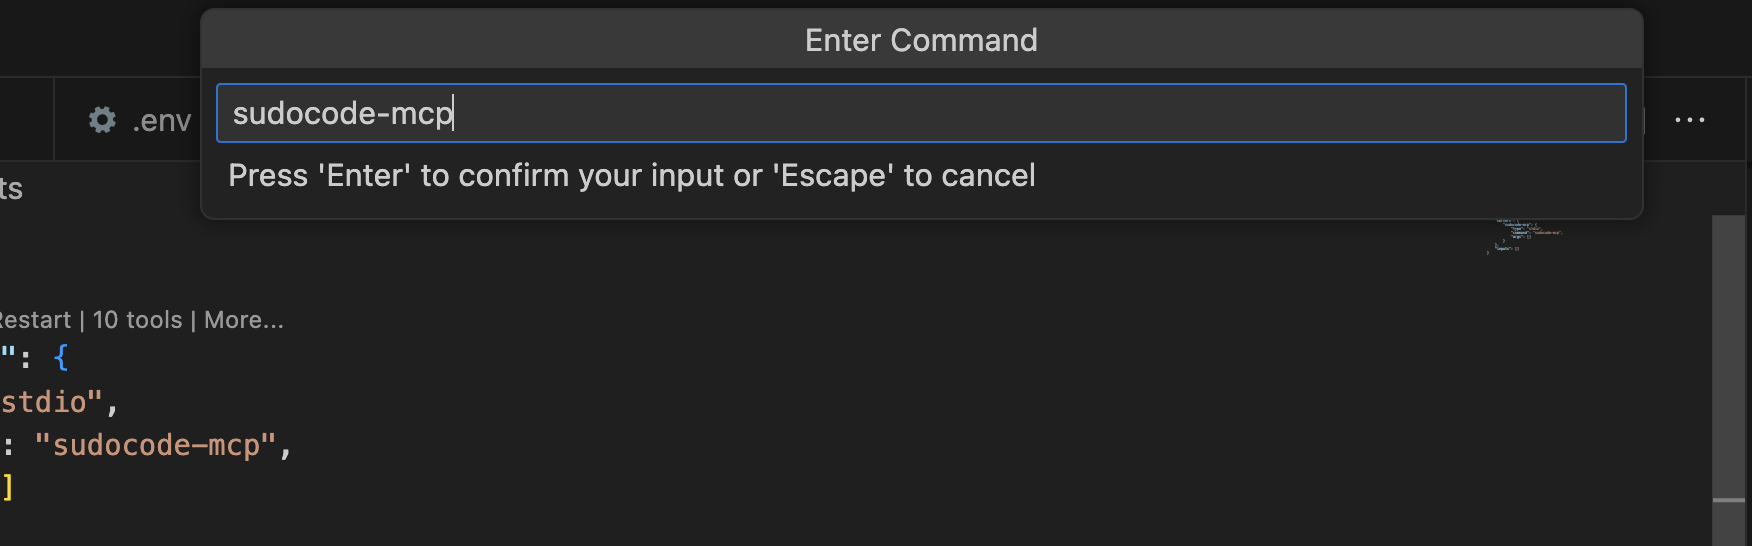
4
Name the server
Give it a name (we recommend 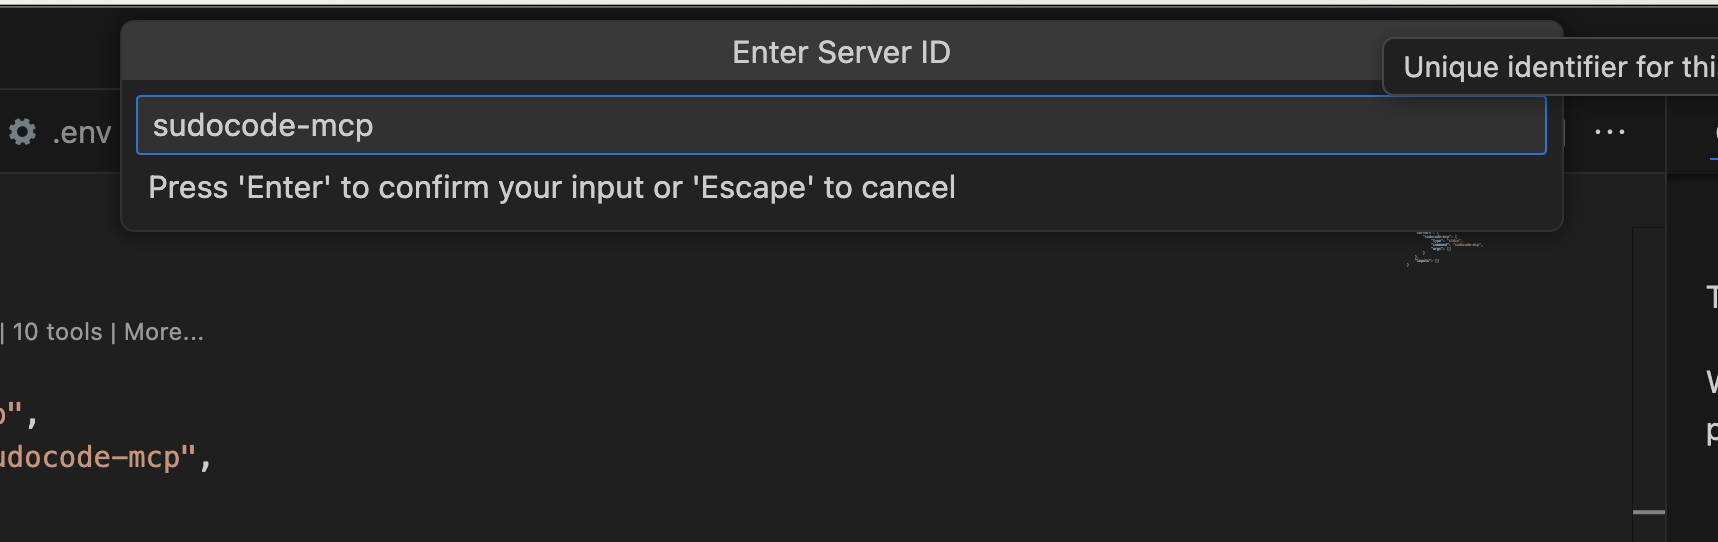
sudocode-mcp).5
Choose Workspace
When prompted to choose between Global or Workspace, select Workspace.
6
Verify configuration
Check that You should see something like this: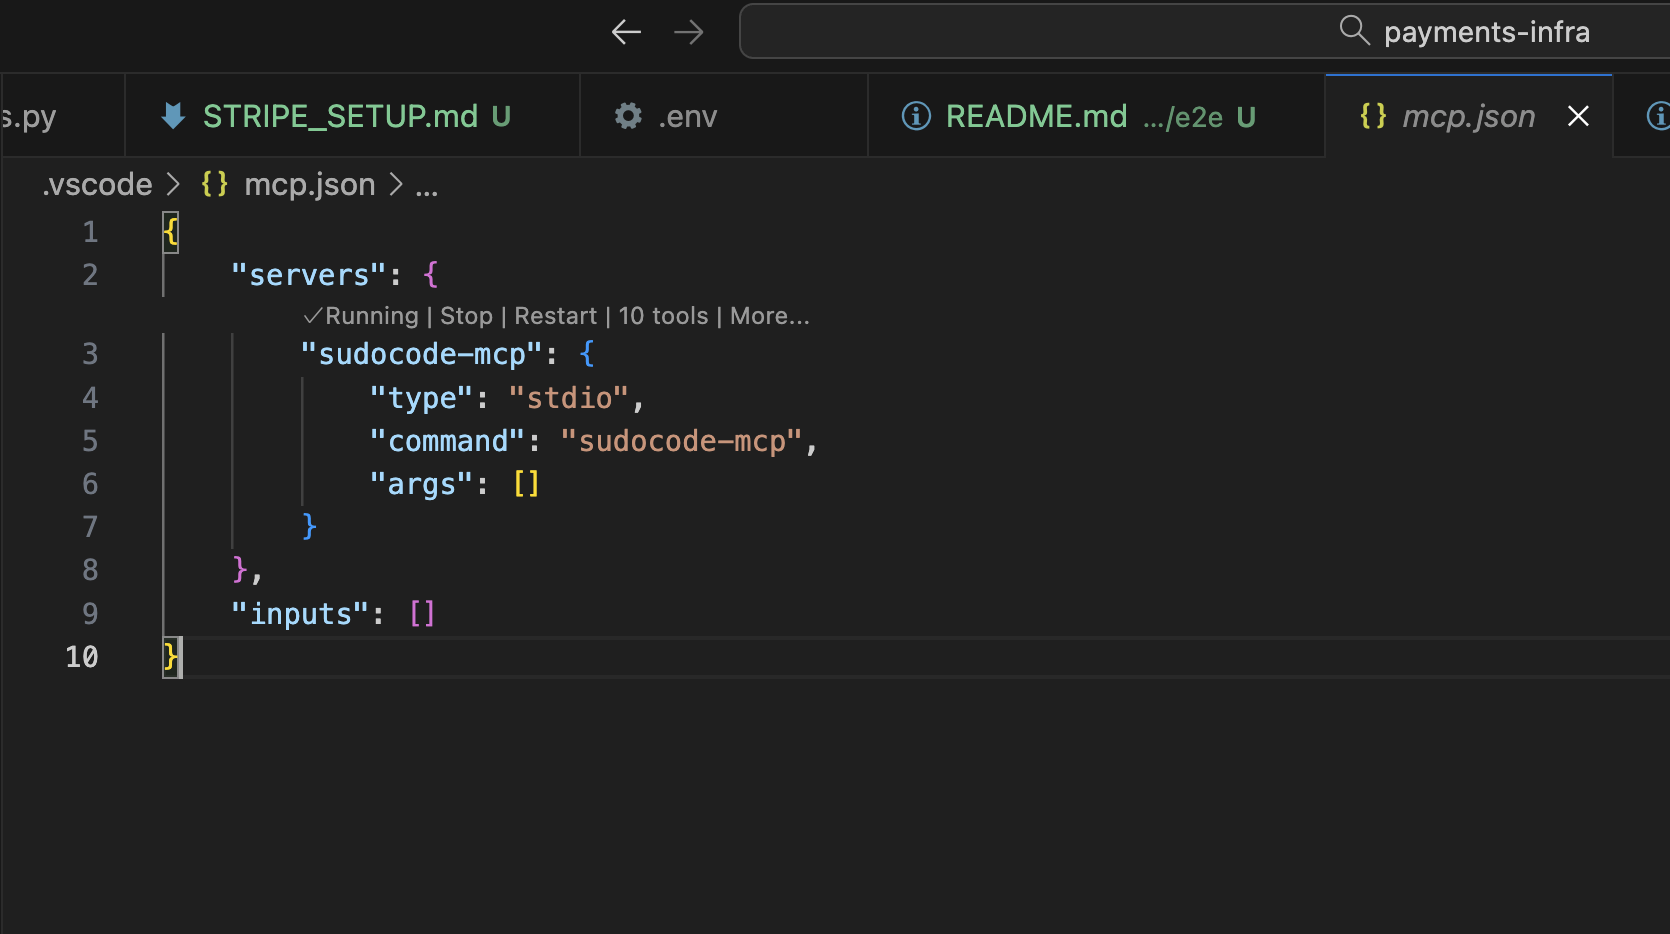
.vscode/mcp.json was created in your project root:.vscode/mcp.json manually:You should see a tool call from sudocode. You’re all set!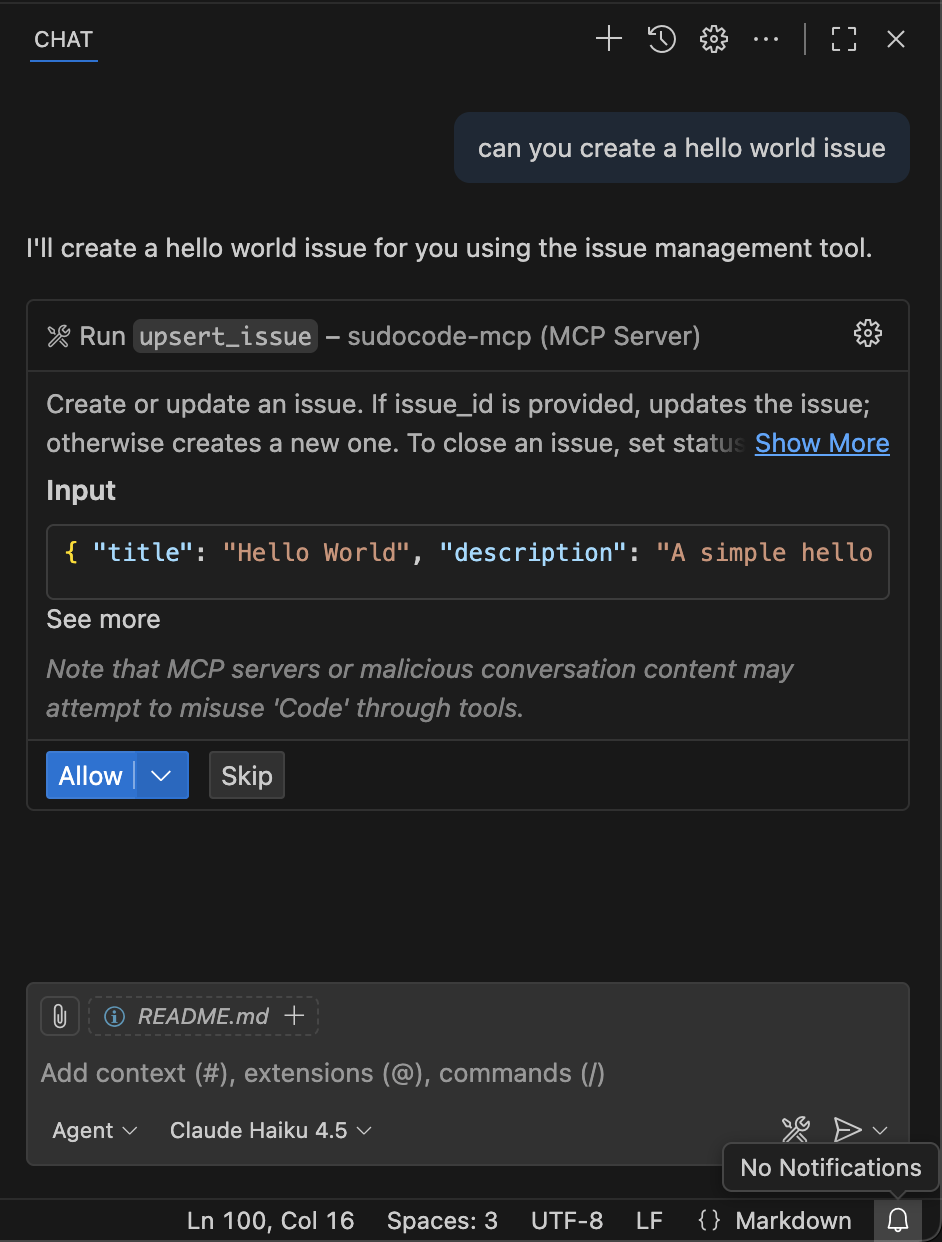
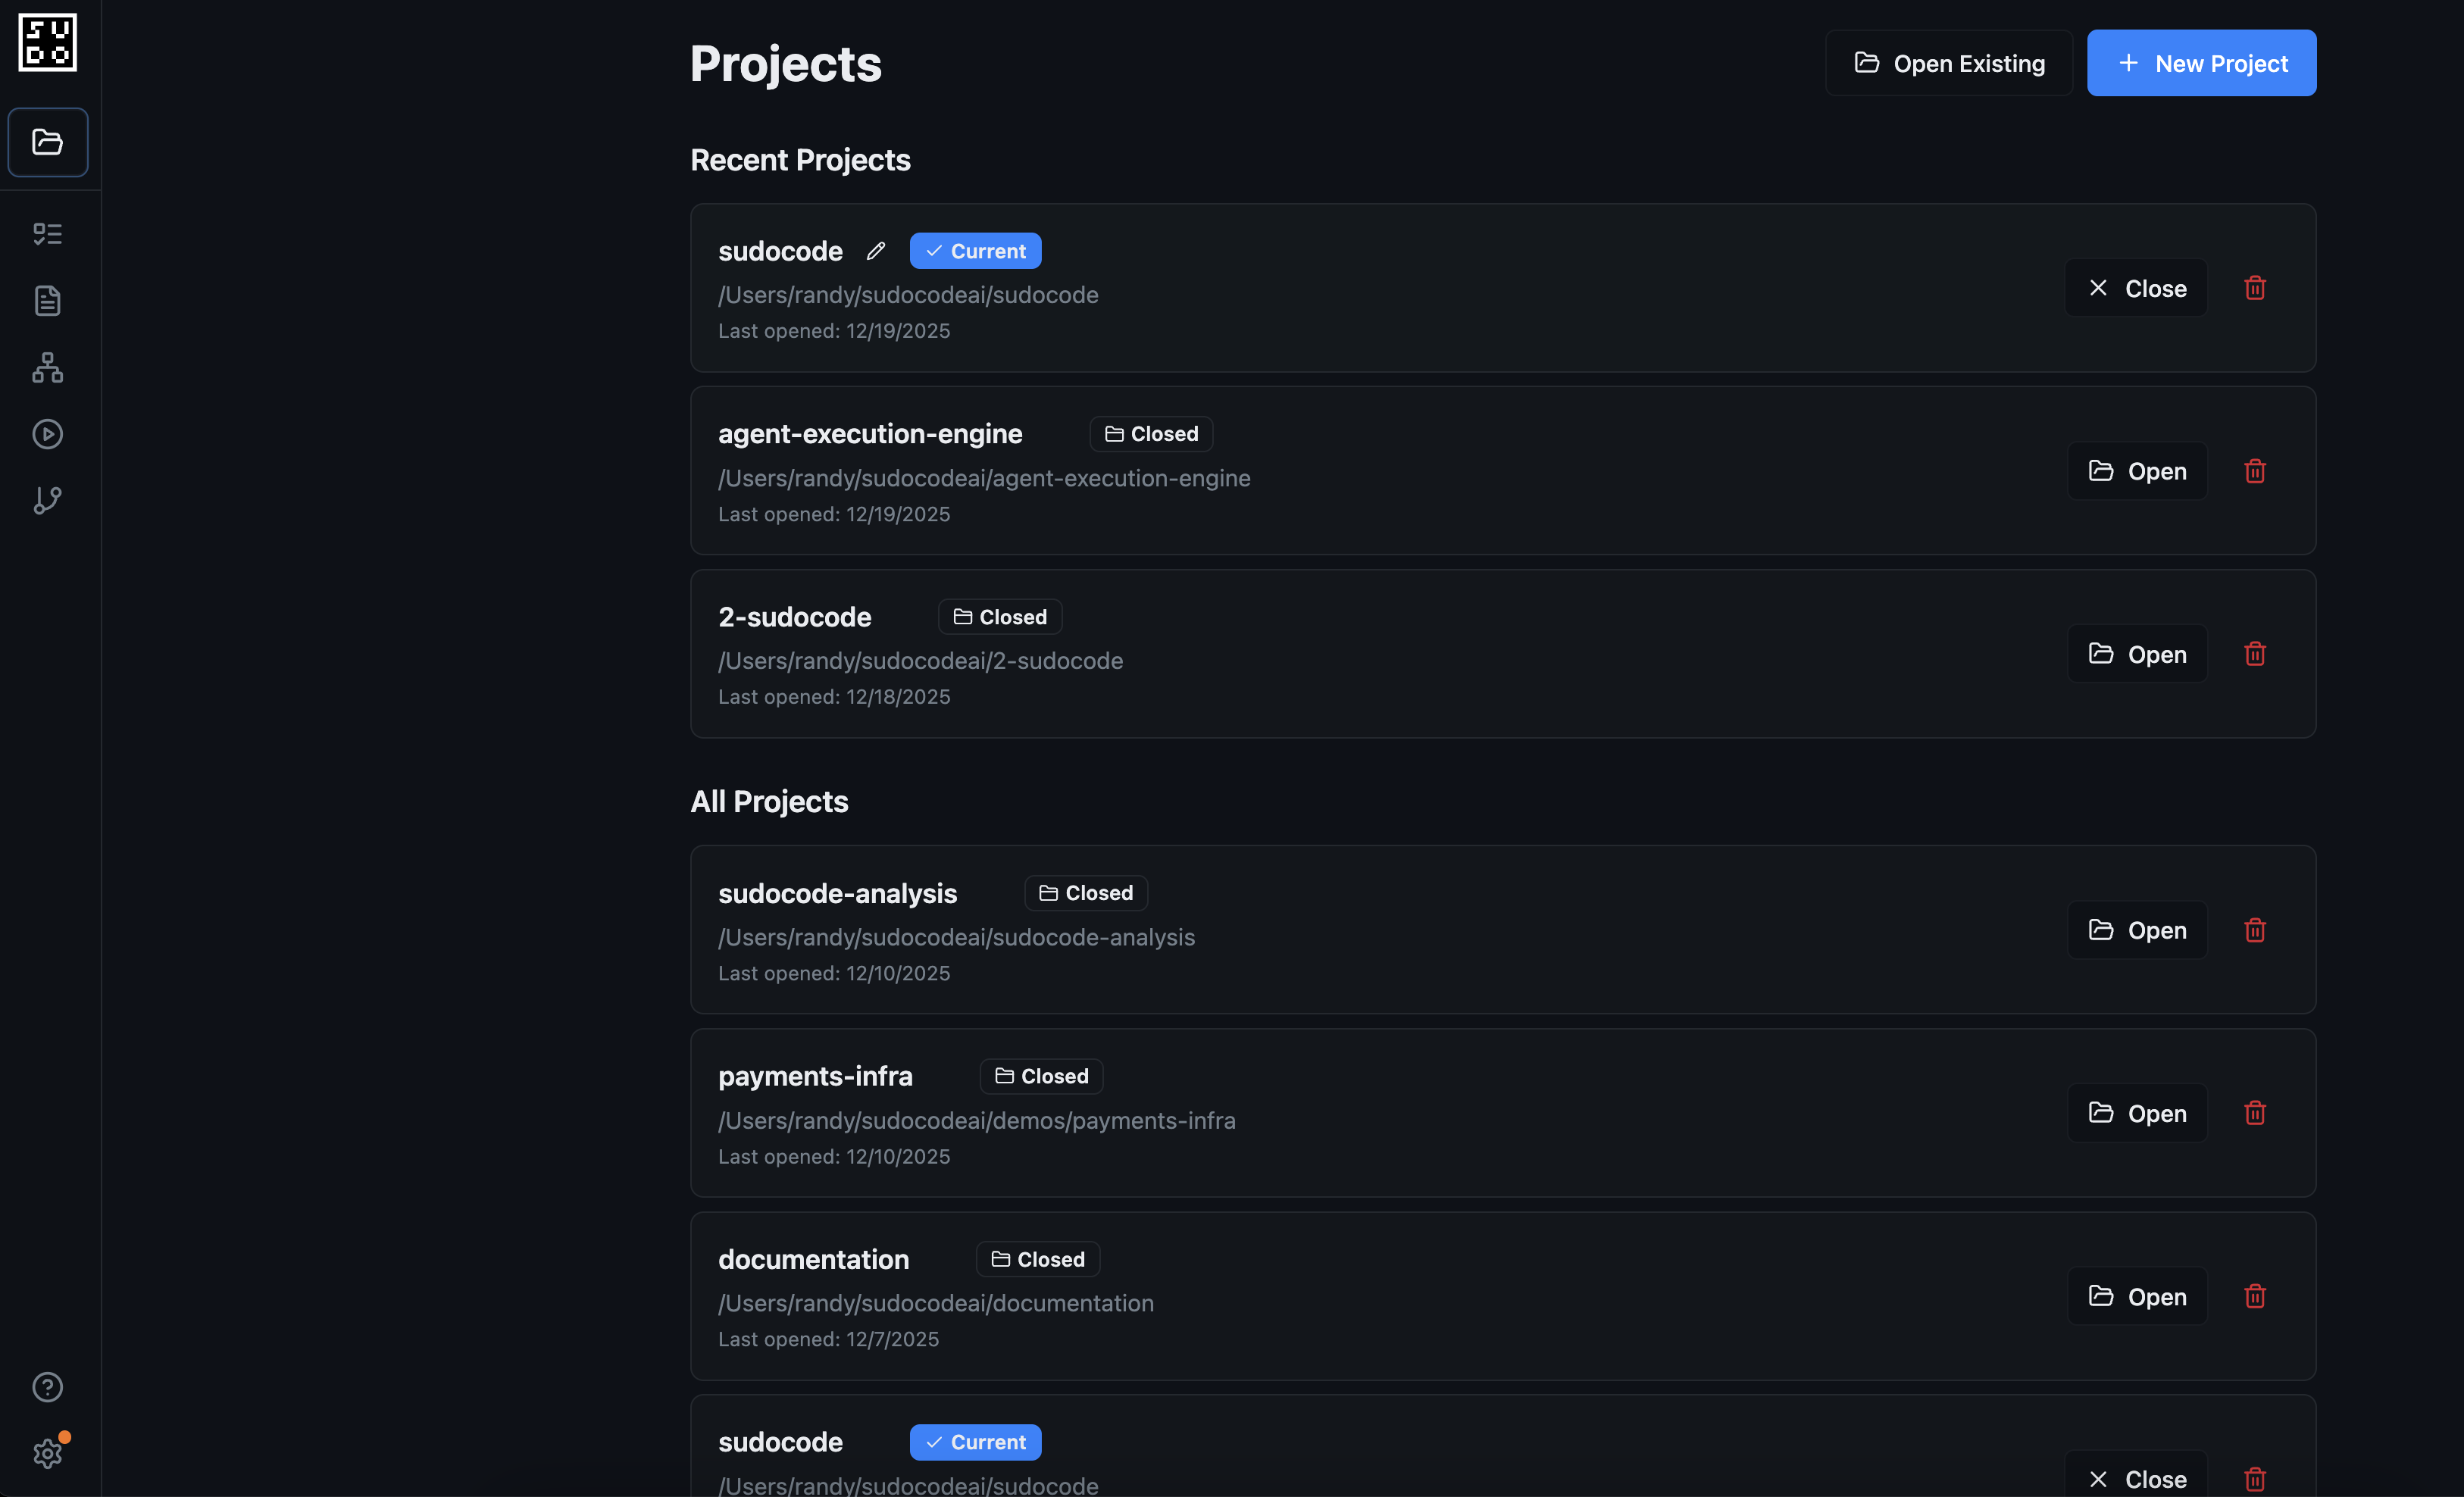
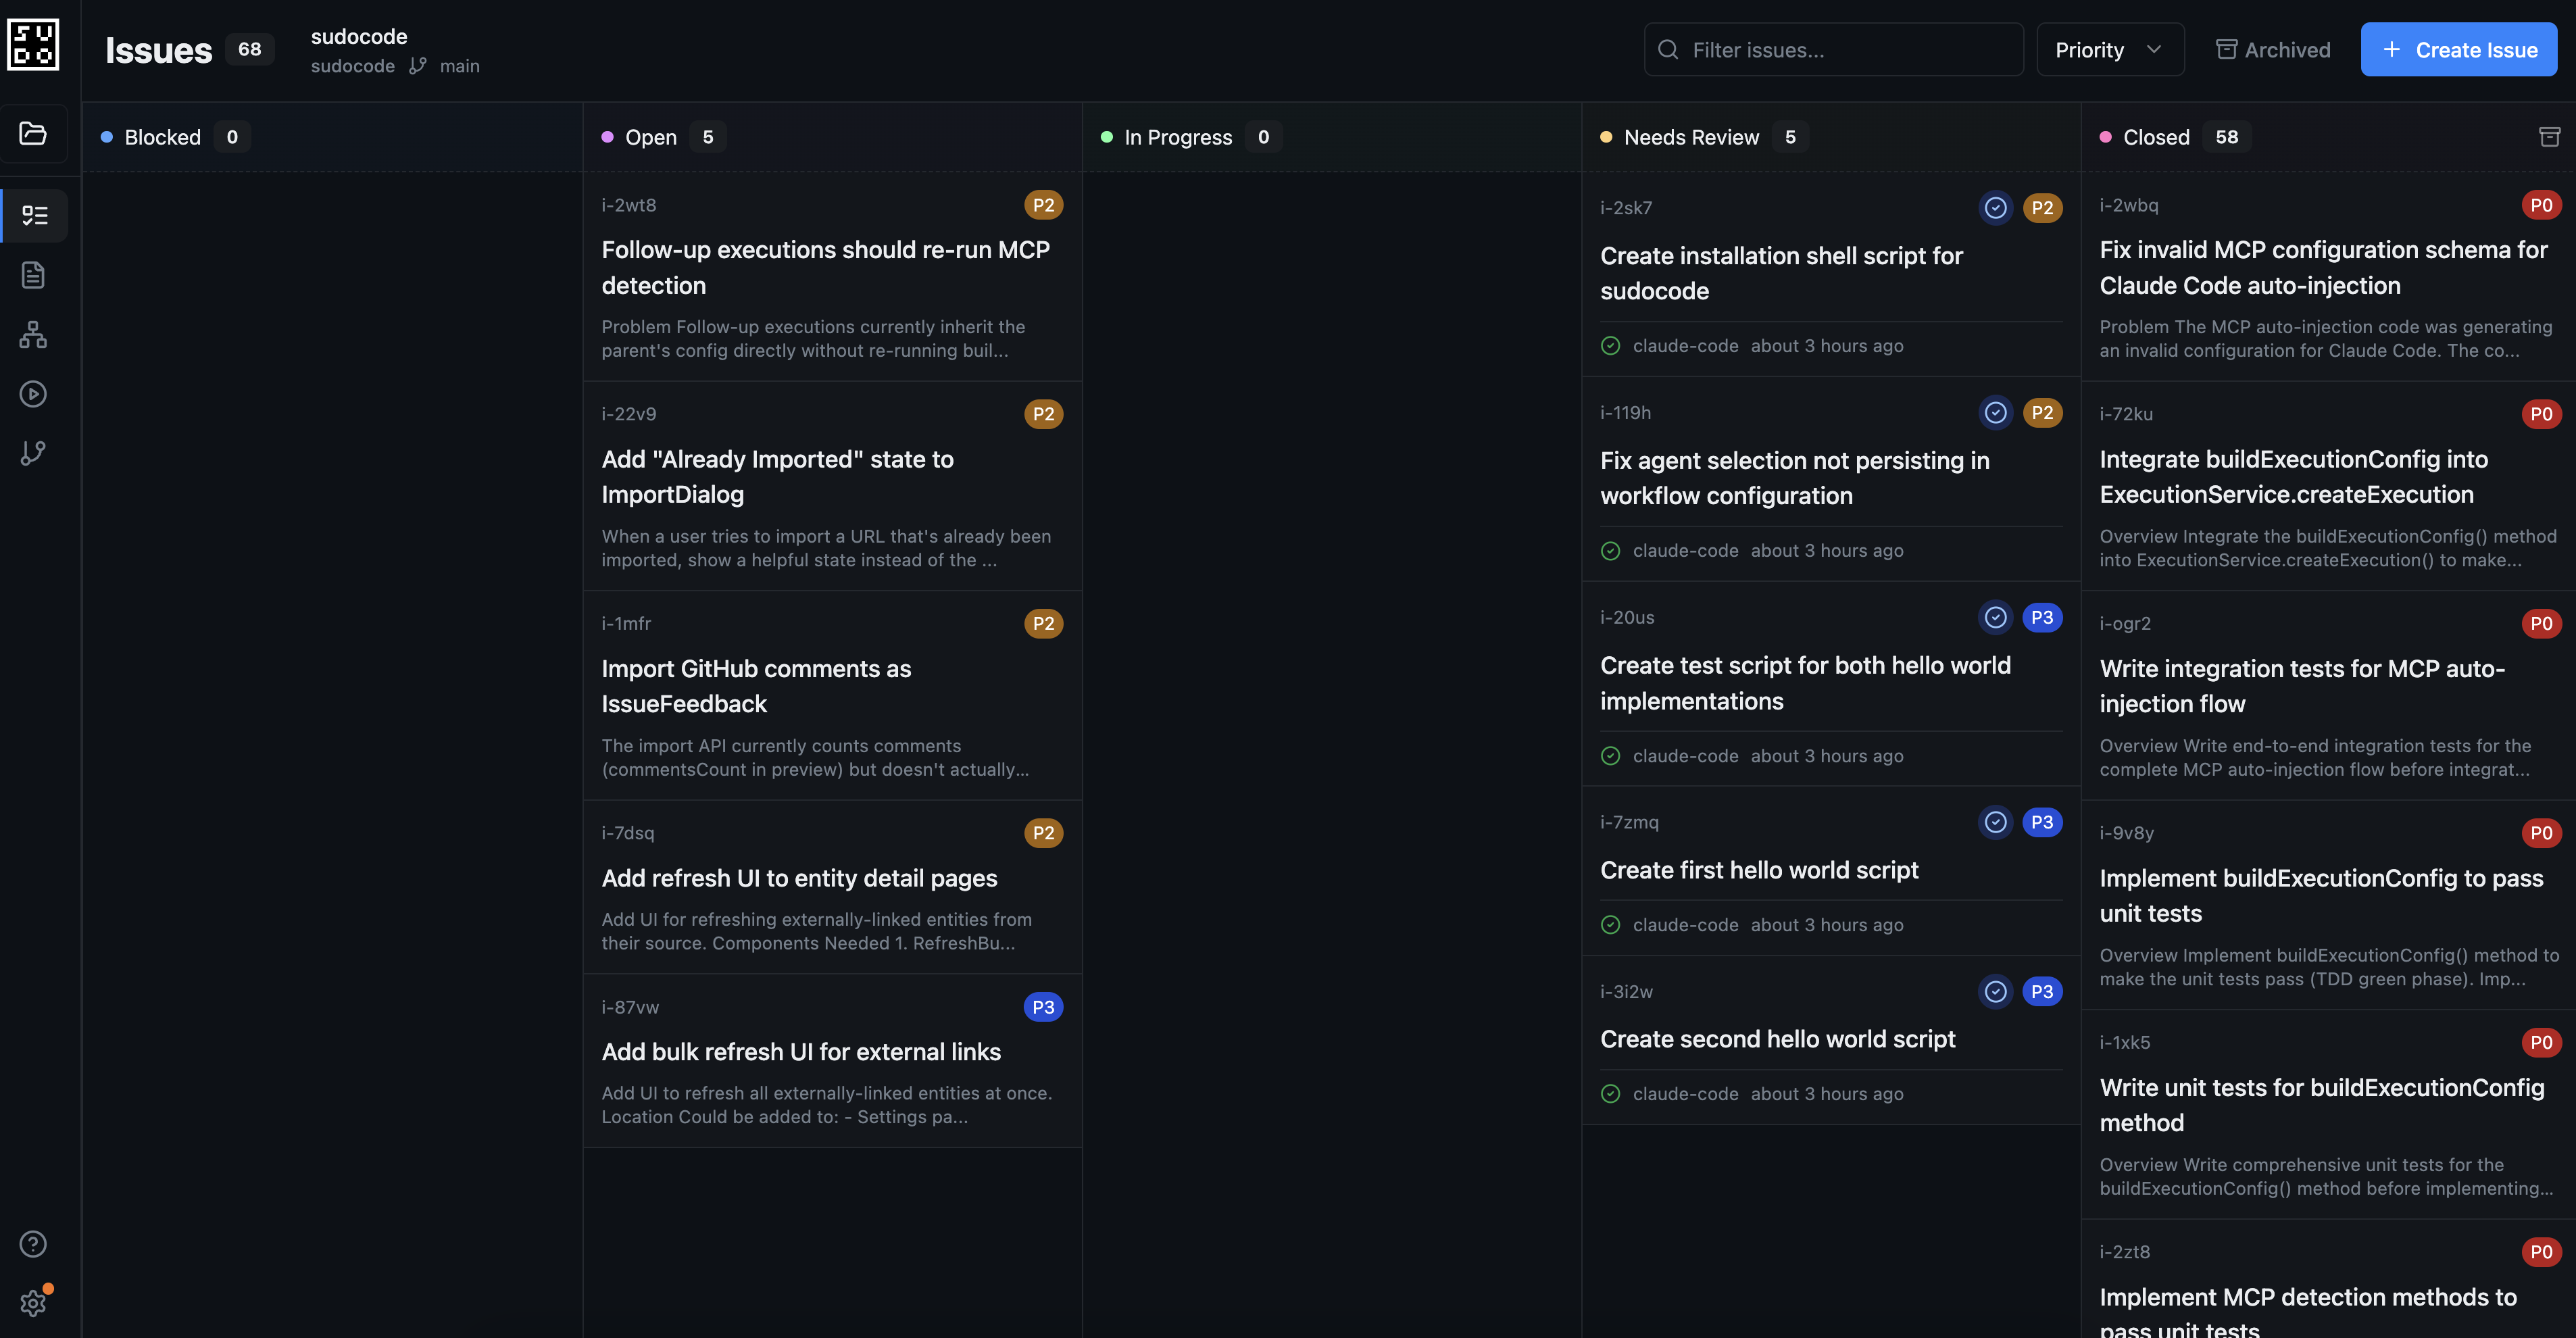
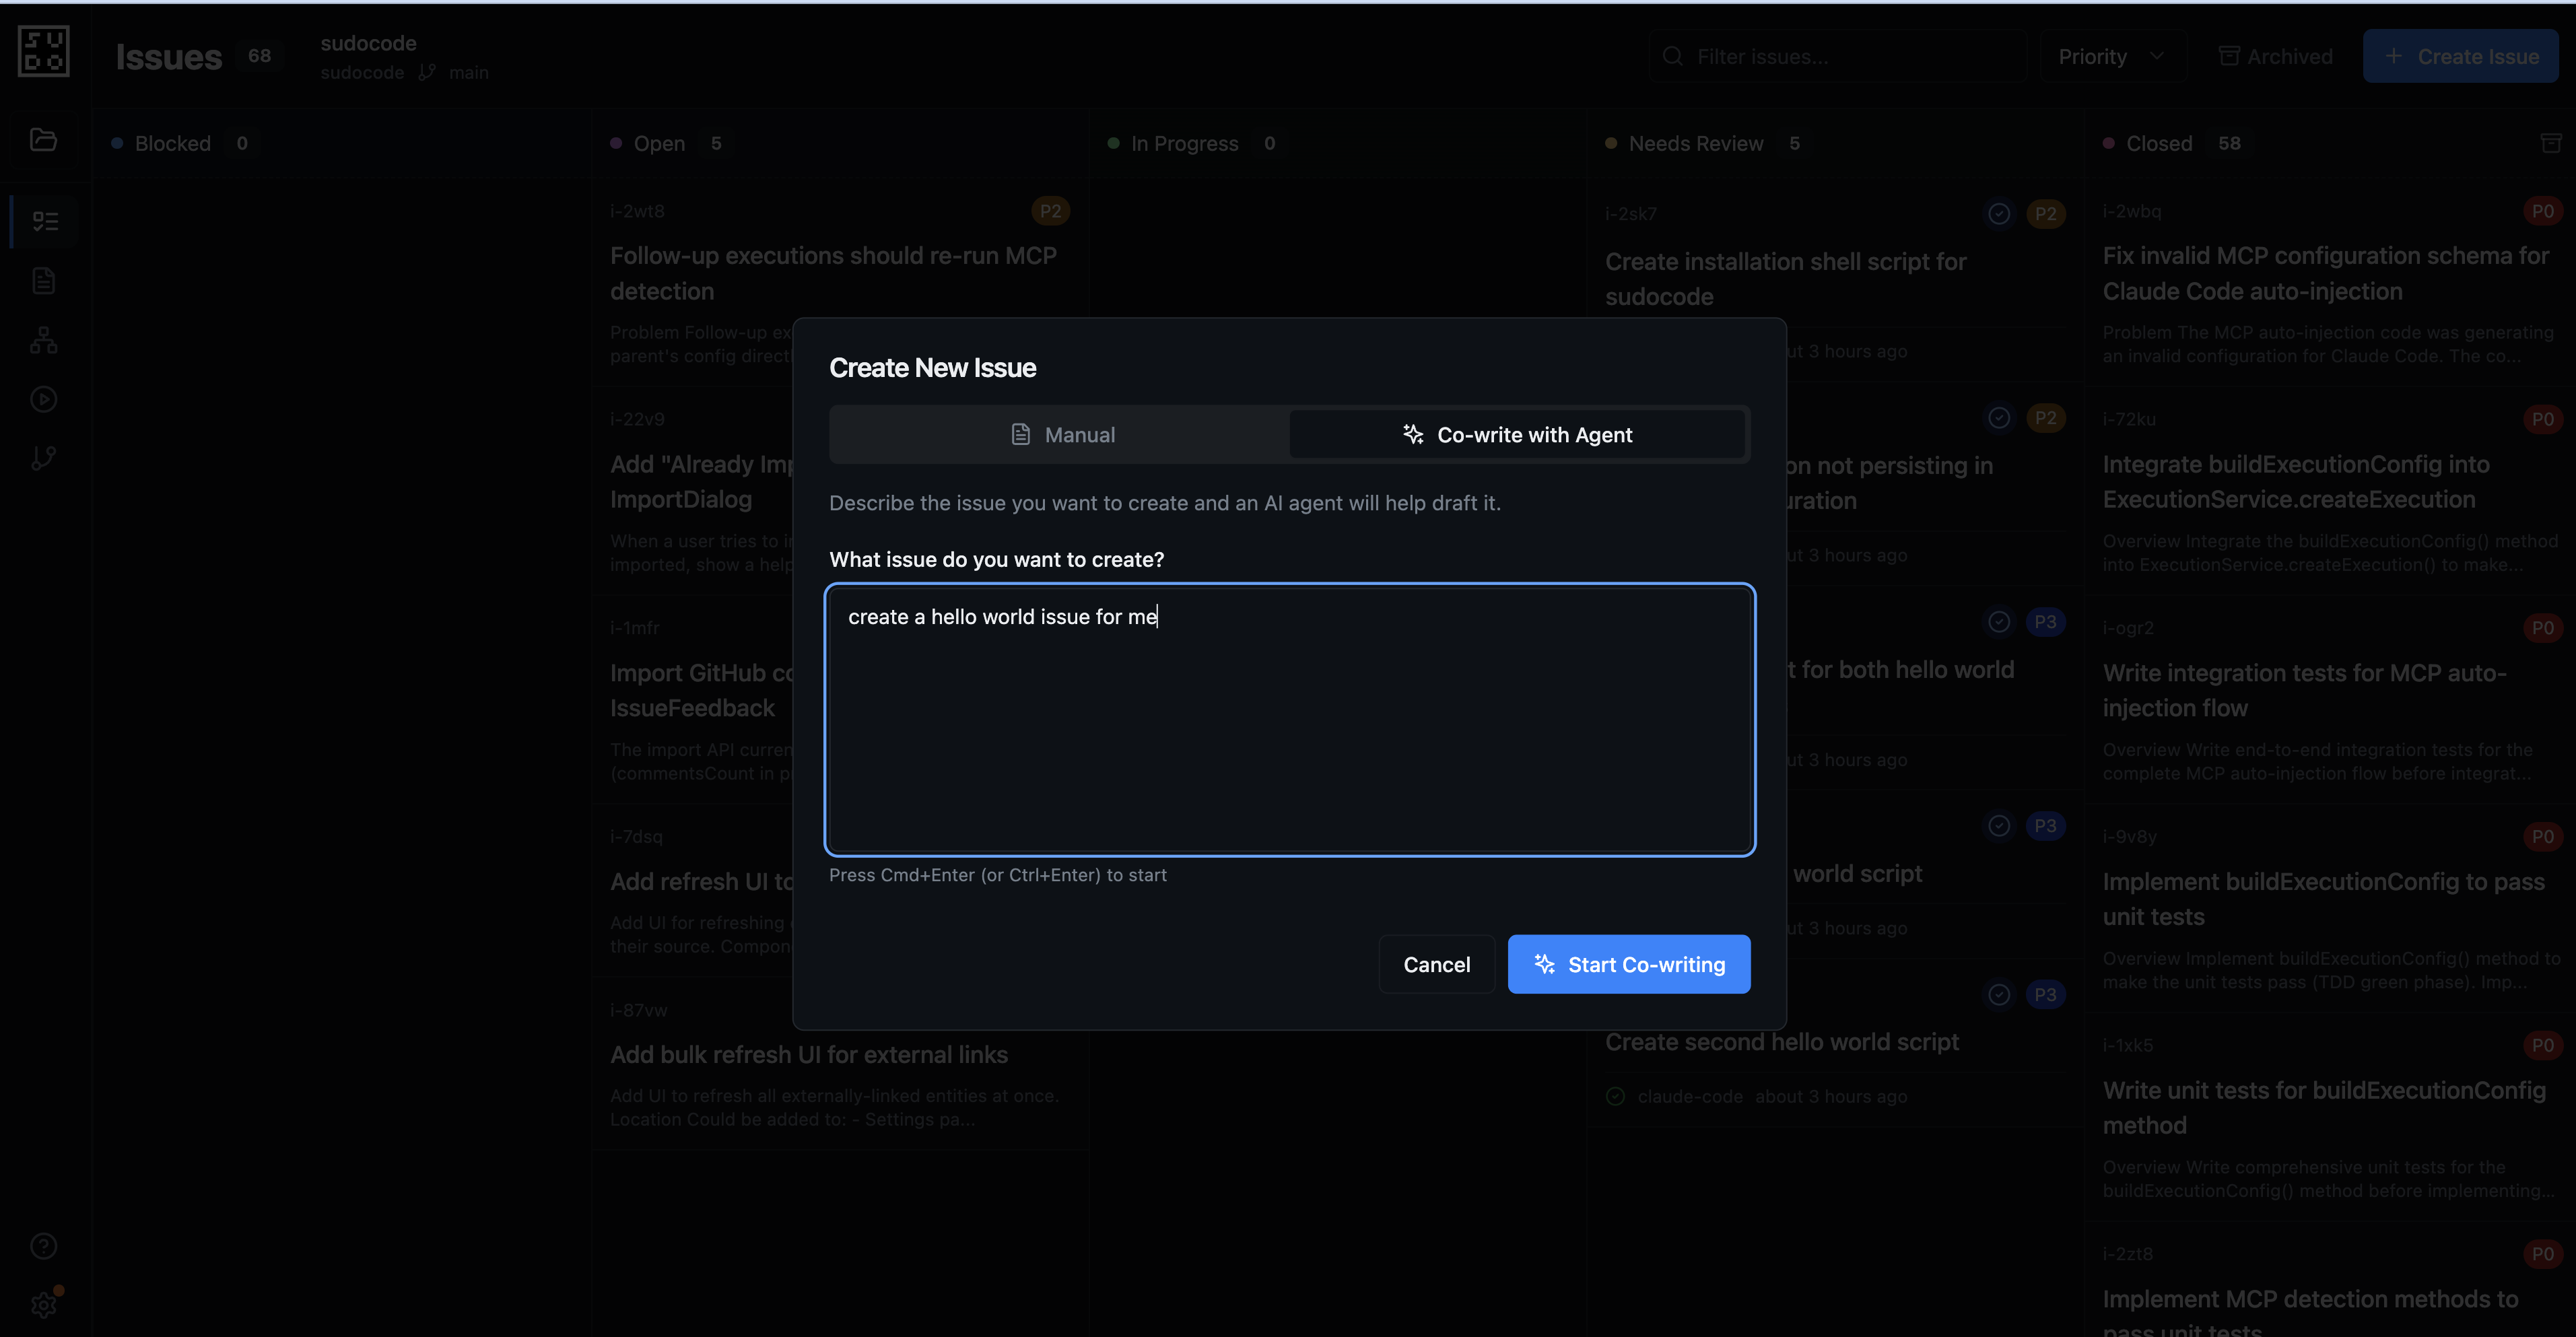
Step 5: Open your project and create your first issue
Navigate tohttp://localhost:3000 in your browser. You’ll see the project selector where you can choose your project:
Step 6: Implement the issue
Once you’ve created your issue, select it and click the run button to start your issue.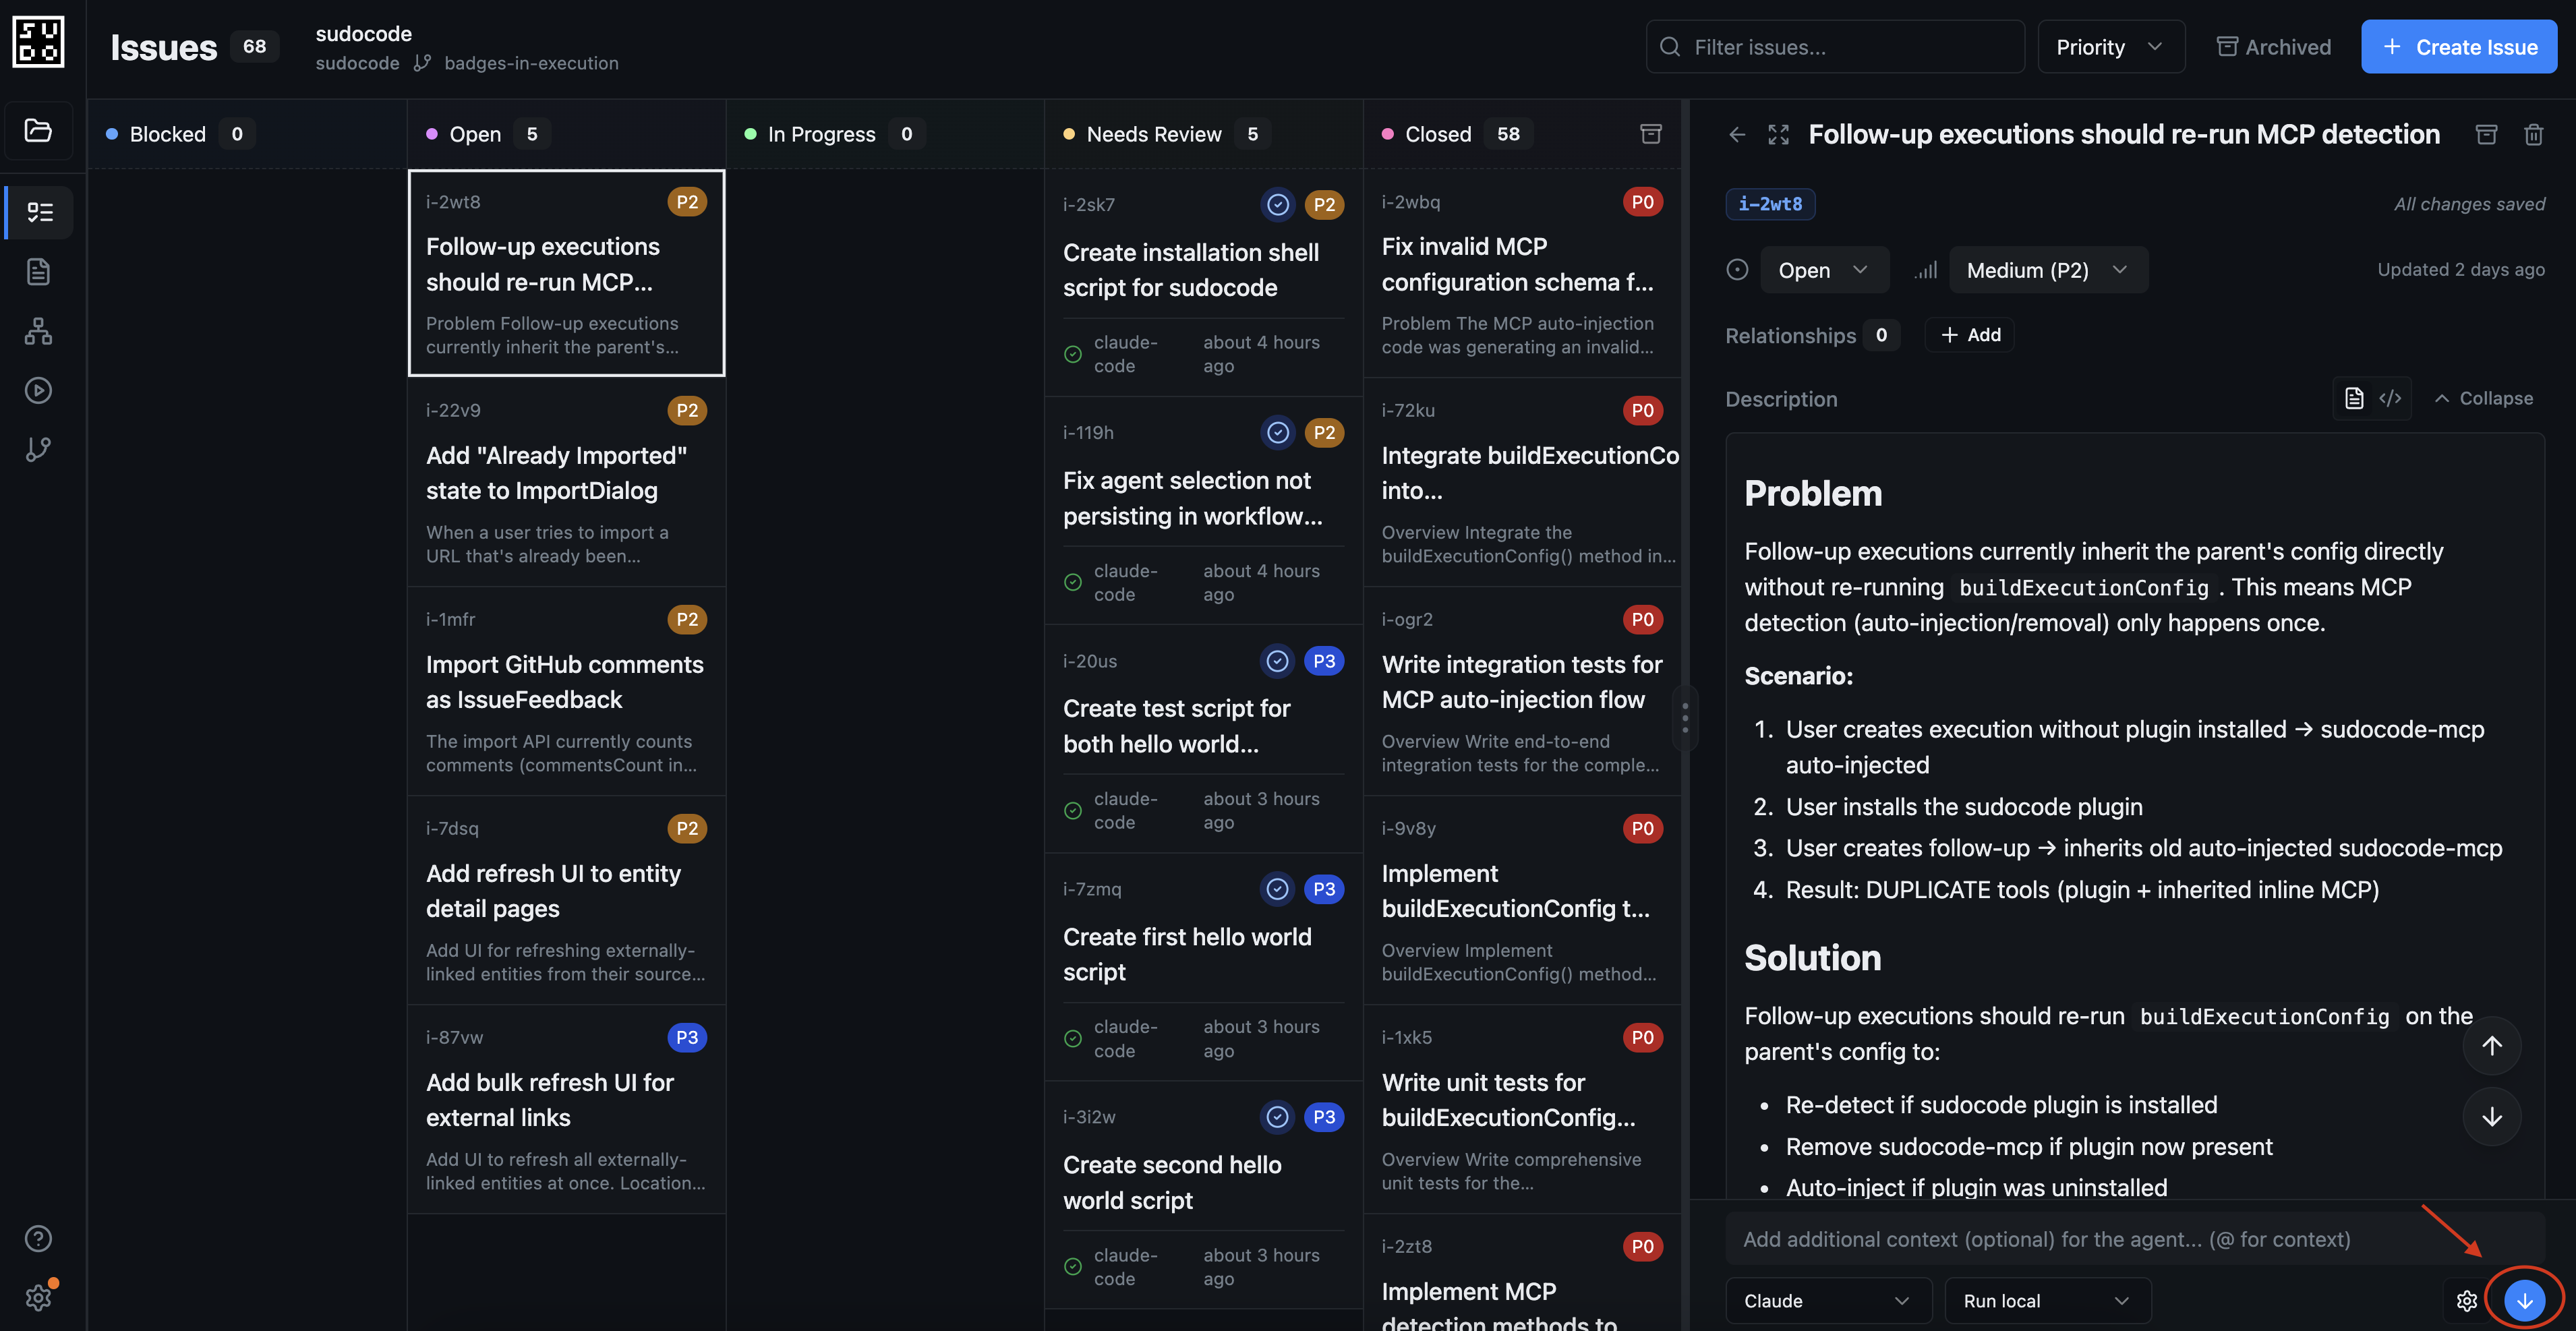
Next Steps
Now that you’ve created and run your first issue, explore these guides to learn more:Agent Workflows Tutorial
See practical workflow examples for AI agents
Spec-Driven Development Tutorial
Follow a complete workflow from spec creation to implementation
Collaborative Data Analysis Tutorial
Build data analysis notebooks through iterative spec refinement
Creating Issues
Learn different methods for creating and organizing issues
Creating Specs
Write specifications that guide your AI agents
Web Interface Overview
Explore all features of the sudocode web interface